
(二)页面展示
各位朋友大家好,我们接着上文继续开发,这一节我们主要是把上一节最后的图片素材从新组合,用web形式展现,我们用到的主要工具是:HBuilderX,这个工具我就不介绍了,上手很容易,很好用的,具体情况大家可以百度研究一下。
1.新建项目
首先启动HBuilderX开发工具,新建一个项目,具体操作“文件”→“新建”→“项目”如图2-1所示。
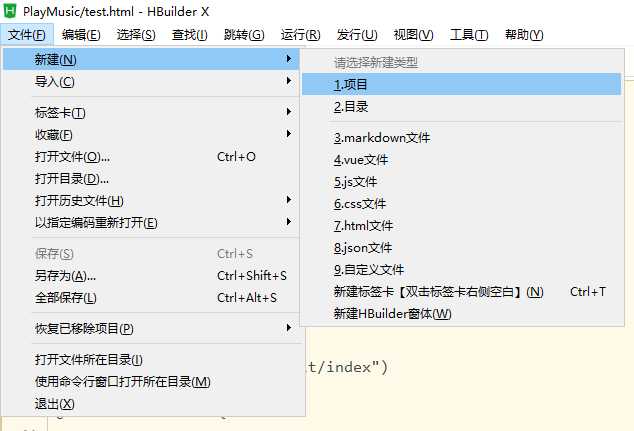
图2-1 新建项目
在弹出的对话框中选择普通项目,项目名称填入“网页播放器”,选择存储路径,选择空项目,单击创建即可,如图2-2所示。
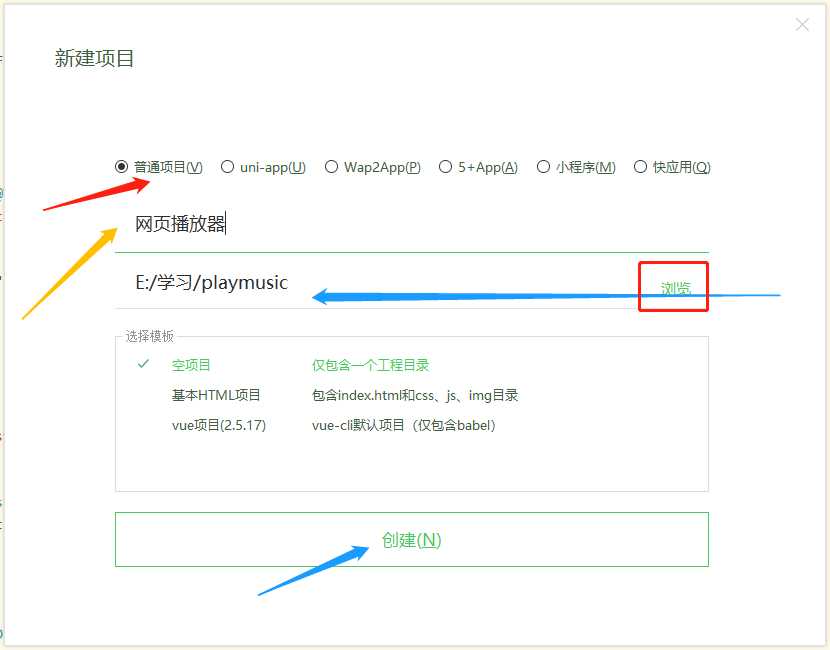
图2-2 设置新项目
2.新建目录
在左侧的项目管理窗口,项目上单击右键选择“新建”→“目录”,CSS文件夹,用于存放样式文件,如图2-3所示新建目录。新建images目录,存放我们上节剪切的图片素材,记得把所有需要的图片素材全部拷贝到该目录下,拷贝十分简单,在文件中复制图片,在项目管理images目录点击右键,选择粘贴,这样所复制的图片就全部拷贝到该目录下了;新建JS目录,用于存放Javascript文件。
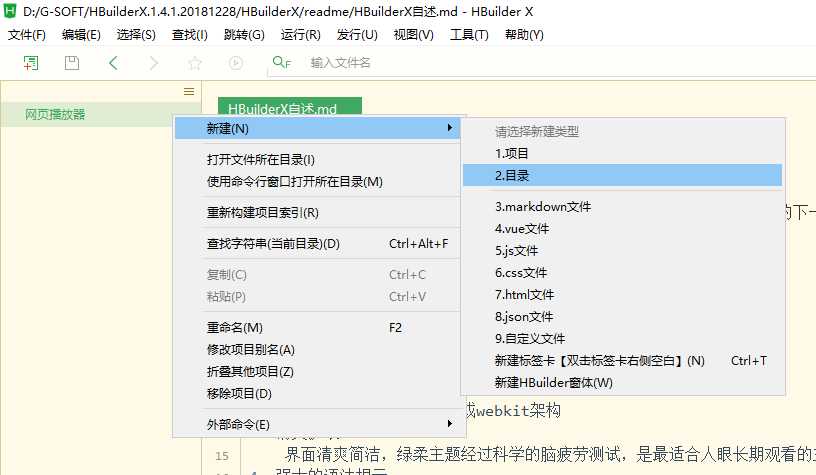
图2-3 新建目录
3.新建文件
新建文件与新建目录大同小异,在项目上点击右键依次选择“新建”→“html文件”,命名为“index.html”,用于编写HTML代码;在CSS目录上点击右键依次选择“新建”→“css文件”,命名为“playMusic.css”,用于编写网页播放器的样式代码;在js目录上点击右键依次选择“新建”→“js文件”,命名为“playMusic.html”,用于编写js代码。这样我们的整个目录结构已经有了,如图2-4所示。终于我们开始编写代码了,哈哈。

图2-4 开发目录结构
4.编写代码。
这里是页面显示代码,我只想题一点,HTML中id对应CSS中“#”+id的对应样式;HTML中classname的样式名称对应CSS中.开头的样式名称。例如:HTML中<div id=”playMusic_Box”>,CSS中“#playMusic_Box”就是这个HTML文件样式;HTML中<div classname=”playMusic_Box”>,则CSS中对应样式为“.playMusic_Box”.
1.整体容器。我们点击index.html文件,我们看到如下的默认代码:
<!DOCTYPE html>
<html>
<head>
<meta charset="utf-8">
<title></title>
</head>
<body>
</body>
</html>
<link rel=”stylesheet” type=”text/css” href=”css/playMusic.css”/>我们在head标签之间引入.js,.css文件,需要添加如下代码:
<script src=”js/playMusic.js”></script>
这样我们就引入了css和js文件。在HBuilderX敲击代码很爽的,提示很多,录入真的很方便。
回到设计图,我们把播放器分成3列,如图2-5所示。

图2-5播放器分割示意图
这样HTML代码可以这样编写:
一个大的DIV,里面按照示意图放三个div,然后我们用css控制显示样式。
HTML代码如下:
<div id="playMusic_Box"><!-- 播放器整个容器 -->
<div id="playMusic_Button"></div><!-- 左侧按钮容器 -->
<div id="playMusic_Progressbar"></div><!-- 中间进度条容器 -->
<div id="playMusic_Songlist"></div><!-- 右侧歌曲列表容器 -->
</div>
CSS代码,在playMusic文件中添加如下代码:
/* 整个容器设置 */
#playMusic_Box{height: 68px;/* 定义播放器高度 */line-height: 68px;/* 定义行高 */ /* 设置背景色 */ position: relative; font-size: 12px;/* 设置字体大小 */}
/* 左侧播放按钮设置 */
#playMusic_Button{
height: 68px; /* 高度 */line-height: 68px;/* 行高 */background:url(../images/PlayBt.png) center center no-repeat;/* 按钮背景图片 左右居中 垂直居中 背景图片不重复填充 */ width: 117px;/* 宽度 */position: absolute;left: 0px;/* 距离左侧0像素 */ top: 0px;/* 距离顶部0像素 */
}
/* 中间播放条设置 */
#playMusic_Progressbar{
height: 68px;width: auto; padding-left: 117px;padding-right: 117px;/* 高度68像素,宽度自动,内部填充距离左侧117px,内部填充距离右侧117px */
}
/* 右侧歌曲列表设置 */
#playMusic_Songlist{
height: 58px;width: 117px; position: absolute;top: 0px;right: 0px; margin-top: 4px;/* 外部距离顶部4像素 */ padding-right: 8px;/* 外部距离右侧8像素 */ overflow-y: scroll;/* 纵向滚动条显示 */ overflow-x:none;/* 隐藏横向滚动条 */
}
解释一下其中关键代码意思,这段代码实现三列,左右两列宽度固定,中间自适应“width: auto”。这里面Position没添加注释,我想单独介绍一下。Position有四个值属性:static、fixed、absolute和relative,我没用了2个属性。
static(静态定位):默认值。没有定位,元素出现在正常的流中(忽略 top, bottom, left, right 或者 z-index 声明)。
relative(相对定位):生成相对定位的元素,通过top,bottom,left,right的设置相对于其正常(原先本身)位置进行定位。可通过z-index进行层次分级。
absolute(绝对定位):生成绝对定位的元素,相对于 static 定位以外的第一个父元素进行定位。元素的位置通过 “left”, “top”, “right” 以及 “bottom” 属性进行规定。可通过z-index进行层次分级。
fixed(固定定位):生成绝对定位的元素,相对于浏览器窗口进行定位。元素的位置通过 “left”, “top”, “right” 以及 “bottom” 属性进行规定。可通过z-index进行层次分级。
属性为relative的元素可以用来布局页面,属性为absolute的元素用来定位某元素在父级中的位置,既然属性为absolute的元素用来定位某元素在父级中位置,就少不了TRBL(top,right,buttom,left的缩写,以下同此),如果父级元素没有position属性那么 absolute元素就会脱离父级元素,但是如果是布局页面,父级元素position的属性又不能为absolute,不然就会以浏览器左上角为原点了,所以父级元素的position属性只能为relative!
如果用position来布局页面,父级元素的position属性必须为relative,而定位于父级内部某个位置的元素,最好用 absolute,因为它不受父级元素的padding的属性影响,当然你也可以用position,不过到时候计算的时候不要忘记padding的值。
2.左侧播放按钮。在前面的CSS代码找那个,我们已经把背景色设为图片“PlayBt.png”,效果如图2-6所示。现在要在

图2-6 播放按钮整体容器CSS代码样式
容器中添加播放按钮,上一首,下一首按钮。依然是三列,具体HTML代码如下:
<div id="Button_Pre"> </div><!-- 上一首按钮 -->
<div id="Button_play"  class="Button_play"> </div><!-- 播放按钮 -->
<div id="Button_next"> </div><!-- 下一首按钮  -->
CSS代码如下:播放按钮中加了个样式“Button_play”,是因为我们下一步需要把这个按钮变成暂停,播放暂停属于一个DIV,这样后面的JS代码会来切换CSS样式,实现播放暂停样式。
#Button_Pre{width: 9px; /* 宽度9像素,这是根据图片宽度确定的 */height: 8px;/* 高度是9像素这是根据图片高度确定的 */ background:url(../images/previous.png) center center no-repeat;/* 背景图片是上一首图片 左右居中 垂直居中 不重复 */ position: absolute;/* 绝对定位 */top: 30px;left: 19px;cursor: pointer;/* 鼠标显示手型 */}
.Button_play{width: 19px;height: 22px; background:url(../images/Play.png) center center no-repeat; position: absolute;top: 22px;left: 52px;cursor: pointer;/* 此段代码同上一首图片代码大同小异 */}
/* 这里面我们应该加个暂停按钮,以便我们后面使用*/
.Button_pause{width: 19px;height: 22px; background:url(../images/pause.png) center center no-repeat; position: absolute;top: 22px;left: 48px;cursor: pointer;}
#Button_next{width: 9px; height: 8px; background: url(../images/next.png) center center no-repeat; position: absolute;top: 30px;left: 88px;cursor: pointer;}
这样播放按钮组合就显示完成了,如图2-7所示。

图2-7网页显示播放按钮组合
3.中间进度条。中间进度条分为3行而不是3列,容器代码相对简单,HTML代码如下:
<!-- 当前播放歌曲信息 -->
<div class="Song_Info">
<!-- 歌曲名称 -->
<span  id="Song_Name"></span>
<!-- 歌曲作者 -->
<span  id="Singer"></span>
<!-- 歌曲时间 -->
<span class="SingerTime">
<!-- 当前时间 -->
<span  id="Songcurrenttime"></span>
--
<!-- 歌曲总时间 -->
<span id="Songalltime"></span></span>
</div>
<!-- 进度条容器 -->
<div  id="Progressbar_Box">
<!-- 播放头 -->
<div  id="Progressbar_playHead"></div>
</div>
<!-- 歌曲操作组合面板 -->
<div class="Progressbar_SongOption">
<!-- 随机播放按钮 -->
<span  id="SongOption_Shuffle"></span>
<!-- 歌曲重复播放按钮 -->
<span id="SongOption_Replay"></span>
<!-- 声音图标 -->
<span class="SongOption_Soundico"></span>
<!-- 声音滑动条 -->
<span class="SongOption_SoundBox">
<!-- 当前音量显示 -->
<span  id="SongOption_SoundCurrent"></span>
<!-- 音量调节头 -->
<span id="SongOption_SoundHead"></span>
</span>
</div>
CSS代码:
/* 歌曲信息 */
.Song_Info{height: 20; line-height: 20px; padding-left: 10px;}
#Songcurrenttime{color: firebrick;}
/* 播放进度条 */
#Progressbar_Box{background:url(../images/progress.png) center center repeat-x;/* 进度条背景色 水平居中 垂直居中 x轴平铺 */ height: 23px; line-height: 23px; padding-left: 10px;margin-right: 25px; position: relative;}
#Progressbar_playHead{background: url(../images/playHead.png) center center no-repeat; height: 17px; width: 16px;position: absolute; top: 2px;left: 0px; z-index: 2;}
/* 歌曲操作信息 */
.Progressbar_SongOption{ height:17px; position: relative; line-height: 17px;}
.Progressbar_SongOption span{display: inline-block;}
/* 随机播放按钮 */
#SongOption_Shuffle{ width: 62px; height: 17px; background: url(../images/shuffle.png) center center no-repeat; cursor: pointer;}
/* 随机播放按钮选中状态 */
#SongOption_Shuffle_on{ width: 62px; height: 17px; background: url(../images/shuffleon.png) center center no-repeat;cursor: pointer;}
/* 重复播放按钮 */
#SongOption_Replay{ width: 54px; height: 17px; background: url(../images/replay.png) center center no-repeat;cursor: pointer;}
/*重复播放按钮 选中状态 */
#SongOption_Replay_on{ width: 54px; height: 17px; background: url(../images/replayon.png) center center no-repeat;cursor: pointer;}
/* 声音图标 */
.SongOption_Soundico{ width: 11px; height: 17px; background: url(../images/sound.png) center center no-repeat;}
/* 调节音量容器 */
.SongOption_SoundBox{width: 111px; height: 17px;background:url(../images/soundbg.png) center center repeat-x; position: relative;}
/* 当前音量 */
#SongOption_SoundCurrent{width:0px; height: 14px; background: url(../images/soundbgon.png) center center repeat-x; position: absolute;left: 0px; top: 1px;}
/* 音量调节头 */
#SongOption_SoundHead{width: 14px; height: 14px; background: url(../images/soundHead.png) center center no-repeat; position: absolute;left: 0px; top: 1px;}
/* 右侧歌曲列表设置 */
4.右侧歌曲列表。
HTML代码如下:
<ul id="Songlist_box">
      <li><span>牧马城市</span></li>
      <li class="currentSong"><span>从头再来</span></li>
</ul>
CSS代码:
#playMusic_Songlist{
    height: 58px;width: 117px; position: absolute;top: 0px;right: 0px; margin-top: 4px;/* 外部距离顶部4像素 */ padding-right: 8px;/* 外部距离右侧8像素 */ overflow-y: scroll;/* 纵向滚动条显示 */ overflow-x:none;/* 隐藏横向滚动条 */
}
#playMusic_Songlist ul,#playMusic_Songlist ul li{list-style: none;padding: 0px; margin: 0px; line-height: 20px; cursor:pointer}
#playMusic_Songlist .currentSong{color: firebrick;}
Ok,我们的所有HTML代码和CSS代码已经告一段落,所有的页面设计已经全部完成,下一步我们将用Javascript进行音乐播放器功能的开发。