
模拟企业架构
环境准备
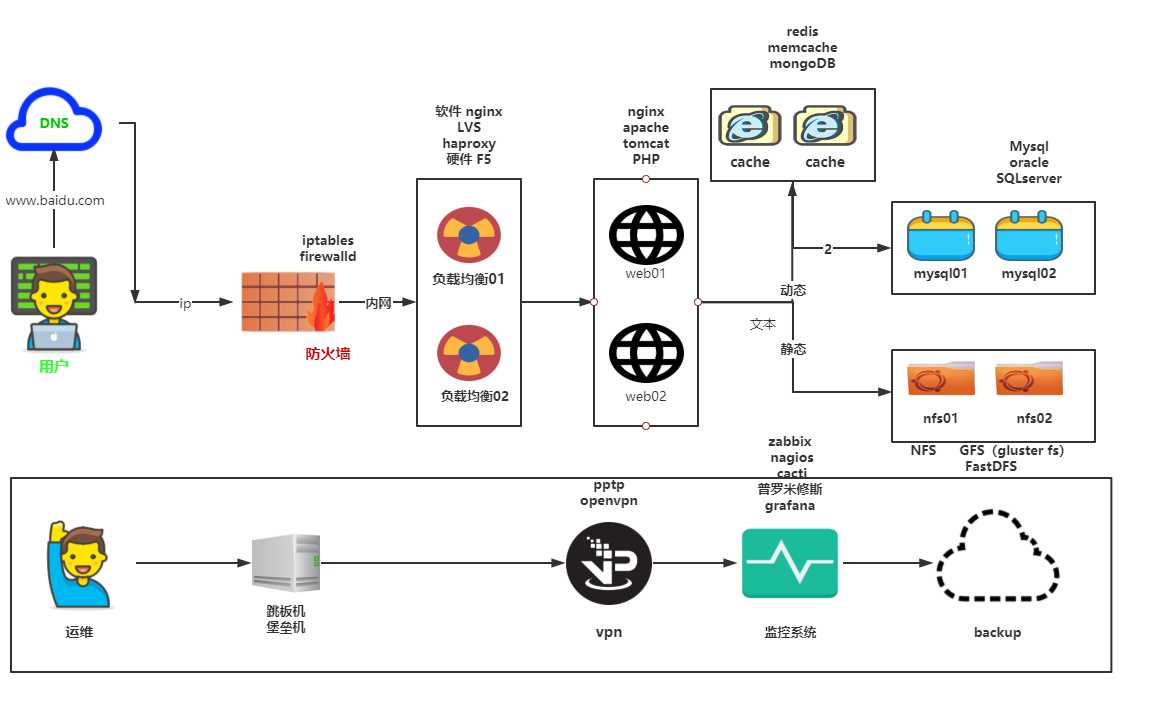
| 主机名 | 外网IP | 内网IP | 安装服务 |
|---|---|---|---|
| web01 | 10.0.0.7 | 172.16.1.7 | nginx php nfs-utils |
| web02 | 10.0.0.8 | 172.16.1.8 | nginx php nfs-utils |
| nfs | 10.0.0.31 | 172.16.1.31 | nfs-utils |
| db01 | 10.0.0.51 | 172.16.1.51 | mariadb-server |
web01和web02部署nginx,php,mariadb 方法一
web01
1.配置nginx官方源
vim /etc/yum.repos.d/nginx.repo
[nginx-stable]
name=nginx stable repo
baseurl=http://nginx.org/packages/centos/$releasever/$basearch/
gpgcheck=1
enabled=1
gpgkey=https://nginx.org/keys/nginx_signing.key
module_hotfixes=true

2.创建nginx的默认启动用户
groupadd www -g 666
useradd www -u 666 -g 666 -s /sbin/nologin -M

3.下载官方nginx
yum install -y nginx

4.修改nginx配置文件
sed -i ‘/^user/c user www;‘ /etc/nginx/nginx.conf
[root@web01 ~]# vim /etc/nginx/nginx.conf 	(二选一)
user www;

5.启动,加入开机自启动
systemctl start nginx
systemctl enable nginx


6.使用第三方扩展源安装php7.1
#先卸载系统自带的php5.4
yum remove -y php-mysql-5.4 php php-fpm php-common

#配置第三方源,下载指定版本的php(7.1)
vim /etc/yum.repos.d/php.repo
[php-webtatic]
name = PHP Repository
baseurl = http://us-east.repo.webtatic.com/yum/el7/x86_64/
gpgcheck = 0

yum -y install php71w php71w-cli php71w-common php71w-devel php71w-embedded php71w-gd php71w-mcrypt php71w-mbstring php71w-pdo php71w-xml php71w-fpm php71w-mysqlnd php71w-opcache php71w-pecl-memcached php71w-pecl-redis php71w-pecl-mongodb

7.配置php-fpm用户与Nginx的运行用户保持一致,不修改的话,nginx连不上PHP
sed -i ‘/^user/c user = www‘ /etc/php-fpm.d/www.conf
sed -i ‘/^group/c group = www‘ /etc/php-fpm.d/www.conf

8.启动php-fpm加入开机自启
systemctl start php-fpm
systemctl enable php-fpm

9.检查进程和端口(#选做)
ps -ef|grep -E ‘nginx|php‘
netstat -lntup|grep -E ‘80|9000‘

10.检查nginx和PHP,PHP和mysql数据库能不能连接(#选做)

11.安装nfs
[root@nfs ~]# yum install -y nfs-utils
[root@web01 ~]# yum install -y nfs-utils
[root@web02 ~]# yum install -y nfs-utils

systemctl start nginx php-fpm mariadb nfs
systemctl enable nginx php-fpm mariadb nfs
web02同上
优点:复制粘贴即可
缺点:安装速度较慢
web01和web02部署nginx,php,nfs方法二
web01和web02同时操作
#使用rz命令上传本地提前打包好的rpm_php的压缩包

# 1.解压打好的包
[root@web01 ~]# tar xf nginx_php.tar.gz
# 2.进入解压开的目录
[root@web01 nginx_php]# cd nginx_php/
# 3.安装nginx和php
yum remove -y php-mysql-5.4 php php-fpm php-common
[root@web01 nginx_php]# rpm -Uvh *.rpm

# 1.解压打好的包
[root@web02 ~]# tar xf nginx_php.tgz
# 2.进入解压开的目录
[root@web02 nginx_php]# cd nginx_php/
# 3.安装nginx和php
	#先卸载系统自带的php5.4
yum remove -y php-mysql-5.4 php php-fpm php-common
[root@web02 nginx_php]# rpm -Uvh *rpm

# 4.创建www用户
[root@web01 ~]# groupadd www -g 666
[root@web01 ~]# useradd www -u 666 -g 666 -s /sbin/nologin -M
[root@web02 ~]# groupadd www -g 666
[root@web02 ~]# useradd www -u 666 -g 666 -s /sbin/nologin -M
[root@nfs ~]# groupadd www -g 666
[root@nfs ~]# useradd www -u 666 -g 666 -s

# 5.修改nginx和PHP的用户
sed -i ‘/^user/c user www;‘ /etc/nginx/nginx.conf
sed -i ‘/^user/c user = www‘ /etc/php-fpm.d/www.conf
sed -i ‘/^group/c group = www‘ /etc/php-fpm.d/www.conf
或者
[root@web01 ~]# vim /etc/nginx/nginx.conf
user www;
[root@web01 ~]# vim /etc/php-fpm.d/www.conf
user = www
group = www
[root@web02 ~]# vim /etc/nginx/nginx.conf
user www;
[root@web02 ~]# vim /etc/php-fpm.d/www.conf
user = www
group = www

# 6.安装nfs
[root@nfs ~]# yum install -y nfs-utils
[root@web01 ~]# yum install -y nfs-utils
[root@web02 ~]# yum install -y nfs-utils

# 7.db01安装mariadb
yum install -y mariadb-server

# 设置开机自启动
systemctl start nginx php-fpm  nfs-utils
systemctl enable nginx php-fpm  nfs-utils
优点:安装简单,速度快,可以使用xshell同步进行,提高生产效率
缺点:需要提前做好nginx_php的压缩包
配置web01的wordpress
vim /etc/nginx/conf.d/wp.conf
server {
	listen 80;
	server_name cs.wp.com;
	root /wp;
	index info.php index.php;

	location ~ \.php$ {
		fastcgi_pass   127.0.0.1:9000;
		fastcgi_index  index.php;
		fastcgi_param  SCRIPT_FILENAME $document_root$fastcgi_script_name;
		include fastcgi_params;
		}
}

2.重载nginx服务
nginx -sreload

3.获取wordpress产品,解压并部署wordpress
mkdir /wp && cd /wp

#三选一
wget http://test.driverzeng.com/Nginx_Code/wordpress-5.0.3-zh_CN.tar.gz
wget https://cn.wordpress.org/wordpress-5.0.3-zh_CN.tar.gz
wget https://cn.wordpress.org/latest-zh_CN.tar.gz

tar xf wordpress-5.0.3-zh_CN.tar.gz && chown -R www.www /wp && mv wordpress/* . && rm -rf /wp/wordpress-5.0.3-zh_CN.tar.gz /wp/wordpress

5.域名解析
10.0.0.7 cs.wp.com

6.通过浏览器访问wordpress,并部署该产品
cs.wp.com
数据库操作
# 1.启动数据库并加入开机自启
[root@db01 ~]# systemctl start mariadb
[root@db01 ~]# systemctl enable mariadb
# 2.给root一个密码
[root@db01 ~]# mysqladmin -uroot password ‘1‘
# 3.连接数据库
[root@db01 ~]# mysql -uroot -p1
# 4.创建用户
MariaDB [(none)]> grant all on *.* to wp_user@‘%‘ identified by ‘1‘;
MariaDB [(none)]> grant all on *.* to zh_user@‘%‘ identified by ‘1‘;
# 5.创建数据库
MariaDB [(none)]> create database wp;
MariaDB [(none)]> create database zh;
# 6.重启数据库
systemctl restart mariadb
web01修改代码连接新数据库环境(参考)
1.修改Wordpress产品代码连接数据库的配置文件
[root@web01 ~]# vim /code/wordpress/wp-config.php
# 数据库名称
define(‘DB_NAME‘, ‘wp‘);
# 数据库用户
define(‘DB_USER‘, ‘wp_user‘);
# 数据库密码
define(‘DB_PASSWORD‘, ‘1‘);
# 数据库地址
define(‘DB_HOST‘, ‘172.16.1.51‘);

2.修改wecenter产品代码连接数据库的配置文件
[root@web01 zh]#  grep -ir "zh_user"|grep -v cache
system/config/database.php:  ‘password‘ => ‘Zls123.com‘,
[root@web01 zh]# vim /code/zh/system/config/database.php
‘host‘ => ‘172.16.1.51‘,
‘username‘ => ‘zh_user‘,
‘password‘ => ‘1‘,
‘dbname‘ => ‘zh‘,

3.最后访问网站,成功打开,至此拆分数据库完成
web02部署(部分选做)
1.创建www用户(#选)
[root@web02 ~]# groupadd -g666 www
[root@web02 ~]# useradd -u666 -g666 www

2.安装LNP
[root@web02 ~]# scp -rp root@172.16.1.7:/etc/yum.repos.d/* /etc/yum.repos.d/
[root@web02 ~]# scp -rp root@172.16.1.7:/etc/pki/rpm-gpg/* /etc/pki/rpm-gpg/

[root@web02 ~]# yum install nginx -y
[root@web02 ~]# yum -y install php71w php71w-cli php71w-common php71w-devel php71w-embedded php71w-gd php71w-mcrypt php71w-mbstring php71w-pdo php71w-xml php71w-fpm php71w-mysqlnd php71w-opcache php71w-pecl-memcached php71w-pecl-redis php71w-pecl-mongodb

3.将web01的nginx配置文件导入到web02
[root@web02 ~]# scp -rp root@172.16.1.7:/etc/nginx /etc

4.将web01的php配置文件导入到web02
[root@web02 ~]# scp -rp root@172.16.1.7:/etc/php-fpm.d /etc/

5.将web01的产品代码打包传输到web02服务器上,在web01上线进行打包操作
[root@web01 ~]# tar czf wp.tar.gz /wp
[root@web01 ~]# scp wp.tar.gz root@172.16.1.8:/tmp

#在web02服务器上进行解压
[root@web02 ~]# tar xf /tmp/wp.tar.gz -C /

6.最后启动nginx与php-fpm,并加入开机自启(#选做)
[root@web02 ~]# systemctl start nginx php-fpm
[root@web02 ~]# systemctl enable nginx php-fpm

7.域名解析
10.0.0.8 cs.wp.com

8.查看日志确认是否访问的是10.0.0.8
tailf /var/log/nginx/access
nfs服务端配置共享存储
# 1.编辑nfs配置文件
[root@nfs ~]# vim /etc/exports
/wp_data 172.16.1.0/24(sync,rw,all_squash,anonuid=666,anongid=666)
/zh_data 172.16.1.0/24(sync,rw,all_squash,anonuid=666,anongid=666)
# 2.创建共享目录
[root@nfs ~]# mkdir /wp_data /zh_data
# 3.授权
[root@nfs ~]# chown -R www.www /wp_data/ /zh_data/
# 4.启动服务,并加入开机自启
[root@nfs ~]# systemctl start nfs-server
[root@nfs ~]# systemctl enable nfs-server
# 5.没有上传过图片,直接创建uploads目录,上传过图片,先把数据拷贝到nfs中
web01执行即可(选做): mkdir /wp/wp-content/uploads -p
[root@web01 ~]# scp -r /wp/wp-content/uploads/* root@172.16.1.31:/wp_data && chown -R www.www /wp_data/
# 6.授权(选做)
[root@nfs ~]# chown -R www.www /wp_data/
# 7.挂载
[root@web01 ~]# mount -t nfs 172.16.1.31:/wp_data /wp/wp-content/uploads/
[root@web02 ~]# mount -t nfs 172.16.1.31:/wp_data /wp/wp-content/uploads/
部署知乎
# 1.创建知乎的nginx配置文件
[root@web01 conf.d]# cp b.zls.com.conf z.zls.com.conf
server {
	listen 80;
	server_name cs.zh;
	root /zh;
	index index.php;

	location ~ \.php$ {
		fastcgi_pass 127.0.0.1:9000;
		fastcgi_index index.php;
		fastcgi_param SCRIPT_FILENAME $document_root$fastcgi_script_name;
		include /etc/nginx/fastcgi_params;
		}
}
# 2.创建站点目录
[root@web01 conf.d]# mkdir /zh
# 2.1重新加载nginx
[root@web01 zh]# systemctl reload nginx
# 3.部署zh代码
[root@web01 zh]# cd /zh
[root@web01 zh]# wget http://test.driverzeng.com/Nginx_Code/WeCenter_3-2-1.zip
[root@web01 zh]# unzip WeCenter_3-2-1.zip
# 4.将代码移动到/code/zh下
[root@web01 zh]# mv WeCenter_3-2-1/* .&& rm -rf WeCenter_3-2-1
# 5.授权
[root@web01 zh]# chown -R www.www /zh
# 6.域名解析
10.0.0.7 cs.zh.com
# 7.打开浏览器访问:z.zls.com
web02部署知乎
[root@web01 zh]# scp /etc/nginx/conf.d/wp.conf 172.16.1.8:/etc/nginx/conf.d/zh.conf
[root@web01 zh]# chown -R www.www /zh && scp -r /zh 172.16.1.8:/zh

[root@web02 ~]# systemctl reload nginx
[root@web02 ~]# mount -t nfs 172.16.1.31:/zh_data /zh/uploads/
web02修改代码连接新数据库环境(参考)
1.修改Wordpress产品代码连接数据库的配置文件
[root@web01 ~]# vim /code/wordpress/wp-config.php
数据库名称
define(‘DB_NAME‘, ‘zh‘);
数据库用户
define(‘DB_USER‘, ‘zh_user‘);
数据库密码
define(‘DB_PASSWORD‘, ‘1‘);
数据库地址
define(‘DB_HOST‘, ‘172.16.1.51‘);
2.修改wecenter产品代码连接数据库的配置文件
[root@web01 zh]# grep -ir “zh_user”|grep -v cache
system/config/database.php: ‘password‘ => ‘Zls123.com‘,
[root@web01 zh]# vim /code/zh/system/config/database.php
‘host‘ => ‘172.16.1.51‘,
‘username‘ => ‘zh_user‘,
‘password‘ => ‘1‘,
‘dbname‘ => ‘zh‘,
3.最后访问网站,成功打开,至此拆分数据库完成