基于uni-app的一个骨架屏插件。
在使用的时候可以直接在components中引入组件quick-skeleton.vue。组件代码如下:
  1 <template>
  2     <view
  3         v-show="show"
  4         :style="{
  5             width: systemInfo.width + ‘px‘,
  6             height: systemInfo.height + ‘px‘,
  7             backgroundColor: bgcolor,
  8             position: ‘absolute‘,
  9             left: 0,
 10             top: 0,
 11             zIndex: 9998,
 12             overflow: ‘hidden‘
 13         }"
 14     >
 15         <view
 16             v-for="(item, rect_idx) in skeletonRectLists"
 17             :key="rect_idx + ‘rect‘"
 18             :class="[loading == ‘chiaroscuro‘ ? ‘chiaroscuro‘ : ‘‘]"
 19             :style="{
 20                 width: item.width + ‘px‘,
 21                 height: item.height + ‘px‘,
 22                 backgroundColor: ‘#f4f4f‘,
 23                 position: ‘absolute‘,
 24                 left: item.left + ‘px‘,
 25                 top: item.top + ‘px‘
 26             }"
 27         ></view>
 28         <view
 29             v-for="(item, circle_idx) in skeletonCircleLists"
 30             :key="circle_idx + ‘circle‘"
 31             :class="loading == ‘chiaroscuro‘ ? ‘chiaroscuro‘ : ‘‘"
 32             :style="{
 33                 width: item.width + ‘px‘,
 34                 height: item.height + ‘px‘,
 35                 backgroundColor: ‘#f4f4f‘,
 36                 borderRadius: item.width + ‘px‘,
 37                 position: ‘absolute‘,
 38                 left: item.left + ‘px‘,
 39                 top: item.top + ‘px‘
 40             }"
 41         ></view>
 42
 43         <view class="spinbox" v-if="loading == ‘spin‘"><view class="spin"></view></view>
 44     </view>
 45 </template>
 46
 47 <script>
 48 export default {
 49     name: ‘skeleton‘,
 50     props: {
 51         bgcolor: {
 52             type: String,
 53             value: ‘#FFF‘
 54         },
 55         selector: {
 56             type: String,
 57             value: ‘skeleton‘
 58         },
 59         loading: {
 60             type: String,
 61             value: ‘spin‘
 62         },
 63         show: {
 64             type: Boolean,
 65             value: false
 66         }
 67     },
 68     data() {
 69         return {
 70             loadingAni: [‘spin‘, ‘chiaroscuro‘],
 71             systemInfo: {},
 72             skeletonRectLists: [],
 73             skeletonCircleLists: []
 74         };
 75     },
 76     watch: {
 77         show() {
 78             this.attachedAction();
 79             this.readyAction();
 80         }
 81     },
 82     methods: {
 83         attachedAction: function() {
 84             //默认的首屏宽高,防止内容闪现
 85             const systemInfo = uni.getSystemInfoSync();
 86             this.systemInfo = {
 87                 width: 750,
 88                 height: 1440
 89             };
 90             this.loading = this.loadingAni.includes(this.loading) ? this.loading : ‘spin‘;
 91         },
 92         readyAction: function() {
 93             const that = this;
 94             //绘制背景
 95             uni.createSelectorQuery()
 96                 .selectAll(`.${this.selector}`)
 97                 .boundingClientRect()
 98                 .exec(function(res) {
 99                     that.systemInfo.height = res[0][0].height + res[0][0].top;
100                 });
101
102             //绘制矩形
103             this.rectHandle();
104
105             //绘制圆形
106             this.radiusHandle();
107         },
108         rectHandle: function() {
109             const that = this;
110
111             //绘制不带样式的节点
112             uni.createSelectorQuery()
113                 .selectAll(`.${this.selector}-rect`)
114                 .boundingClientRect()
115                 .exec(function(res) {
116                     that.skeletonRectLists = res[0];
117                 });
118         },
119         radiusHandle() {
120             const that = this;
121
122             uni.createSelectorQuery()
123                 .selectAll(`.${this.selector}-radius`)
124                 .boundingClientRect()
125                 .exec(function(res) {
126                     that.skeletonCircleLists = res[0];
127                 });
128         }
129     }
130 };
131 </script>
132
133 <style>
134 .spinbox {
135     position: fixed;
136     display: flex;
137     justify-content: center;
138     align-items: center;
139     height: 100%;
140     width: 100%;
141     z-index: 9999;
142 }
143 .spin {
144     display: inline-block;
145     width: 64rpx;
146     height: 64rpx;
147 }
148 .spin:after {
149     content: ‘ ‘;
150     display: block;
151     width: 46rpx;
152     height: 46rpx;
153     margin: 1rpx;
154     border-radius: 50%;
155     border: 5rpx solid #409eff;
156     border-color: #409eff transparent #409eff transparent;
157     animation: spin 1.2s linear infinite;
158 }
159 @keyframes spin {
160     0% {
161         transform: rotate(0deg);
162     }
163     100% {
164         transform: rotate(360deg);
165     }
166 }
167
168 .chiaroscuro {
169     width: 100%;
170     height: 100%;
171     background: #f4f4f4;
172     animation-duration: 2s;
173     animation-name: blink;
174     animation-iteration-count: infinite;
175 }
176
177 @keyframes blink {
178     0% {
179         opacity: 0.5;
180     }
181     50% {
182         opacity: 1;
183     }
184     100% {
185         opacity: 0.5;
186     }
187 }
188
189 @keyframes flush {
190     0% {
191         left: -100%;
192     }
193     50% {
194         left: 0;
195     }
196     100% {
197         left: 100%;
198     }
199 }
200 .shine {
201     animation: flush 2s linear infinite;
202     position: absolute;
203     top: 0;
204     bottom: 0;
205     width: 100%;
206     background: linear-gradient(to left, rgba(255, 255, 255, 0) 0%, rgba(255, 255, 255, 0.85) 50%, rgba(255, 255, 255, 0) 100%);
207 }
208 </style>
引入代码后,在需要加载骨架屏的页面中,为整个页面的盒子加一类名skeleton,并加一个兄弟节点quick-skeleton引入组件:
showSkeleton控制骨架屏是否显示;
骨架屏显示时catchtouchmove和fixed控制页面是否可以滑动,这里用fixed让页面不可滑动;
bgcolor为骨架屏的背景颜色。其余属性不需改动,可以直接使用。
在onReady()中控制骨架屏的加载,
若是即时加载的骨架屏,可以将_this.showSkeleton = false;放在接口调用成功之后,这样就实现了加载完后骨架屏自动消失的效果,这里暂用定时器来实现骨架屏的隐藏。
 1 <view>
 2     <quick-skeleton
 3         :show="showSkeleton"
 4         ref="skeleton"
 5         catchtouchmove="true"
 6         fixed="true"
 7         loading="chiaroscuro"
 8         selector="skeleton"
 9         bgcolor="#FFF"
10         style="overflow: hidden;"
11     ></quick-skeleton>
12     <div class="page-content skeleton"></div>
13 </view>
14 <script>
15     import quickSkeleton from ‘../../components/quick-skeleton.vue‘;
16     export default {
17         data() {
18             return {
19                 showSkeleton: true,
20             };
21         },
22         components: {
23             quickSkeleton
24         },
25         onReady() {
26             let _this = this;
27             _this.$refs.skeleton.attachedAction();
28             _this.$refs.skeleton.readyAction();
29             setTimeout(function() {
30                 _this.showSkeleton = false;
31             }, 3000);
32         },
33     }
34 </script>
然后只要在页面中为想要生成骨架屏的元素加类名即可:
skeleton-radius表示圆形,skeleton-rect表示矩形
注:如果是利用v-for动态生成的结构,不能自动生成骨架屏,所以这里写出结构模板,给模板元素固定的宽高和背景颜色(与骨架屏相同),再用showSkeleton控制页面加载完成后隐藏结构模板。
 1 <div v-show="showSkeleton">
 2     <navigator hover-class="none" class="">
 3         <div class="">
 4             <div class="skeleton-radius" style="background: #f5f6f7;"><img class="" mode="" /></div>
 5             <div class="">
 6                 <span class="skeleton-rect" style="background: #f5f6f7;height: 26px;"></span>
 7                 <div class="skeleton-rect" style="background: #f5f6f7;height: 15px;"></div>
 8             </div>
 9         </div>
10         <ul class="skeleton-rect" style="background: #f5f6f7;"></ul>
11         <ul class="skeleton-rect" style="background: #f5f6f7;">
12             <li class=""><img class="" mode="" /></li>
13             <li class=""><img class="" mode="" /></li>
14             <li class=""><img class="" mode="" /></li>
15         </ul>
16         <div class="skeleton-rect" style="background: #f5f6f7;height: 20px;"></div>
17     </navigator>
18 </div>
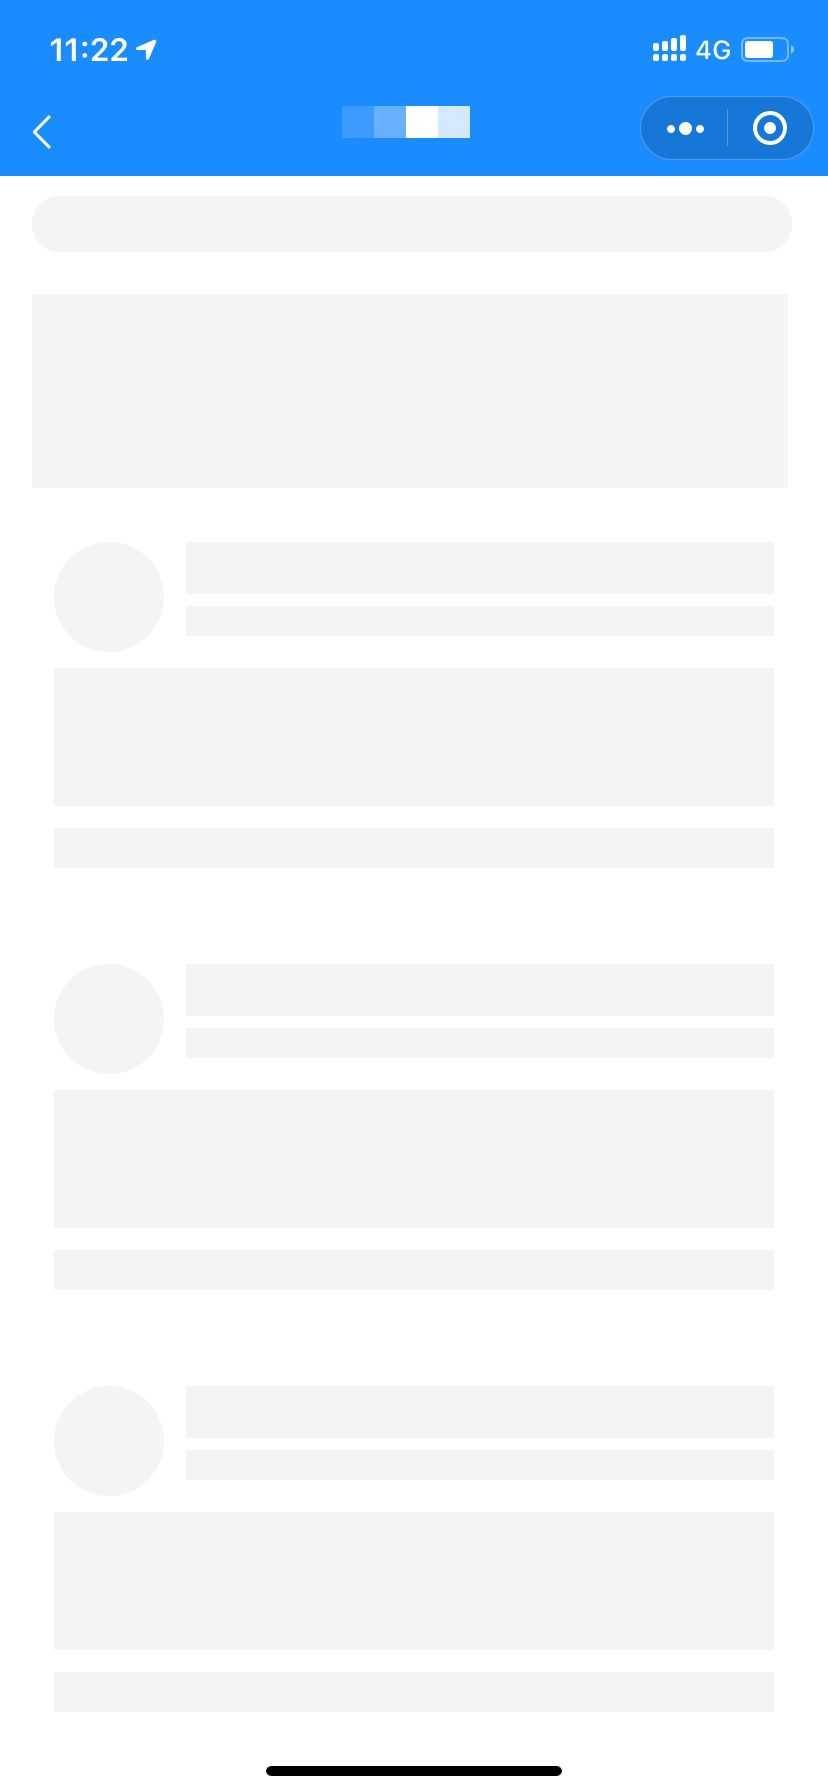
此骨架屏为颜色渐浅的闪烁效果,如果想要修改的话只需在组件中修改css。
效果如下:
