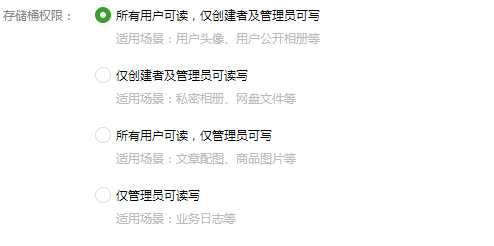
在微信云开发环境当中,普通的用户并没有往云存储内写入文件的权限

所以普通用户想要使用wx.cloud.uploadFile显然是不现实的
但是我们同时也知道,云函数是后台服务端,具有管理员权限,只要能调用云函数上传文件就可以解决这个问题了
const cloud = require(‘wx-server-sdk‘)const fs = require(‘fs‘)const path = require(‘path‘)exports.main = async (event, context) => { const fileStream = fs.createReadStream(path.join(__dirname, ‘demo.jpg‘)) return await cloud.uploadFile({ cloudPath: ‘demo.jpg‘, fileContent: fileStream, })}
官方文档写的云里雾里,并不是这么容易理解
_dirname代表的是文件根目录,官方文档能实现的功能貌似只是移动云存储空间中的文件,并不能操作本地文件
只上传文件路径是不能把本地文件成功上传到云存储的,但是我们可以将本地文件进行 进制 编码 转化为字节流上传到云函数中,
再在云函数的操作中把字节或文件转化为相对应的格式
微信小程序文档为我们提供了一个很好的用于编码文件的功能函数
利用这个函数,可以把图片编码成为base64 的形式上传到云函数
如果是多个图片上传,只需要遍历即可
wx.getFileSystemManager().readFile({ filePath: that.data.images[i], //选择图片返回的相对路径 encoding: ‘base64‘, //编码格式 success: res => { //成功的回调 wx.cloud.callFunction({ name:‘file‘, data:{ path: ‘pictures/‘ + util.vcode(new Date())+index+‘.png‘, file: res.data }, success(_res){ console.log(_res) },fail(_res){ console.log(_res) } }) index++; } })
其中index的作用是对图片进行区分编码,有不同的名字,不然重名的文件上传,原文件会被覆盖
import { promisify} from ‘../../utils/promise.util‘import { $init, $digest} from ‘../../utils/common.util‘var util = require(‘../../utils/util.js‘)const wxUploadFile = promisify(wx.uploadFile)const db = wx.cloud.database()Page({ data: { titleCount: 0, contentCount: 0, content: ‘‘, images: [] }, onLoad(options) { $init(this) }, handleTitleInput(e) { const value = e.detail.value this.data.title = value this.data.titleCount = value.length $digest(this) }, handleContentInput(e) { const value = e.detail.value this.data.content = value this.data.contentCount = value.length $digest(this) }, chooseImage(e) { wx.chooseImage({ count: 3, sizeType: [‘original‘, ‘compressed‘], sourceType: [‘album‘, ‘camera‘], success: res => { const images = this.data.images.concat(res.tempFilePaths) this.data.images = images.length <= 3 ? images : images.slice(0, 3) $digest(this) } }) }, removeImage(e) { const idx = e.target.dataset.idx this.data.images.splice(idx, 1) $digest(this) }, handleImagePreview(e) { const idx = e.target.dataset.idx const images = this.data.images wx.previewImage({ current: images[idx], urls: images, }) }, submitForm(e) { var that = this; var index = 0; var len = that.data.images.length; wx.showLoading({ title: ‘上传中...‘, }) for(var i = 0; i < len ; i++) { console.log(i) wx.getFileSystemManager().readFile({ filePath: that.data.images[i], //选择图片返回的相对路径 encoding: ‘base64‘, //编码格式 success: res => { //成功的回调 wx.cloud.callFunction({ name:‘file‘, data:{ path: ‘pictures/‘ + util.vcode(new Date())+index+‘.png‘, file: res.data }, success(_res){ console.log(_res) wx.hideLoading() //wx.hideLoading() },fail(_res){ console.log(_res) } }) index++; } }) } }})
其中 $digest(this) 与 $init(this) 是setData的封装写法
详细内容如下
微信小程序开发工具包--> Gitee
至于想用什么方式保存 返回的文件 id 取决于自己
// 云函数入口文件const cloud = require(‘wx-server-sdk‘)const fs = require(‘fs‘)const path = require(‘path‘)cloud.init({ env: ‘kindear-fd77cd‘})exports.main = async (event, context) => { try{ return await cloud.uploadFile({ cloudPath: event.path, fileContent: new Buffer(event.file, ‘base64‘) }) }catch(e){ return e; }}
其中,必须强调的是cloud.init 必须重新确定下环境id
不然上传的文件或者图片并不在小程序初始化的环境中

图片提交界面如图所示
点击提交

在云存储中查看
成功上传

基本方式在js文件中已经有具体描述,通过具体到秒的时间 和 图片的上传顺序进行编码 基本可以保证不会有重名的文件存在
现在给出时间的编码方式
function vcode(date){ var year = date.getFullYear() var month = date.getMonth() + 1 var day = date.getDate() var hour = date.getHours() var minute = date.getMinutes() var second = date.getSeconds() return [year, month, day].map(formatNumber).join(‘_‘) + ‘_‘+[hour, minute, second].map(formatNumber).join(‘_‘)}