
原文:How To Make An App Like Pokemon Go
作者:Jean-Pierre Distler
译者:kmyhy
如今最流行的一个手机游戏就是精灵宝可梦。它使用增强现实技术将游戏带入到“真实世界”,让玩家做一些对健康有益的事情。
在本教程中,我们将编写自己的增强现实精灵捕获游戏。这个游戏会显示一张包含有你的位置和敌人的位置的地图,用一个 3D SceneKit 视图呈现后置摄像头中拍摄的图像和敌人的 3D 模型。
如果你第一次接触增强现实,你可以先看一下我们的基于地理位置的 RA 教程。对于要介绍如何编写精灵宝可梦 app 的本教程来说,它不是必须的,但它里面包含了大量本教程未涉及的关于数学和 RA 的有用知识。
开始
本教程的开始项目在此处下载。项目包含了两个 view controller 和一个 art.scnassets 文件夹,这个文件夹中包括了必须的 3D 模型和贴图。
ViewController.swift 是一个 UIViewController 子类,用于显示 app 的 AR 内容。MapViewController 用于显示一张地图,地图上会包含你的当前位置以及附近敌人的位置。一些基本的东西,比如约束和出口,都是已经建好的了,你只需要关注本教程的核心内容,即怎样让 app 长得像精灵宝可梦。
在地图上添加敌人
在你能够和敌人战斗之前,需要知道敌人在哪。新建一个 Swift 文件,叫做 ARItem.swift。
在文件的 ARItem.swift 的 import Foundation 一行后添加:
import CoreLocation

struct ARItem {
  let itemDescription: String
  let location: CLLocation
}
ARItem 有一个描述字段和一个坐标。这样我们就能够知道是什么样的敌人,以及它在哪里。
打开 MapViewController.swift 添加一个 impor CoreLocation 语句以及一个属性:
var targets = [ARItem]()
添加如下方法:
func setupLocations() {
  let firstTarget = ARItem(itemDescription: "wolf", location: CLLocation(latitude: 0, longitude: 0))
  targets.append(firstTarget)

  let secondTarget = ARItem(itemDescription: "wolf", location: CLLocation(latitude: 0, longitude: 0))
  targets.append(secondTarget)

  let thirdTarget = ARItem(itemDescription: "dragon", location: CLLocation(latitude: 0, longitude: 0))
  targets.append(thirdTarget)
}
我们通过硬编码的方式创建了 3 个敌人。我们会将坐标(0,0) 替换成靠近你物理坐标附近的坐标。
有许多查找坐标的方法。比如,可以在你当前位置附近创建一些随机的坐标,使用我们在上一篇教程的 PlacesLoader 或者 Xcode 模拟当前位置。当然,我们不想让随机坐标出现在你邻居的卧室里。那就尴尬了。
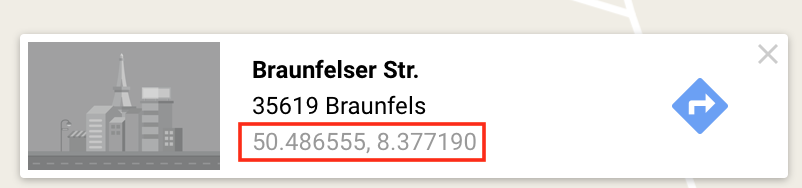
简单点的方法,就是使用 Google 地图。打开 https://www.google.com/maps/ 查找你当前的位置。当你点击地图,会显示一个大头钉,底部弹出一个气泡。
在气泡中会显示你的经纬度。我建议你从你的位置或你所在的街道附近创建出一些硬编码的位置,这样你就没有必要去敲邻居家门,告诉他你需要去他的卧室抓一条龙。
选择 3 个位置,将上面代码中的 0 替换成你选择的坐标。
在地图上标出敌人
我们已经设定了敌人的坐标,应该在地图上将它们显示出来。新增一个 Swift 文件,取名为 MapAnnotation.swift。在这个文件中编写如下代码:
import MapKit

class MapAnnotation: NSObject, MKAnnotation {
  //1
  let coordinate: CLLocationCoordinate2D
  let title: String?
  //2
  let item: ARItem
  //3
  init(location: CLLocationCoordinate2D, item: ARItem) {
    self.coordinate = location
    self.item = item
    self.title = item.itemDescription

    super.init()
  }
}
我们创建了一个 MapAnnotation 类并实现了 MKAnnotation 协议。
- 这个协议需要实现一个 coordinate 属性和 title 属性。
- item 属性保存了和大头钉相关的 ARItem。
- 实现一个便利初始化方法,在方法中对所有属性进行赋值。
回到 MapViewController.swift 在 setupLocations() 方法最后一句添加:
for item in targets {
  let annotation = MapAnnotation(location: item.location.coordinate, item: item)
  self.mapView.addAnnotation(annotation)
}
循环遍历 targets 数组,每个 target 都会添加一个大头钉到地图上。
在 viewDidLoad() 方法最后调用 setupLocations():
override func viewDidLoad() {
  super.viewDidLoad()

  mapView.userTrackingMode = MKUserTrackingMode.followWithHeading
  setupLocations()
}
在定位之前,我们必须获得权限。
在 MapViewController 中添加一个新属性:
let locationManager = CLLocationManager()
在 viewDidLoad() 最后一句,添加请求权限的代码:
if CLLocationManager.authorizationStatus() == .notDetermined {
  locationManager.requestWhenInUseAuthorization()
}
注意:如果不进行权限请求,map view 无法加载用户位置。而且不会提示任何错误信息。每当你调用位置服务时,你都无法获得位置信息,要排除错误请首先从这个地方开始。
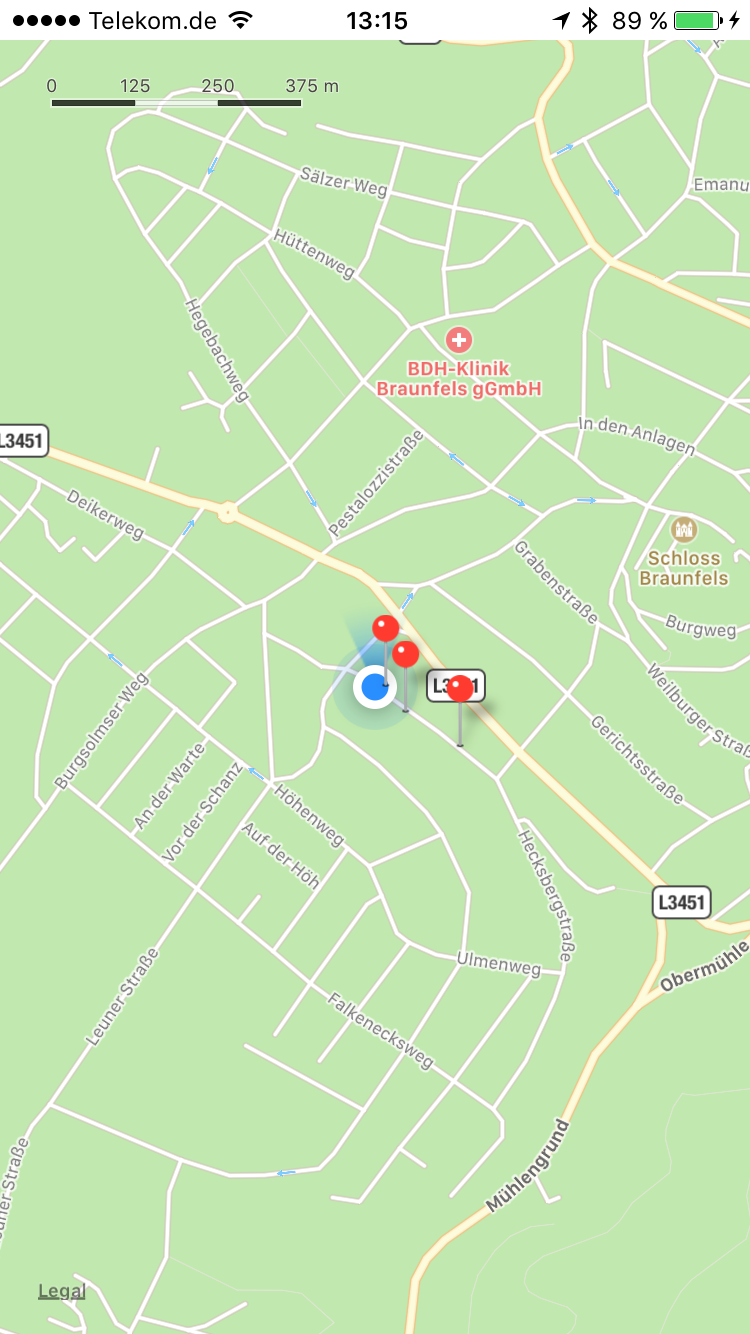
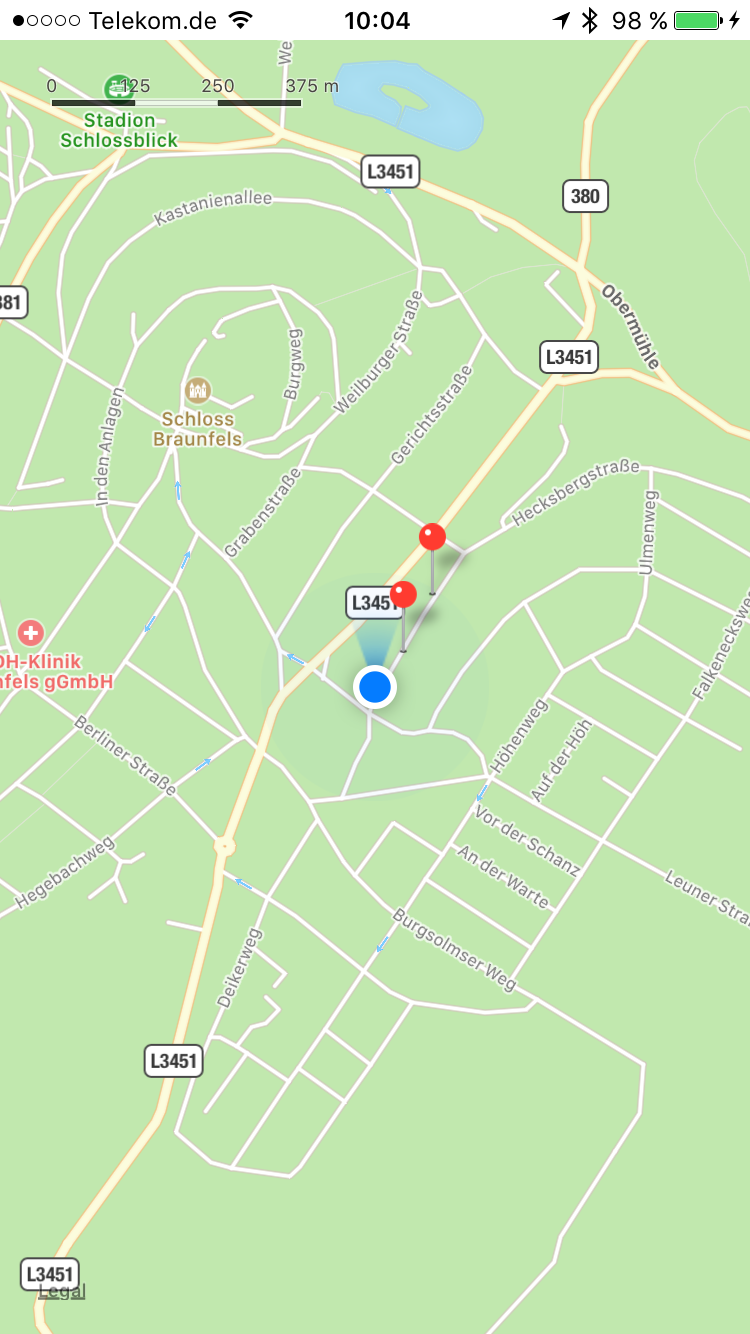
运行 app,等一会地图将缩放到你的当前位置并显示出一些红色的大头钉,它们表示了敌人的位置。
添加增强现实效果
我们有一个看起来不错的 app,但我们还需要添加一些 AR 元素。在下一节,我们将添加一个摄像窗口并添加一个简单的方块来代表敌人。
首先我们需要跟踪用户位置。在 MapViewController 声明属性:
var userLocation: CLLocation?
然后添加一个扩展:
extension MapViewController: MKMapViewDelegate {
  func mapView(_ mapView: MKMapView, didUpdate userLocation: MKUserLocation) {
    self.userLocation = userLocation.location
  }
}
每次设备的位置发生改变,这个方法会被调用。这个方法中,我们简单地保存了用户位置,以便在另一个方法中使用。
在扩展中添加委托方法:
func mapView(_ mapView: MKMapView, didSelect view: MKAnnotationView) {
  //1
  let coordinate = view.annotation!.coordinate
  //2
  if let userCoordinate = userLocation {
    //3
    if userCoordinate.distance(from: CLLocation(latitude: coordinate.latitude, longitude: coordinate.longitude)) < 50 {
      //4
      let storyboard = UIStoryboard(name: "Main", bundle: nil)

      if let viewController = storyboard.instantiateViewController(withIdentifier: "ARViewController") as? ViewController {
        // more code later
        //5
        if let mapAnnotation = view.annotation as? MapAnnotation {
          //6
          self.present(viewController, animated: true, completion: nil)
        }
      }
    }
  }
}
当用户点击到一个距离你不超过 50 米的敌人时,显示一个摄像画面:
- 获取所选中的大头钉的坐标。
- 去报 uerLocation 不为空。
- 确认所点的大头钉在用户位置 50 米范围内。
- 从故事版中实例化一个 ARViewController 实例。
- 检查被点击到的大头钉类型是 MapAnnotation。
- 显示 viewController。
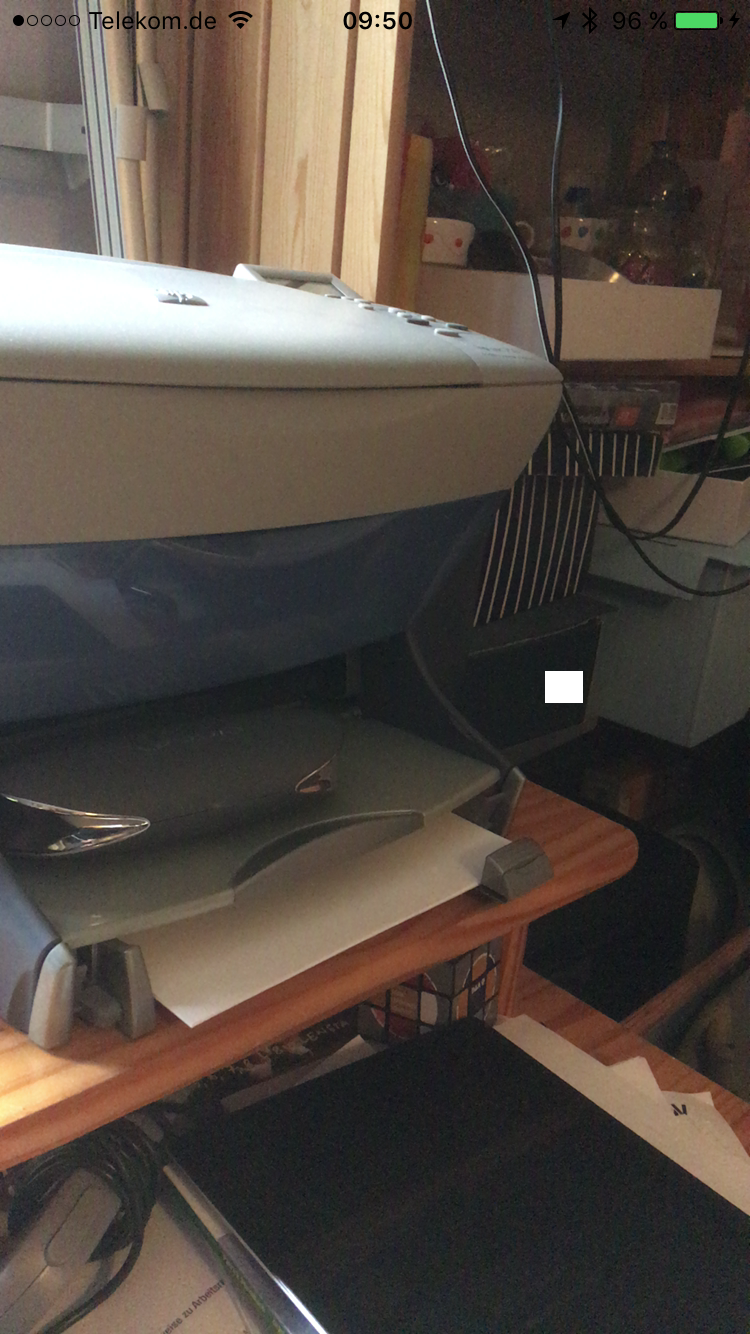
运行 app,点击你位置附近的任意大头钉,会显示一个空白的 view controller:
添加摄像画面
打开 ViewController.swift,在 import SceneKit 后面添加 import AVFoundation:
import UIKit
import SceneKit
import AVFoundation

class ViewController: UIViewController {
...
添加两个属性用于保存一个 AVCaptureSession 对象和一个 AVCaptureVideoPreviewLayer 对象:
var cameraSession: AVCaptureSession?
var cameraLayer: AVCaptureVideoPreviewLayer?
我们会用 capture session 来访问视频输入(比如镜头)和输出(比如取景框)。
添加一个方法:
func createCaptureSession() -> (session: AVCaptureSession?, error: NSError?) {
  //1
  var error: NSError?
  var captureSession: AVCaptureSession?

  //2
  let backVideoDevice = AVCaptureDevice.defaultDevice(withDeviceType: .builtInWideAngleCamera, mediaType: AVMediaTypeVideo, position: .back)

  //3
  if backVideoDevice != nil {
    var videoInput: AVCaptureDeviceInput!
    do {
      videoInput = try AVCaptureDeviceInput(device: backVideoDevice)
    } catch let error1 as NSError {
      error = error1
      videoInput = nil
    }

    //4
    if error == nil {
      captureSession = AVCaptureSession()

      //5
      if captureSession!.canAddInput(videoInput) {
        captureSession!.addInput(videoInput)
      } else {
        error = NSError(domain: "", code: 0, userInfo: ["description": "Error adding video input."])
      }
    } else {
      error = NSError(domain: "", code: 1, userInfo: ["description": "Error creating capture device input."])
    }
  } else {
    error = NSError(domain: "", code: 2, userInfo: ["description": "Back video device not found."])
  }

  //6
  return (session: captureSession, error: error)
}
这个方法负责这些事情:
- 创建一些变量,用于返回一些值。
- 获得后置摄像头。
- 如果摄像头有效,获取它的输入。
- 创建 AVCaptureSession 对象。
- 将后置摄像头输入添加到 capture session。
- 返回一个元组,包含 captureSession 和 error。
现在我们已经从摄像头拿到输入了,就可以把它添加到视图中:
func loadCamera() {
  //1
  let captureSessionResult = createCaptureSession()

  //2
  guard captureSessionResult.error == nil, let session = captureSessionResult.session else {
    print("Error creating capture session.")
    return
  }

  //3
  self.cameraSession = session

  //4
  if let cameraLayer = AVCaptureVideoPreviewLayer(session: self.cameraSession) {
    cameraLayer.videoGravity = AVLayerVideoGravityResizeAspectFill
    cameraLayer.frame = self.view.bounds
    //5
    self.view.layer.insertSublayer(cameraLayer, at: 0)
    self.cameraLayer = cameraLayer
  }
}
代码解释如下:
- 首先调用前面的方法获得一个 capture session。
- 判断是否有错误发生,或者 capture session 为空,如果是立即 return,和 AR 说 bye-bye 吧!
- 否则,将 capture session 保存到 cameraSession 变量。
- 创建摄像预览图层,如果创建成功,设置它的 videoGravity 属性和 frame 属性,让它占据整个屏幕。
- 将摄像预览图层(取景框)添加到 sublayers 中并保存到 cameraLayer 变量。
然后,在 viewDidLoad() 加入:
  loadCamera()
  self.cameraSession?.startRunning()
这里只做了两件事情:首先调用前面编写的方法,然后打开镜头取景框。这个取景框立马会显示到预览图层上。
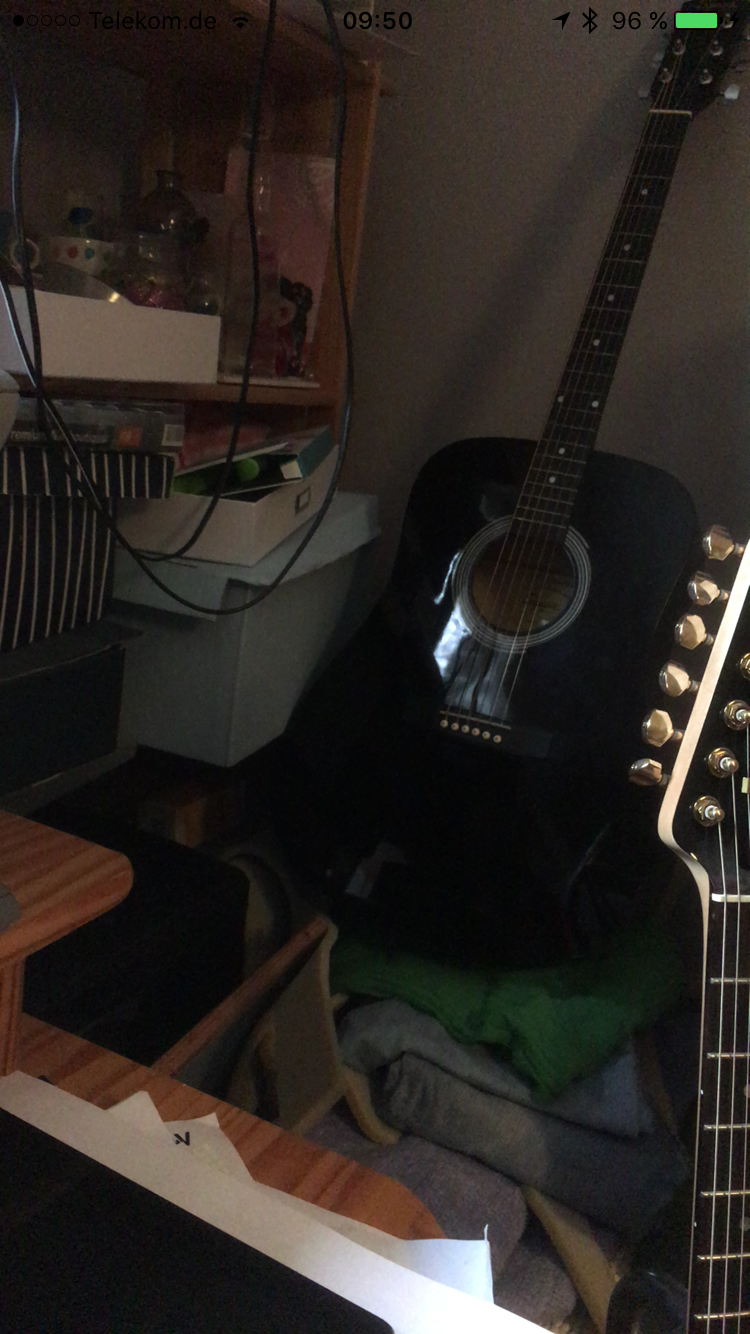
运行 app,点击你身边的任何一个位置,你会看到一个全新的镜头预览界面:
添加方块
干得不错,但这还不算真正的 RA。在这一节,我们将添加一个简单的方块来表示敌人,并根据用户的位置和朝向来移动它。
这个游戏会有两种敌人:狼和龙。
因此,我们需要知道敌人的种类以及应该在哪里显示它们。
在 ViewController 中添加如下属性(用于保存敌人的信息):
var target: ARItem!
打开 MapViewController.swift, 找到 mapView(_:, didSelect:) 将最后一个 if 语句修改为:
if let mapAnnotation = view.annotation as? MapAnnotation {
  //1
  viewController.target = mapAnnotation.item

  self.present(viewController, animated: true, completion: nil)
}
在显示 viewController 之前,将一个 ARItem(它是被点击的大头钉的 item 属性)赋给它。这样,viewController 就能够知道当前敌人的种类。
现在 ViewController 已经获得了 target 的信息了。
打开 ARItem.swift 导入 SceneKit。
import Foundation
import SceneKit

struct ARItem {
...
}
添加一个属性,用于保存一个 SCNNode 对象:
var itemNode: SCNNode?
确保这个属性声明在 ARItem 结构的其它属性之后,因为在隐式的初始化方法将使用相同的顺序来定义参数。
Xcode 会提示 MapViewController.swift 中有一个错误。要解决这个错误,请打开这个文件,找到 setupLocations() 方法。
我们需要修改在编辑器左边标有一个红点的代码。
![]()
对于这些代码,我们都需要将缺少的 itemNode 参数用 nil 来补上。
例如,这一行:
let firstTarget = ARItem(itemDescription: "wolf", location: CLLocation(latitude: 50.5184, longitude: 8.3902))
应当改为:
let firstTarget = ARItem(itemDescription: "wolf", location: CLLocation(latitude: 50.5184, longitude: 8.3902), itemNode: nil)
我们知道了敌人的种类,以及它们的位置,但我们还需要知道设备当前朝向。
打开 ViewController.swift ,导入 CoreLocation:
import UIKit
import SceneKit
import AVFoundation
import CoreLocation
然后,增加属性声明:
//1
var locationManager = CLLocationManager()
var heading: Double = 0
var userLocation = CLLocation()
//2
let scene = SCNScene()
let cameraNode = SCNNode()
let targetNode = SCNNode(geometry: SCNBox(width: 1, height: 1, length: 1, chamferRadius: 0))
代码解释如下:
- 我们用一个 CLLocationManager 去监听设备的朝向。heading 的单位为度,表示正北方或者磁北极偏转角度。
- 创建一个 SCNode() 和一个 SCNode 对象。targetNode 将用来放入一个立方体。
在 viewDidLoad() 最后一句添加:
//1
self.locationManager.delegate = self
//2
self.locationManager.startUpdatingHeading()

//3
sceneView.scene = scene
cameraNode.camera = SCNCamera()
cameraNode.position = SCNVector3(x: 0, y: 0, z: 10)
scene.rootNode.addChildNode(cameraNode)
代码解释如下:
- 将 ViewController 设置为 CLLocationManager 委托。
- 通过调用 startUpdatingHeading 方法,我们可以接收方向通知。默认,当方向改变超过 1 度时,委托方法会被调用。
This sets ViewController as the delegate for the CLLocationManager. - 设置 SCNView。首先创建了一个空的 scene,然后将相机添加到其中。
添加一个扩展,实现 CLLocationManagerDelegate 协议:
extension ViewController: CLLocationManagerDelegate {
  func locationManager(_ manager: CLLocationManager, didUpdateHeading newHeading: CLHeading) {
    //1
    self.heading = fmod(newHeading.trueHeading, 360.0)
    repositionTarget()
  }
}
当收到新的方向通知,CLLocationManager 会调用这个委托方法。fmod 对 double 进行取模运算,确保方向的取值位于 0-359 之间。
在 ViewController.swift 中添加一个 repostionTarget()方法,注意是放在类实现而不是 CLLocationManagerDelegate 扩展中:
func repositionTarget() {
  //1
  let heading = getHeadingForDirectionFromCoordinate(from: userLocation, to: target.location)

  //2
  let delta = heading - self.heading

  if delta < -15.0 {
    leftIndicator.isHidden = false
    rightIndicator.isHidden = true
  } else if delta > 15 {
    leftIndicator.isHidden = true
    rightIndicator.isHidden = false
  } else {
    leftIndicator.isHidden = true
    rightIndicator.isHidden = true
  }

  //3
  let distance = userLocation.distance(from: target.location)

  //4
  if let node = target.itemNode {

    //5
    if node.parent == nil {
      node.position = SCNVector3(x: Float(delta), y: 0, z: Float(-distance))
      scene.rootNode.addChildNode(node)
    } else {
      //6
      node.removeAllActions()
      node.runAction(SCNAction.move(to: SCNVector3(x: Float(delta), y: 0, z: Float(-distance)), duration: 0.2))
    }
  }
}
代码解释如下:
- getHeadingForDirectionFromCoordinate 这个方法用于计算从当前位置到目标的方向,具体实现后面介绍。
- 计算设备当前方向和目标方向之间的偏转角度(即 delta)。如果 delta 小于 -15,显示左箭头。如果大于 15,显示右箭头。如果在 -15 到 15 之间,两个箭头都隐藏,表示敌人就在屏幕中。
- 计算从设备位置到敌人之间的距离。
- 如果 itemNode 不为空……
- 同时 node 没有父节点,将 itemNode 的位置设置为 distance 并将 node 放到屏幕上。
- 否则,删除所有 action 并创建一个新的 action。
如果你懂 SceneKit 或者 SpriteKit,则最后一句代码你懂的。否则,这里会进行更详细的介绍。
SCNAction.move(to:, duration:) 方法创建一个 action,将节点以指定时间移动到指定的位置。runAction(_:) 也是 SCNNode 方法,用于执行一个 action。我们还可以创建 action 组/序列。要了解更多内容,请阅读我们的这本书3D Apple Games by Tutorials。
继续实现前面未实现的方法。在 ViewController.swift 中添加这几个方法:
func radiansToDegrees(_ radians: Double) -> Double {
  return (radians) * (180.0 / M_PI)
}

func degreesToRadians(_ degrees: Double) -> Double {
  return (degrees) * (M_PI / 180.0)
}

func getHeadingForDirectionFromCoordinate(from: CLLocation, to: CLLocation) -> Double {
  //1
  let fLat = degreesToRadians(from.coordinate.latitude)
  let fLng = degreesToRadians(from.coordinate.longitude)
  let tLat = degreesToRadians(to.coordinate.latitude)
  let tLng = degreesToRadians(to.coordinate.longitude)

  //2
  let degree = radiansToDegrees(atan2(sin(tLng-fLng)*cos(tLat), cos(fLat)*sin(tLat)-sin(fLat)*cos(tLat)*cos(tLng-fLng)))

  //3
  if degree >= 0 {
    return degree
  } else {
    return degree + 360
  }
}
radiansToDegrees(_:) 和 degreesToRadians(_:) 方法用于将弧度和角度互转。
getHeadingForDirectionFromCoordinate(from:to:) 方法代码解释如下:
- 首先,将角度转换为弧度。
- 然后用转换后的弧度计算出方向在转成角度。
- 如果 degree 是负数,将之加上 360 度让数据更一致。这是可以的,因为 -90 度就等于 270 度。
还需要几个步骤才能运行你的 app。
首先,必须将用户的坐标传递给 viewController。打开 MapViewController.swift 找到 mapView(_:, didSelect:) 的最后一个 if 语句,在显示 view controller 之前加上这句:
viewController.userLocation = mapView.userLocation.location!
然后在 ViewController.swift 中添加这个方法:
func setupTarget() {
  targetNode.name = "enemy"
  self.target.itemNode = targetNode
}
这个方法为 targetNode 设置一个名字,然后将它赋给 target。
现在可以在 viewDidLoad() 方法最后来调用这个方法了。在添加完摄像头之后添加:
scene.rootNode.addChildNode(cameraNode)
setupTarget()
运行 app,可以看到方块在移动:
美化我们的 app
在开发 app 初期用方块或者圆球是一种简单的处理方法,因为这样省去了大量 3D 建模的时间——但 3D 模型看起来毕竟要漂亮得多。在这一节,我们将继续美化我们的 app ,为敌人加入 3D 模型,以及赋予玩家扔出火球的能力。
打开 art.scnassets 文件夹,里面有两个 .dae 文件。它们包含了敌人的模型:狼和龙。
接下来修改 ViewController.swift 中的 setupTarget() 方法,在其中加载这些 3D 模型并赋给目标的 itemNode 属性。
将 setupTarget() 方法修改为:
func setupTarget() {
  //1
  let scene = SCNScene(named: "art.scnassets/\(target.itemDescription).dae")
  //2
  let enemy = scene?.rootNode.childNode(withName: target.itemDescription, recursively: true)
  //3
  if target.itemDescription == "dragon" {
    enemy?.position = SCNVector3(x: 0, y: -15, z: 0)
  } else {
    enemy?.position = SCNVector3(x: 0, y: 0, z: 0)
  }

  //4
  let node = SCNNode()
  node.addChildNode(enemy!)
  node.name = "enemy"
  self.target.itemNode = node
}
代码解释如下:
- 首先将模型加载到场景中。目标的 itemDescription 属性名和 .dae 文件名对应。
- 然后遍历场景,查找其中和 itemDescription 名字相同的节点。这只会有一个节点,即模型的根节点。
- 调整模型放置的位置,以便两个模型都会在同一地方出现。如果两个模型都出自同一个设计师之手,可能这一步是不必要的。但是我的这两个模型分别来自不同的设计师:狼来自于 3dwarehouse.sketchup.com ,龙来自于 https://clara.io。
- 将模型添加到空节点,然后将节点赋给当前目标的 itemNode 属性。还剩下一个小问题,即触摸的处理,放在后面介绍。
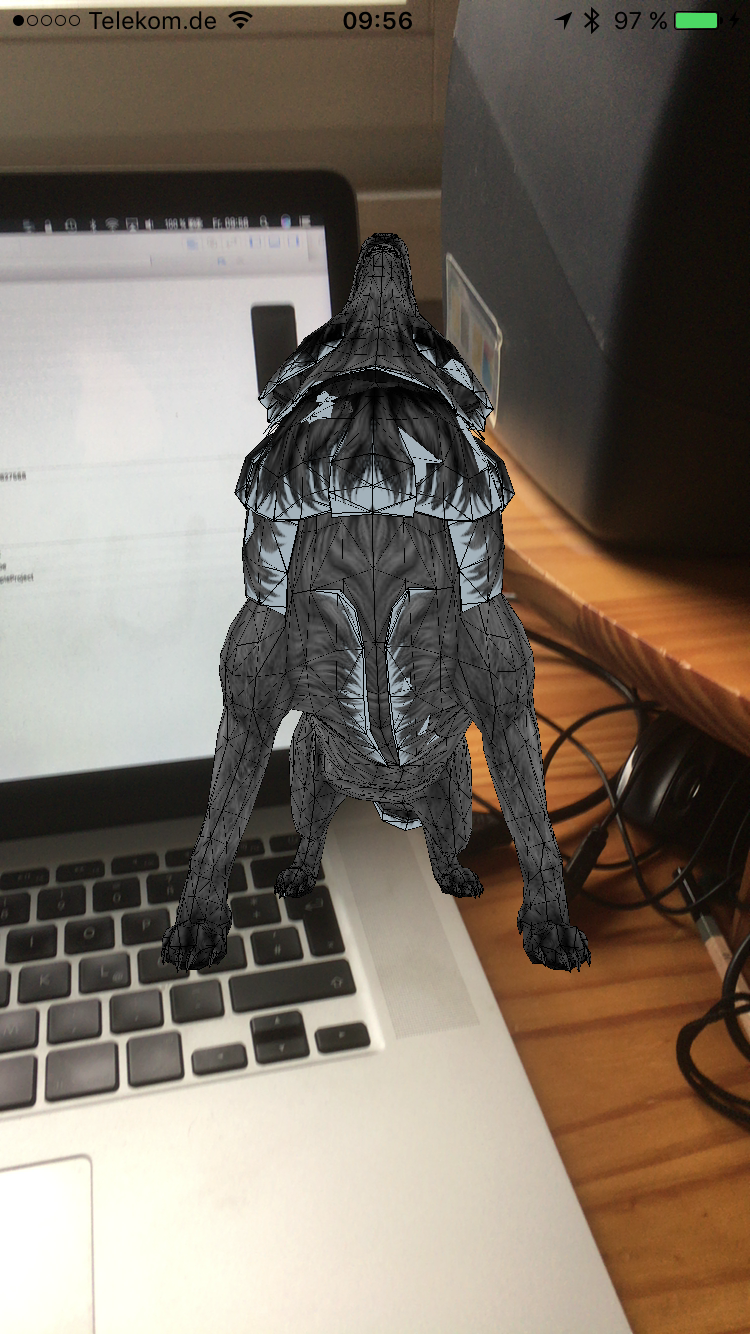
运行 app,你会看到一只立体的狼,这可比一个便宜的方块要吓人多了!
事实上,这只狼足以让你吓得远远抛开了,但作为勇敢主角的你,逃跑从来不是你的选择!接下来你应该加上几个火球,这样你就能在成为狼的点心之前战胜它了。
抛出火球的最好时机是用户的触摸结束事件,因此在 ViewController.swift 中实现这个方法:
override func touchesEnded(_ touches: Set<UITouch>, with event: UIEvent?) {
  //1
  let touch = touches.first!
  let location = touch.location(in: sceneView)

  //2
  let hitResult = sceneView.hitTest(location, options: nil)
  //3
  let fireBall = SCNParticleSystem(named: "Fireball.scnp", inDirectory: nil)
  //4
  let emitterNode = SCNNode()
  emitterNode.position = SCNVector3(x: 0, y: -5, z: 10)
  emitterNode.addParticleSystem(fireBall!)
  scene.rootNode.addChildNode(emitterNode)

  //5
  if hitResult.first != nil {
    //6
    target.itemNode?.runAction(SCNAction.sequence([SCNAction.wait(duration: 0.5), SCNAction.removeFromParentNode(), SCNAction.hide()]))
    let moveAction = SCNAction.move(to: target.itemNode!.position, duration: 0.5)
      emitterNode.runAction(moveAction)
  } else {
    //7
    emitterNode.runAction(SCNAction.move(to: SCNVector3(x: 0, y: 0, z: -30), duration: 0.5))
  }
}
代码解释如下:
- 将触摸转换成场景坐标。
- hitTest(_, options:) 方法向指定的位置发射射线,返回一个 SCNHitTestResult 数组,表示该射线所穿过的所有节点。
- 从 SceneKit 粒子文件中加载粒子系统,用于发射火球。
- 将粒子系统加到一个空节点身上,然后将它放到屏幕下方以外。这使得火球看起来是从玩家位置发射的。
- 判断是否有碰撞发生……
- 等待 0.5 秒,然后移除敌人所对应的 itemNode。同时将粒子发射器节点移动到敌人的位置。
- 如果没有碰撞发生,火球移动到一个固定的位置。
运行 app,让恶饿狼在火焰中焚烧吧!
收尾工作
要完成 app,我们还需要将敌人从列表中删除,关闭 AR 视图并回到地图,以便找到下一个敌人。
移除敌人应当在 MapViewController 中进行,因为敌人列表就在那里。我们可以说明只有一个方法的委托协议,当目标被击中后调用这个方法。
在 ViewController.swift 的类声明之前,添加如下协议:
protocol ARControllerDelegate {
  func viewController(controller: ViewController, tappedTarget: ARItem)
}
同时为 ViewController 声明一个属性:
var delegate: ARControllerDelegate?
委托方法会告诉委托对象说明时候发生了碰撞事件,然后委托对象就可以进行下一步的处理。
在 ViewController.swift 中找到 touchesEnded(_:with:) 方法,将if 语句中的代码块修改为:
if hitResult.first != nil {
  target.itemNode?.runAction(SCNAction.sequence([SCNAction.wait(duration: 0.5), SCNAction.removeFromParentNode(), SCNAction.hide()]))
  //1
  let sequence = SCNAction.sequence(
    [SCNAction.move(to: target.itemNode!.position, duration: 0.5),
     //2
     SCNAction.wait(duration: 3.5),
     //3
     SCNAction.run({_ in
        self.delegate?.viewController(controller: self, tappedTarget: self.target)
      })])
   emitterNode.runAction(sequence)
} else {
  ...
}
解释如下:
- 将粒子发射器节点的 action 改成一个 action 序列,其中 move 动作仍然保留。
- move 动作之后,暂停 3.5 秒。
- 通知委托对象,target 被击中。
打开 MapViewController.swift 声明一个属性,用于保存 选中的大头钉:
var selectedAnnotation: MKAnnotation?
这个属性用于待会将它从地图上移出。修改它的 viewController 的初始化和条件绑定(if let)部分的代码:
if let viewController = storyboard.instantiateViewController(withIdentifier: "ARViewController") as? ViewController {
  //1
  viewController.delegate = self

  if let mapAnnotation = view.annotation as? MapAnnotation {
    viewController.target = mapAnnotation.item
    viewController.userLocation = mapView.userLocation.location!

    //2
    selectedAnnotation = view.annotation
    self.present(viewController, animated: true, completion: nil)
  }
}
非常简单:
- 将 viewController 的委托设置为 MapViewController。
- 保存用户点中的大头钉对象。
在 MKMapViewDelegate 扩展下面添加:
extension MapViewController: ARControllerDelegate {
  func viewController(controller: ViewController, tappedTarget: ARItem) {
    //1
    self.dismiss(animated: true, completion: nil)
    //2
    let index = self.targets.index(where: {$0.itemDescription == tappedTarget.itemDescription})
    self.targets.remove(at: index!)

    if selectedAnnotation != nil {
      //3
      mapView.removeAnnotation(selectedAnnotation!)
    }
  }
}
代码解释如下:
- 解散 AR 视图。
- 从 targets 数组中删除 target。
- 从地图上删除大头钉。
运行 app,你将看到最终效果:
结束
最终完成的项目在这里下载。
如果你想尽可能地学习如何编写这个 app,请参考下列教程:
- 关于 MapKit 和位置服务,请参考我们的 MapKit Swift 入门。
- 关于视频捕捉,请参考我们的 AVFoundation 系列。
- 关于 SceneKit,请参考我们的 SceneKit 系列教程。
- 要避免对敌人位置进行硬编码,则需要后台数据的支持,请参考如何编写一个简单的 PHP/MySQL 服务 以及 如何用 Vapor 进行服务端编程。
希望你喜欢本教程。如果有任何问题和建议,请在下面留言。
$(function () {
$(‘pre.prettyprint code‘).each(function () {
var lines = $(this).text().split(‘\n‘).length;
var $numbering = $(‘
$(this).addClass(‘has-numbering‘).parent().append($numbering);
for (i = 1; i <= lines; i++) {
$numbering.append($(‘ ‘).text(i));
};
$numbering.fadeIn(1700);
});
});