
原文:Android项目实战(二十七):数据交互(信息编辑)填写总结
前言:
项目中必定用到的数据填写需求。比如修改用户名的文字编辑对话框,修改生日的日期选择对话框等等。现总结一下,方便以后使用。
注:
先写实现过程,想要学习的同学可以看看,不需要的同学可以直接拉到最下面复制代码使用。
————————————————————————————————————————————
一、文字编辑对话框
看下效果图(仿今日头条):
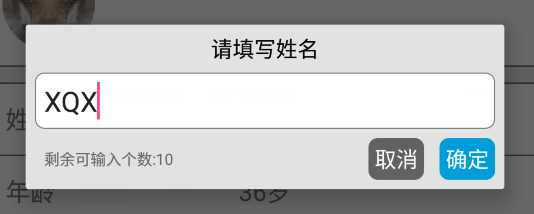
需求包括:
一个标题TextView
一个圆角白色背景EditText
一个可输入个数提示的TextView
两个按钮,‘确定’、‘取消’
对话框展现形式。
代码实现:
(1)编写布局文件


<?xml version="1.0" encoding="utf-8"?>
<LinearLayout xmlns:android="http://schemas.android.com/apk/res/android"
    android:orientation="vertical"
    android:layout_width="match_parent"
    android:layout_height="wrap_content"
    android:background="@color/grey_5"
    android:id="@+id/popup_edit_info_ly"
    >
    <!--标题-->
    <TextView
        android:id="@+id/popup_edit_info_txt_title"
        android:layout_width="match_parent"
        android:layout_height="wrap_content"
        android:text="title"
        android:gravity="center_horizontal"
        android:padding="@dimen/dp_6"
        android:textColor="@color/black"
        />

    <!--编辑框-->
    <EditText
        android:id="@+id/popup_edit_info_edit_content"
        android:layout_width="match_parent"
        android:layout_height="wrap_content"
        android:layout_marginLeft="@dimen/dp_6"
        android:layout_marginRight="@dimen/dp_6"
        android:background="@drawable/bg_popup_edit"
        android:padding="@dimen/dp_6"
        >
    </EditText>

    <RelativeLayout
        android:layout_width="match_parent"
        android:layout_height="wrap_content"
        android:padding="@dimen/dp_6"
        >
        <!--提示文字-->
        <TextView
            android:id="@+id/popup_edit_info_txt_tip"
            android:layout_width="wrap_content"
            android:layout_height="wrap_content"
            android:textSize="@dimen/txt_10"
            android:text="剩余可输入个数:"
            android:layout_centerVertical="true"
            android:layout_marginLeft="@dimen/dp_6"
            />

        <!--确定按钮,这里用TextView ,当然也可以用Button ImageButton-->
        <TextView
            android:id="@+id/popup_edit_info_btn_confirm"
            android:layout_width="wrap_content"
            android:layout_height="wrap_content"
            android:text="@string/confirm"
            android:background="@drawable/bg_btn_blue"
            android:padding="@dimen/dp_4"
            android:textColor="@color/white"
            android:layout_alignParentRight="true"
            />

        <!--取消按钮-->
        <TextView
            android:id="@+id/popup_edit_info_btn_cancel"
            android:layout_width="wrap_content"
            android:layout_height="wrap_content"
            android:text="@string/cancel"
            android:background="@drawable/bg_btn_grey"
            android:padding="@dimen/dp_4"
            android:textColor="@color/white"
            android:layout_toLeftOf="@id/popup_edit_info_btn_confirm"
            android:layout_marginRight="@dimen/dp_10"
            />
    </RelativeLayout>

</LinearLayout>
dialog_edit_txt
里面编辑框EditView涉及到了圆角白色背景 需要写一个drawable文件
<?xml version="1.0" encoding="utf-8"?>
<shape xmlns:android="http://schemas.android.com/apk/res/android">
    <!--popupwindow 编辑框的背景颜色 用于popup_edit_info.xml布局文件-->
    <solid android:color="@color/white" ></solid>
    <corners android:radius="@dimen/dp_6"></corners>
    <stroke android:width="0.5dp" android:color="@color/grey_1"></stroke>
</shape>
bg_popup_edit
(2)、在activity或者fragment中使用
①、这里我把对话框写在一个方法里,方便使用
title 文本对话框的标题
isSingleLine EditText是否限制一行显示
maxSize EditText中文字的最大长度
textview 修改的TextView控件,首先要讲该控件的文本显示在EditText中,点击确定后需要将编辑文本显示在改控件中

private void showEditDialog(String title , boolean isSingleLine , final int maxSize, final TextView textview)
②、根据布局文件生成view 并 初始化控件
     View view = LayoutInflater.from(this).inflate(R.layout.dialog_edit_txt, null);
        TextView popup_edit_info_txt_title;//标题
        final TextView popup_edit_info_txt_tip;       //编辑框剩余个数提示
        TextView popup_edit_info_btn_cancel;    //取消按钮
        TextView popup_edit_info_btn_confirm;    //确定按钮
        final EditText popup_edit_info_edit_content;   //编辑框
        popup_edit_info_txt_title = (TextView) view.findViewById(R.id.popup_edit_info_txt_title);
        popup_edit_info_txt_tip = (TextView) view.findViewById(R.id.popup_edit_info_txt_tip);
        popup_edit_info_btn_cancel = (TextView) view.findViewById(R.id.popup_edit_info_btn_cancel);
        popup_edit_info_btn_confirm = (TextView) view.findViewById(R.id.popup_edit_info_btn_confirm);
        popup_edit_info_edit_content = (EditText) view.findViewById(R.id.popup_edit_info_edit_content);
③、进行控件的属性设置
     popup_edit_info_edit_content.setText(textview.getText().toString());            // 将参数textview的文本数据显示在EditText中
        popup_edit_info_edit_content.setSingleLine(isSingleLine);                       // 设置EditView是否单行,像用户名这种信息需要单行,像评价简介这种的不需要单行
        popup_edit_info_edit_content.setFilters(new InputFilter[]{new InputFilter.LengthFilter(maxSize)}); // 设置EditText的最大长度,当输入超过这个值的时候不在允许输入
        popup_edit_info_txt_tip.setText("剩余可输入个数:"+(maxSize-textview.getText().toString().length()));        // 设置 剩余文字个数提示
popup_edit_info_edit_content.setSelection(content.getText().length()); // 光标默认显示在最后
        final AlertDialog dialog = new AlertDialog.Builder(this)                        //创建对话框
                .setView(view)
                .create();
        popup_edit_info_txt_title.setText(title);                                       // 设置标题
dialog.setCanceledOnTouchOutside(false); // 设置点击屏幕Dialog不消失
④、进行EditText的设置 ,监听文字数据字数变化,改变提示文本的内容
      popup_edit_info_edit_content.addTextChangedListener(new TextWatcher() {
            @Override
            public void beforeTextChanged(CharSequence s, int start, int count, int after) {
            }
            @Override
            public void onTextChanged(CharSequence s, int start, int before, int count) {
            }
            @Override
            public void afterTextChanged(Editable s) {
                int length = s.length();
                popup_edit_info_txt_tip.setText("剩余可输入个数:"+(maxSize-length));
            }
        });
⑤、设置‘确定’、‘取消’点击事件
popup_edit_info_btn_cancel.setOnClickListener(new View.OnClickListener() {
            @Override
            public void onClick(View v) {
                dialog.dismiss();
            }
        });
        popup_edit_info_btn_confirm.setOnClickListener(new View.OnClickListener() {
            @Override
            public void onClick(View v) {
                textview.setText(popup_edit_info_edit_content.getText().toString());
                dialog.dismiss();
            }
        });
⑥、显示对话框
dialog.show();
————————————————————————————————————————————
二、单个条件选择的自定义PopupWindow
效果图:
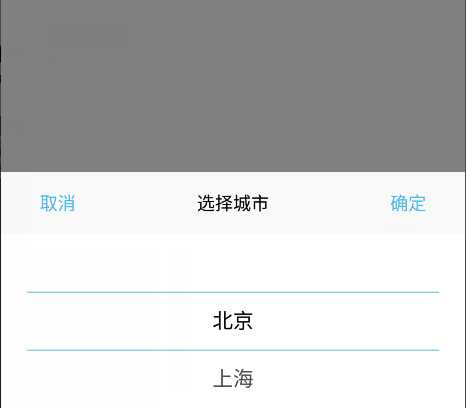
需求包括:
1、顶部两个按钮:“取消”、“确定”按钮
2、标题
3、滚动的wheelview选择器
代码实现:
1、选择一个WheelView控件,这个github上很多,我这里选用的是
https://github.com/xiangyunwan/WheelView-master/
在app目录下的 build.gradle文件中添加
compile ‘com.wx.wheelview:wheelview:1.3.3‘
2、构建PopupWindow布局文件
这个比较简单,按效果图来 两个按钮,一个标题文本,一个WheelView
<?xml version="1.0" encoding="utf-8"?>
<LinearLayout xmlns:android="http://schemas.android.com/apk/res/android"
    android:orientation="vertical"
    android:layout_width="match_parent"
    android:layout_height="wrap_content"
    android:id="@+id/popup_one_item_ly"
    android:background="@color/white"
    >

    <RelativeLayout
        android:layout_width="match_parent"
        android:layout_height="wrap_content"
        android:background="@color/grey_6"
        >
        <Button
            android:id="@+id/popup_one_item_btn_cancel"
            android:layout_width="wrap_content"
            android:layout_height="wrap_content"
            android:background="#0000"
            android:text="取消"

            android:textColor="@color/line_blue_main"
            />

        <Button
            android:id="@+id/popup_one_item_btn_submit"
            android:layout_width="wrap_content"
            android:layout_height="wrap_content"
            android:text="确定"
            android:layout_alignParentRight="true"
            android:background="#0000"
            android:textColor="@color/line_blue_main"
            ></Button>

        <TextView
            android:id="@+id/popup_one_item_txt_title"
            android:layout_width="wrap_content"
            android:layout_height="wrap_content"
            android:textColor="@color/black"
            android:layout_centerInParent="true"
            />
    </RelativeLayout>

    <com.wx.wheelview.widget.WheelView
        android:id="@+id/popup_one_item_wheel"
        android:layout_width="match_parent"
        android:layout_height="wrap_content"
        android:layout_gravity="center_horizontal"
        android:layout_marginLeft="@dimen/dp_20"
        android:layout_marginRight="@dimen/dp_20"
        >

    </com.wx.wheelview.widget.WheelView>

</LinearLayout>
popup_one_item
对应的几个资源:
<color name="grey_6">#faf9f9</color>
<color name="blue_main">#4ab8e9</color>
3、写一个封装的继承PopupWindow的类,以后类似的直接拿来用即可,这里命名OneItemPopupWindow
①、参数分析
需要上下文 Context 用于构建View
需要点击事件,接口回调的方式 View.OnClickListener
需要标题文本,String
需要WheelView显示的数据源,ArrayList<String>
所以构造方法:
public OneItemPopupWindow(Context context, View.OnClickListener itemsOnClick, String t, ArrayList<String> datas) {
        super(context);
}
②、定义需要的数据
    private View mMenuView; //popupwindow布局生成的View
    private TextView title; //标题
    private Button cancel;  //取消按钮
    private Button submit;  //确定按钮
    private WheelView wheel;  //wheelview控件
    private int currentPosition;  // 当然的wheelview选择的item的位置
    ArrayList<String> datas = new ArrayList<>();    // wheelview的数据源
③、生成PopupWindow的View 并获取相应控件 初始化, 从这里开始都写在构造方法里
     LayoutInflater inflater = (LayoutInflater) context
                .getSystemService(Context.LAYOUT_INFLATER_SERVICE);
        mMenuView = inflater.inflate(R.layout.popup_one_item, null);
        cancel = (Button) mMenuView.findViewById(R.id.popup_one_item_btn_cancel);
        submit = (Button) mMenuView.findViewById(R.id.popup_one_item_btn_submit);
        wheel = (WheelView) mMenuView.findViewById(R.id.popup_one_item_wheel);
        title = (TextView) mMenuView.findViewById(R.id.popup_one_item_txt_title);
        this.datas = datas; //根据参数初始化数据源
        title.setText(t);   //设置标题
④、设置wheelview控件的相应属性方法
     wheel.setWheelAdapter(new ArrayWheelAdapter(context)); // 文本数据源
        wheel.setSkin(WheelView.Skin.Holo); // common皮肤
        wheel.setWheelData(datas);  // 数据集合
        wheel.setOnWheelItemSelectedListener(new WheelView.OnWheelItemSelectedListener() {
            @Override
            public void onItemSelected(int position, Object o) {
                currentPosition = wheel.getCurrentPosition();
            }
        });
        cancel.setOnClickListener(new View.OnClickListener() {
            @Override
            public void onClick(View v) {
                dismiss();
            }
        });
        submit.setOnClickListener(itemsOnClick);
⑤、设置PopupWindow的自身属性方法
     this.setContentView(mMenuView);
        this.setWidth(ViewGroup.LayoutParams.MATCH_PARENT);
        this.setHeight(ViewGroup.LayoutParams.WRAP_CONTENT);
        ColorDrawable dw = new ColorDrawable(0x000000);
        this.setBackgroundDrawable(dw);
        this.setFocusable(true);
        //点击popupWindow之外的部分  关闭popupWindow
        mMenuView.setOnTouchListener(new View.OnTouchListener() {
            public boolean onTouch(View v, MotionEvent event) {
                int height = mMenuView.findViewById(R.id.popup_one_item_ly).getTop();
                int y = (int) event.getY();
                if (event.getAction() == MotionEvent.ACTION_UP){
                    if(y<height){
                        dismiss();
                    }
                }
                return true;
            }
        });
到这里构造方法完成了,然后我们需要写一个方法,让new OneItemPopupWindow(…)的Activity能获取到数据源选中位置的数据
   public int getCurrentPosition() { // 获取到wheelview当前选中的位置
        return currentPosition;
    }

    public ArrayList<String> getDatas() { //获取wheelview的数据源
        return datas;
    }
自定义 OneItemPopupWindow 的全部代码
import android.content.Context;
import android.graphics.drawable.ColorDrawable;
import android.view.LayoutInflater;
import android.view.MotionEvent;
import android.view.View;
import android.view.ViewGroup;
import android.widget.Button;
import android.widget.PopupWindow;
import android.widget.TextView;

import com.maiji.magkarepatient.R;
import com.wx.wheelview.adapter.ArrayWheelAdapter;
import com.wx.wheelview.widget.WheelView;

import java.util.ArrayList;

/**
 * Created by 徐启鑫 on 2016/11/15.
 * 一个选项的popupwindow
 */
public class OneItemPopupWindow extends PopupWindow{

    private View mMenuView; //popupwindow布局生成的View
    private TextView title; //标题
    private Button cancel;  //取消按钮
    private Button submit;  //确定按钮
    private WheelView wheel;  //wheelview控件
    private int currentPosition;  // 当然的wheelview选择的item的位置
    ArrayList<String> datas = new ArrayList<>();    // wheelview的数据源

    public int getCurrentPosition() {
        return currentPosition;
    }

    public ArrayList<String> getDatas() {
        return datas;
    }

    public OneItemPopupWindow(Context context, View.OnClickListener itemsOnClick, String t, ArrayList<String> datas) {
        super(context);

        LayoutInflater inflater = (LayoutInflater) context
                .getSystemService(Context.LAYOUT_INFLATER_SERVICE);
        mMenuView = inflater.inflate(R.layout.popup_one_item, null);
        cancel = (Button) mMenuView.findViewById(R.id.popup_one_item_btn_cancel);
        submit = (Button) mMenuView.findViewById(R.id.popup_one_item_btn_submit);
        wheel = (WheelView) mMenuView.findViewById(R.id.popup_one_item_wheel);
        title = (TextView) mMenuView.findViewById(R.id.popup_one_item_txt_title);

        this.datas = datas; //根据参数初始化数据源
        title.setText(t);   //设置标题

        wheel.setWheelAdapter(new ArrayWheelAdapter(context)); // 文本数据源
        wheel.setSkin(WheelView.Skin.Holo); // common皮肤

        wheel.setWheelData(datas);  // 数据集合
        wheel.setOnWheelItemSelectedListener(new WheelView.OnWheelItemSelectedListener() {
            @Override
            public void onItemSelected(int position, Object o) {
                currentPosition = wheel.getCurrentPosition();
            }
        });
        cancel.setOnClickListener(new View.OnClickListener() {
            @Override
            public void onClick(View v) {
                dismiss();
            }
        });
        submit.setOnClickListener(itemsOnClick);

        this.setContentView(mMenuView);
        this.setWidth(ViewGroup.LayoutParams.MATCH_PARENT);
        this.setHeight(ViewGroup.LayoutParams.WRAP_CONTENT);
        ColorDrawable dw = new ColorDrawable(0x000000);
        this.setBackgroundDrawable(dw);
        this.setFocusable(true);
        //点击popupWindow之外的部分  关闭popupWindow
        mMenuView.setOnTouchListener(new View.OnTouchListener() {
            public boolean onTouch(View v, MotionEvent event) {
                int height = mMenuView.findViewById(R.id.popup_one_item_ly).getTop();
                int y = (int) event.getY();
                if (event.getAction() == MotionEvent.ACTION_UP){
                    if(y<height){
                        dismiss();
                    }
                }
                return true;
            }
        });

    }
}
OneItemPopupWindow
至此 封装好了一个 有一个筛选条件的 自定义PopupWindow
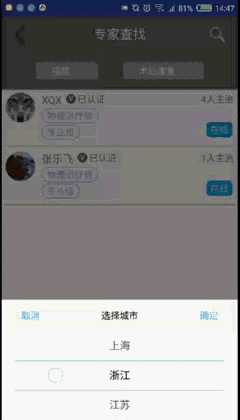
4、OneItemPopupWindow 的使用
          ArrayList<String> condition = new ArrayList<>();  //构建数据源
                condition.add("北京");
                condition.add("上海");
                condition.add("浙江");
                condition.add("江苏");
                condition.add("山东");
                condition.add("山西");
                condition.add("广东");
                condition.add("福建");
                popup = new OneItemPopupWindow(this, selectItemsOnClick,"选择城市",condition);  //创建自定义的popupwindow对象
                // 设置popupWindow显示的位置
                // 此时设在界面底部并且水平居中
                popup.showAtLocation(find_expert_ly,
                        Gravity.BOTTOM| Gravity.CENTER_HORIZONTAL, 0, 0);
                // 当popupWindow 出现的时候 屏幕的透明度  ,设为0.5 即半透明 灰色效果
                backgroundAlpha(0.5f);
                // 设置popupWindow取消的点击事件,即popupWindow消失后,屏幕的透明度,全透明,就回复原状态
                popup.setOnDismissListener(new PopupWindow.OnDismissListener() {
                    @Override
                    public void onDismiss() {
                        backgroundAlpha(1f);
                    }
                });
5、监听事件的接口回调,也是写在创建 OneItemPopupWindow 对象的Activity中
private View.OnClickListener selectItemsOnClick = new View.OnClickListener() {
        public void onClick(View v) {
            switch (v.getId()) {
                //根据popupWindow 布局文件中的id 来执行相应的点击事件
                case R.id.popup_one_item_btn_submit:
                    String s = popup.getDatas().get(popup.getCurrentPosition());
                    find_expert_btn_location.setText(s);
                    break;
                // ....
            }
            //每次点击popupWindow中的任意按钮,记得关闭此popupWindow,
            popup.dismiss();
        }
    };
6、界面半透明效果方法
  /**
     * 设置添加屏幕的背景透明度
     * @param bgAlpha
     */
    public void backgroundAlpha(float bgAlpha)
    {
        WindowManager.LayoutParams lp = getWindow().getAttributes();
        lp.alpha = bgAlpha; //0.0-1.0
        getWindow().setAttributes(lp);
    }
效果图:
————————————————————————————————————————————
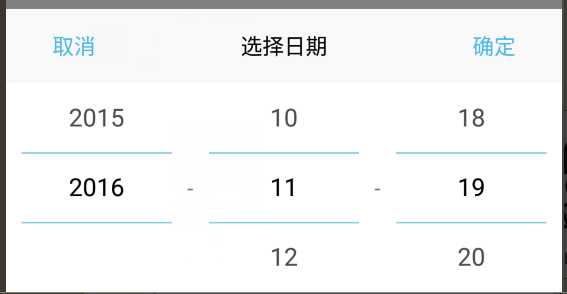
三、日期选择的自定义DatePopupWindow
需求同上,一个标题,一个确定按钮 ,一个时间按钮
三个水平排列的wheelview选择空间
效果图:
代码实现:
1、 和 “单个条件选择的自定义PopupWindow” 实现类似,只是多了两个wheelview ,代码直接贴在最下面了
———————————————————————————————————————
完整代码:
一、文字编辑对话框
布局文件:
<?xml version="1.0" encoding="utf-8"?>
<LinearLayout xmlns:android="http://schemas.android.com/apk/res/android"
    android:orientation="vertical"
    android:layout_width="match_parent"
    android:layout_height="wrap_content"
    android:background="@color/grey_5"
    android:id="@+id/popup_edit_info_ly"
    >
    <!--标题-->
    <TextView
        android:id="@+id/popup_edit_info_txt_title"
        android:layout_width="match_parent"
        android:layout_height="wrap_content"
        android:text="title"
        android:gravity="center_horizontal"
        android:padding="@dimen/dp_6"
        android:textColor="@color/black"
        />

    <!--编辑框-->
    <EditText
        android:id="@+id/popup_edit_info_edit_content"
        android:layout_width="match_parent"
        android:layout_height="wrap_content"
        android:layout_marginLeft="@dimen/dp_6"
        android:layout_marginRight="@dimen/dp_6"
        android:background="@drawable/bg_popup_edit"
        android:padding="@dimen/dp_6"
        >
    </EditText>

    <RelativeLayout
        android:layout_width="match_parent"
        android:layout_height="wrap_content"
        android:padding="@dimen/dp_6"
        >
        <!--提示文字-->
        <TextView
            android:id="@+id/popup_edit_info_txt_tip"
            android:layout_width="wrap_content"
            android:layout_height="wrap_content"
            android:textSize="@dimen/txt_10"
            android:text="剩余可输入个数:"
            android:layout_centerVertical="true"
            android:layout_marginLeft="@dimen/dp_6"
            />

        <!--确定按钮,这里用TextView ,当然也可以用Button ImageButton-->
        <TextView
            android:id="@+id/popup_edit_info_btn_confirm"
            android:layout_width="wrap_content"
            android:layout_height="wrap_content"
            android:text="@string/confirm"
            android:background="@drawable/bg_btn_blue"
            android:padding="@dimen/dp_4"
            android:textColor="@color/white"
            android:layout_alignParentRight="true"
            />

        <!--取消按钮-->
        <TextView
            android:id="@+id/popup_edit_info_btn_cancel"
            android:layout_width="wrap_content"
            android:layout_height="wrap_content"
            android:text="@string/cancel"
            android:background="@drawable/bg_btn_grey"
            android:padding="@dimen/dp_4"
            android:textColor="@color/white"
            android:layout_toLeftOf="@id/popup_edit_info_btn_confirm"
            android:layout_marginRight="@dimen/dp_10"
            />
    </RelativeLayout>

</LinearLayout>
dialog_edit_txt
drawable文件: 用于设置EditText圆角白色背景
<?xml version="1.0" encoding="utf-8"?>
<shape xmlns:android="http://schemas.android.com/apk/res/android">
    <!--popupwindow 编辑框的背景颜色 用于popup_edit_info.xml布局文件-->
    <solid android:color="@color/white" ></solid>
    <corners android:radius="@dimen/dp_6"></corners>
    <stroke android:width="0.5dp" android:color="@color/grey_1"></stroke>
</shape>
bg_popup_edit
java文件:
showEditDialog("请填写姓名",true,10,edit_info_txt_name);

    private void showEditDialog(String title , boolean isSingleLine , final int maxSize, final TextView textview) {

        View view = LayoutInflater.from(this).inflate(R.layout.dialog_edit_txt, null);
        TextView popup_edit_info_txt_title;//标题
        final TextView popup_edit_info_txt_tip;       //编辑框剩余个数提示
        TextView popup_edit_info_btn_cancel;    //取消按钮
        TextView popup_edit_info_btn_confirm;    //确定按钮
        final EditText popup_edit_info_edit_content;   //编辑框
        popup_edit_info_txt_title = (TextView) view.findViewById(R.id.popup_edit_info_txt_title);
        popup_edit_info_txt_tip = (TextView) view.findViewById(R.id.popup_edit_info_txt_tip);
        popup_edit_info_btn_cancel = (TextView) view.findViewById(R.id.popup_edit_info_btn_cancel);
        popup_edit_info_btn_confirm = (TextView) view.findViewById(R.id.popup_edit_info_btn_confirm);
        popup_edit_info_edit_content = (EditText) view.findViewById(R.id.popup_edit_info_edit_content);
        popup_edit_info_edit_content.setText(textview.getText().toString());
        popup_edit_info_edit_content.setSingleLine(isSingleLine);
        popup_edit_info_edit_content.setFilters(new InputFilter[]{new InputFilter.LengthFilter(maxSize)});
        popup_edit_info_txt_tip.setText("剩余可输入个数:"+(maxSize-textview.getText().toString().length()));
        final AlertDialog dialog = new AlertDialog.Builder(this)
                .setView(view)
                .create();
        popup_edit_info_txt_title.setText(title);

        popup_edit_info_edit_content.addTextChangedListener(new TextWatcher() {
            @Override
            public void beforeTextChanged(CharSequence s, int start, int count, int after) {
            }
            @Override
            public void onTextChanged(CharSequence s, int start, int before, int count) {
            }
            @Override
            public void afterTextChanged(Editable s) {
                int length = s.length();
                popup_edit_info_txt_tip.setText("剩余可输入个数:"+(maxSize-length));
            }
        });
        popup_edit_info_btn_cancel.setOnClickListener(new View.OnClickListener() {
            @Override
            public void onClick(View v) {
                dialog.dismiss();
            }
        });
        popup_edit_info_btn_confirm.setOnClickListener(new View.OnClickListener() {
            @Override
            public void onClick(View v) {
                textview.setText(popup_edit_info_edit_content.getText().toString());
                dialog.dismiss();
            }
        });
        dialog.setCanceledOnTouchOutside(false);// 设置点击屏幕Dialog不消失
        dialog.show();

    }
java
效果图:

二、单个条件选择PopupWindow
布局文件:
<?xml version="1.0" encoding="utf-8"?>
<LinearLayout xmlns:android="http://schemas.android.com/apk/res/android"
    android:orientation="vertical"
    android:layout_width="match_parent"
    android:layout_height="wrap_content"
    android:id="@+id/popup_one_item_ly"
    android:background="@color/white"
    >

    <RelativeLayout
        android:layout_width="match_parent"
        android:layout_height="wrap_content"
        android:background="@color/grey_6"
        >
        <Button
            android:id="@+id/popup_one_item_btn_cancel"
            android:layout_width="wrap_content"
            android:layout_height="wrap_content"
            android:background="#0000"
            android:text="取消"

            android:textColor="@color/blue_main"
            />

        <Button
            android:id="@+id/popup_one_item_btn_submit"
            android:layout_width="wrap_content"
            android:layout_height="wrap_content"
            android:text="确定"
            android:layout_alignParentRight="true"
            android:background="#0000"
            android:textColor="@color/blue_main"
            ></Button>

        <TextView
            android:id="@+id/popup_one_item_txt_title"
            android:layout_width="wrap_content"
            android:layout_height="wrap_content"
            android:textColor="@color/black"
            android:layout_centerInParent="true"
            />
    </RelativeLayout>

    <com.wx.wheelview.widget.WheelView
        android:id="@+id/popup_one_item_wheel"
        android:layout_width="match_parent"
        android:layout_height="wrap_content"
        android:layout_gravity="center_horizontal"
        android:layout_marginLeft="@dimen/dp_20"
        android:layout_marginRight="@dimen/dp_20"
        >

    </com.wx.wheelview.widget.WheelView>

</LinearLayout>
popup_one_item
java文件:
import android.content.Context;
import android.graphics.drawable.ColorDrawable;
import android.view.LayoutInflater;
import android.view.MotionEvent;
import android.view.View;
import android.view.ViewGroup;
import android.widget.Button;
import android.widget.PopupWindow;
import android.widget.TextView;

import com.maiji.magkarepatient.R;
import com.wx.wheelview.adapter.ArrayWheelAdapter;
import com.wx.wheelview.widget.WheelView;

import java.util.ArrayList;

/**
 * Created by 徐启鑫 on 2016/11/15.
 * 一个选项的popupwindow
 */
public class OneItemPopupWindow extends PopupWindow{

    private View mMenuView; //popupwindow布局生成的View
    private TextView title; //标题
    private Button cancel;  //取消按钮
    private Button submit;  //确定按钮
    private WheelView wheel;  //wheelview控件
    private int currentPosition;  // 当然的wheelview选择的item的位置
    ArrayList<String> datas = new ArrayList<>();    // wheelview的数据源

    public int getCurrentPosition() {
        return currentPosition;
    }

    public ArrayList<String> getDatas() {
        return datas;
    }

    public OneItemPopupWindow(Context context, View.OnClickListener itemsOnClick, String t, ArrayList<String> datas) {
        super(context);

        LayoutInflater inflater = (LayoutInflater) context
                .getSystemService(Context.LAYOUT_INFLATER_SERVICE);
        mMenuView = inflater.inflate(R.layout.popup_one_item, null);
        cancel = (Button) mMenuView.findViewById(R.id.popup_one_item_btn_cancel);
        submit = (Button) mMenuView.findViewById(R.id.popup_one_item_btn_submit);
        wheel = (WheelView) mMenuView.findViewById(R.id.popup_one_item_wheel);
        title = (TextView) mMenuView.findViewById(R.id.popup_one_item_txt_title);

        this.datas = datas; //根据参数初始化数据源
        title.setText(t);   //设置标题

        wheel.setWheelAdapter(new ArrayWheelAdapter(context)); // 文本数据源
        wheel.setSkin(WheelView.Skin.Holo); // common皮肤

        wheel.setWheelData(datas);  // 数据集合
        wheel.setOnWheelItemSelectedListener(new WheelView.OnWheelItemSelectedListener() {
            @Override
            public void onItemSelected(int position, Object o) {
                currentPosition = wheel.getCurrentPosition();
            }
        });
        cancel.setOnClickListener(new View.OnClickListener() {
            @Override
            public void onClick(View v) {
                dismiss();
            }
        });
        submit.setOnClickListener(itemsOnClick);

        this.setContentView(mMenuView);
        this.setWidth(ViewGroup.LayoutParams.MATCH_PARENT);
        this.setHeight(ViewGroup.LayoutParams.WRAP_CONTENT);
        ColorDrawable dw = new ColorDrawable(0x000000);
        this.setBackgroundDrawable(dw);
        this.setFocusable(true);
        //点击popupWindow之外的部分  关闭popupWindow
        mMenuView.setOnTouchListener(new View.OnTouchListener() {
            public boolean onTouch(View v, MotionEvent event) {
                int height = mMenuView.findViewById(R.id.popup_one_item_ly).getTop();
                int y = (int) event.getY();
                if (event.getAction() == MotionEvent.ACTION_UP){
                    if(y<height){
                        dismiss();
                    }
                }
                return true;
            }
        });

    }
}
OneItemPopupWindow
color资源:
<color name="grey_6">#faf9f9</color>
<color name="blue_main">#4ab8e9</color>
使用代码:
点击事件接口回调:
private View.OnClickListener selectItemsOnClick = new View.OnClickListener() {
        public void onClick(View v) {
            switch (v.getId()) {
                //根据popupWindow 布局文件中的id 来执行相应的点击事件
                case R.id.popup_one_item_btn_submit:
                    String s = popup.getDatas().get(popup.getCurrentPosition());
                    find_expert_btn_location.setText(s);
                    break;
                // ....
            }
            //每次点击popupWindow中的任意按钮,记得关闭此popupWindow,
            popup.dismiss();
        }
    };
onclicklistener
弹出PopupWindow操作
ArrayList<String> condition = new ArrayList<>();
                condition.add("北京");
                condition.add("上海");
                condition.add("浙江");
                condition.add("江苏");
                condition.add("山东");
                condition.add("山西");
                condition.add("广东");
                condition.add("福建");
                popup = new OneItemPopupWindow(this, selectItemsOnClick,"选择城市",condition);
                // 设置popupWindow显示的位置
                // 此时设在界面底部并且水平居中
                popup.showAtLocation(find_expert_ly,
                        Gravity.BOTTOM| Gravity.CENTER_HORIZONTAL, 0, 0);
                // 当popupWindow 出现的时候 屏幕的透明度  ,设为0.5 即半透明 灰色效果
                backgroundAlpha(0.5f);
                // 设置popupWindow取消的点击事件,即popupWindow消失后,屏幕的透明度,全透明,就回复原状态
                popup.setOnDismissListener(new PopupWindow.OnDismissListener() {
                    @Override
                    public void onDismiss() {
                        backgroundAlpha(1f);
                    }
                });
popupwindow
效果图:

三、日期选择的自定义DatePopupWindow
1、布局文件:
<?xml version="1.0" encoding="utf-8"?>
<LinearLayout xmlns:android="http://schemas.android.com/apk/res/android"
    android:orientation="vertical"
    android:layout_width="match_parent"
    android:layout_height="wrap_content"
    android:id="@+id/popup_data_ly"
    android:background="@color/white"
    >

    <RelativeLayout
        android:layout_width="match_parent"
        android:layout_height="wrap_content"
        android:background="@color/grey_6"
        >
        <Button
            android:id="@+id/popup_data_cancel"
            android:layout_width="wrap_content"
            android:layout_height="wrap_content"
            android:background="#0000"
            android:text="取消"

            android:textColor="@color/blue_main"
            />

        <Button
            android:id="@+id/popup_data_submit"
            android:layout_width="wrap_content"
            android:layout_height="wrap_content"
            android:text="确定"
            android:layout_alignParentRight="true"
            android:background="#0000"
            android:textColor="@color/blue_main"
            ></Button>

        <TextView
            android:id="@+id/popup_data_title"
            android:layout_width="wrap_content"
            android:layout_height="wrap_content"
            android:textColor="@color/black"
            android:layout_centerInParent="true"
            />
    </RelativeLayout>

    <LinearLayout
        android:layout_width="match_parent"
        android:layout_height="wrap_content"
        android:orientation="horizontal"
        >
        <com.wx.wheelview.widget.WheelView
            android:id="@+id/popup_data_year"
            android:layout_width="0dp"
            android:layout_weight="1"
            android:layout_height="wrap_content"
            android:layout_marginLeft="@dimen/dp_10"
            >
        </com.wx.wheelview.widget.WheelView>
        <TextView
            android:layout_width="wrap_content"
            android:layout_height="wrap_content"
            android:text="-"
            android:layout_gravity="center_vertical"
            android:layout_margin="@dimen/dp_10"
            />
        <com.wx.wheelview.widget.WheelView
            android:id="@+id/popup_data_month"
            android:layout_width="0dp"
            android:layout_weight="1"
            android:layout_height="wrap_content"
            >
        </com.wx.wheelview.widget.WheelView>
        <TextView
            android:layout_width="wrap_content"
            android:layout_height="wrap_content"
            android:text="-"
            android:layout_gravity="center_vertical"
            android:layout_margin="@dimen/dp_10"
            />
        <com.wx.wheelview.widget.WheelView
            android:id="@+id/popup_data_day"
            android:layout_width="0dp"
            android:layout_weight="1"
            android:layout_height="wrap_content"
            android:layout_marginRight="@dimen/dp_10"
            >
        </com.wx.wheelview.widget.WheelView>

    </LinearLayout>

</LinearLayout>
popup_date
2、DatePopupWindow.java
import android.content.Context;
import android.graphics.drawable.ColorDrawable;
import android.view.LayoutInflater;
import android.view.MotionEvent;
import android.view.View;
import android.view.ViewGroup;
import android.widget.Button;
import android.widget.PopupWindow;
import android.widget.TextView;

import com.maiji.magkarepatient.R;
import com.wx.wheelview.adapter.ArrayWheelAdapter;
import com.wx.wheelview.widget.WheelView;

import java.util.ArrayList;
import java.util.Calendar;

/**
 */
public class DatePopupWindow extends PopupWindow{
    private View mMenuView; //popupwindow布局生成的View
    private TextView title; //标题
    private Button cancel;  //取消按钮
    private Button submit;  //确定按钮
    private WheelView<String> year;
    private WheelView<String> month;
    private WheelView<String> day;
    private ArrayList<String> date_y;
    private ArrayList<String> date_m;
    private ArrayList<String> date_d;
    private int currentYear;
    private int currentMonth;
    private int currentDay;


    public DatePopupWindow(Context context, View.OnClickListener itemsOnClick, String t , final int startYear) {
        super(context);
        LayoutInflater inflater = (LayoutInflater) context
                .getSystemService(Context.LAYOUT_INFLATER_SERVICE);
        mMenuView = inflater.inflate(R.layout.popup_date, null);

        title = (TextView) mMenuView.findViewById(R.id.popup_data_title);
        cancel = (Button) mMenuView.findViewById(R.id.popup_data_cancel);
        submit = (Button) mMenuView.findViewById(R.id.popup_data_submit);

        year = (WheelView<String>) mMenuView.findViewById(R.id.popup_data_year);
        month = (WheelView<String>) mMenuView.findViewById(R.id.popup_data_month);
        day = (WheelView<String>) mMenuView.findViewById(R.id.popup_data_day);

        initDate(startYear);
        title.setText(t);   //设置标题
        year.setWheelAdapter(new ArrayWheelAdapter(context)); // 文本数据源
        year.setSkin(WheelView.Skin.Holo); // common皮肤
        month.setWheelAdapter(new ArrayWheelAdapter(context)); // 文本数据源
        month.setSkin(WheelView.Skin.Holo); // common皮肤
        day.setWheelAdapter(new ArrayWheelAdapter(context)); // 文本数据源
        day.setSkin(WheelView.Skin.Holo); // common皮肤


        year.setWheelData(date_y);  // 数据集合
        year.setSelection(currentYear-startYear);
        year.setOnWheelItemSelectedListener(new WheelView.OnWheelItemSelectedListener() {
            @Override
            public void onItemSelected(int position, Object o) {
                currentYear = year.getCurrentPosition()+startYear;
            }
        });
        month.setWheelData(date_m);  // 数据集合
        month.setSelection(currentMonth-1);
        month.setOnWheelItemSelectedListener(new WheelView.OnWheelItemSelectedListener() {
            @Override
            public void onItemSelected(int position, Object o) {
                currentMonth = month.getCurrentPosition()+1;
            }
        });
        day.setWheelData(date_d);  // 数据集合
        day.setSelection(currentDay-1);
        day.setOnWheelItemSelectedListener(new WheelView.OnWheelItemSelectedListener() {
            @Override
            public void onItemSelected(int position, Object o) {
                currentDay =  day.getCurrentPosition()+1;
            }
        });


        cancel.setOnClickListener(new View.OnClickListener() {
            @Override
            public void onClick(View v) {
                dismiss();
            }
        });
        submit.setOnClickListener(itemsOnClick);


        this.setContentView(mMenuView);
        this.setWidth(ViewGroup.LayoutParams.MATCH_PARENT);
        this.setHeight(ViewGroup.LayoutParams.WRAP_CONTENT);
        ColorDrawable dw = new ColorDrawable(0x000000);
        this.setBackgroundDrawable(dw);
        this.setFocusable(true);
        //点击popupWindow之外的部分  关闭popupWindow
        mMenuView.setOnTouchListener(new View.OnTouchListener() {
            public boolean onTouch(View v, MotionEvent event) {
                int height = mMenuView.findViewById(R.id.popup_data_ly).getTop();
                int y = (int) event.getY();
                if (event.getAction() == MotionEvent.ACTION_UP){
                    if(y<height){
                        dismiss();
                    }
                }
                return true;
            }
        });
    }

    public int getCurrentYear() {
        return currentYear;
    }

    public int getCurrentMonth() {
        return currentMonth;
    }

    public int getCurrentDay() {
        return currentDay;
    }

    private void initDate(int startYear) {
        Calendar calendar = Calendar.getInstance();
        int nowYear = calendar.get(Calendar.YEAR);
        int nowMonth = calendar.get(Calendar.MONTH)+1;
        int nowDay = calendar.get(Calendar.DAY_OF_MONTH);
        currentYear = nowYear;
        currentMonth = nowMonth;
        currentDay = nowDay;
        date_y = new ArrayList<>();
        date_m = new ArrayList<>();
        date_d = new ArrayList<>();
        for (int i = startYear; i <= nowYear; i++) {
            date_y.add(i+"");
        }
        for (int i = 1; i <= 12; i++) {
            date_m.add(i+"");
        }
        for (int i = 1; i <= 31; i++) {
            date_d.add(i+"");
        }
    }
}
DatePopupWindow
3、使用代码:
private void showDatePopupWindow() {

        popup = new DatePopupWindow(this, selectItemsOnClick,"选择日期",2015);  //创建自定义的popupwindow对象
        // 设置popupWindow显示的位置
        // 此时设在界面底部并且水平居中
        popup.showAtLocation(feedback_list_ly,
                Gravity.BOTTOM| Gravity.CENTER_HORIZONTAL, 0, 0);
        // 当popupWindow 出现的时候 屏幕的透明度  ,设为0.5 即半透明 灰色效果
        backgroundAlpha(0.5f);
        // 设置popupWindow取消的点击事件,即popupWindow消失后,屏幕的透明度,全透明,就回复原状态
        popup.setOnDismissListener(new PopupWindow.OnDismissListener() {
            @Override
            public void onDismiss() {
                backgroundAlpha(1f);
            }
        });
    }

    /**
     * 设置添加屏幕的背景透明度
     * @param bgAlpha
     */
    public void backgroundAlpha(float bgAlpha)
    {
        WindowManager.LayoutParams lp = getWindow().getAttributes();
        lp.alpha = bgAlpha; //0.0-1.0
        getWindow().setAttributes(lp);
    }
    private View.OnClickListener selectItemsOnClick = new View.OnClickListener() {
        public void onClick(View v) {
            switch (v.getId()) {
                //根据popupWindow 布局文件中的id 来执行相应的点击事件
                case R.id.popup_data_submit:
                    feedback_list_plan_data.setText(popup.getCurrentYear()+"-"+popup.getCurrentMonth()+"-"+popup.getCurrentDay());
                    break;
                // ....
            }
            //每次点击popupWindow中的任意按钮,记得关闭此popupWindow,
            popup.dismiss();
        }
    };
useCode
效果图: