原文:
ASP.NET Core 2.2 : 十六.扒一扒2.2版更新的新路由方案
ASP.NET Core 从2.2版本开始,采用了一个新的名为Endpoint的路由方案,与原来的方案在使用上差别不大,但从内部运行方式上来说,差别还是很大的。上一篇详细介绍了原版路由方案的运行机制,本文仍然通过一幅图来了解一下新版的运行机制,最后再总结一下二者的异同点。(ASP.NET Core 系列目录)
一、概述
此方案从2.2版本开始,被称作终结点路由(下文以“新版”称呼),它是默认开启的,若想采用原来的方案(<=2.1,下文以原版称呼),可以在AddMvc的时候进行设置
services.AddMvc(option=>option.EnableEndpointRouting = false).SetCompatibilityVersion(CompatibilityVersion.Version_2_2);
EnableEndpointRouting 默认为true,也就是启用新的Endpoint方案,设置为false则采用旧版(<=2.1)的路由方案。
在配置方法上来说,系统仍然采用在Startup中的use.Mvc()中配置,而实际上内部的处理中间件已由原来的RouterMiddleware改为EndpointMiddleware和EndpointRoutingMiddleware两个中间件处理,下面依旧通过一幅图来详细看一下:
二、流程及解析

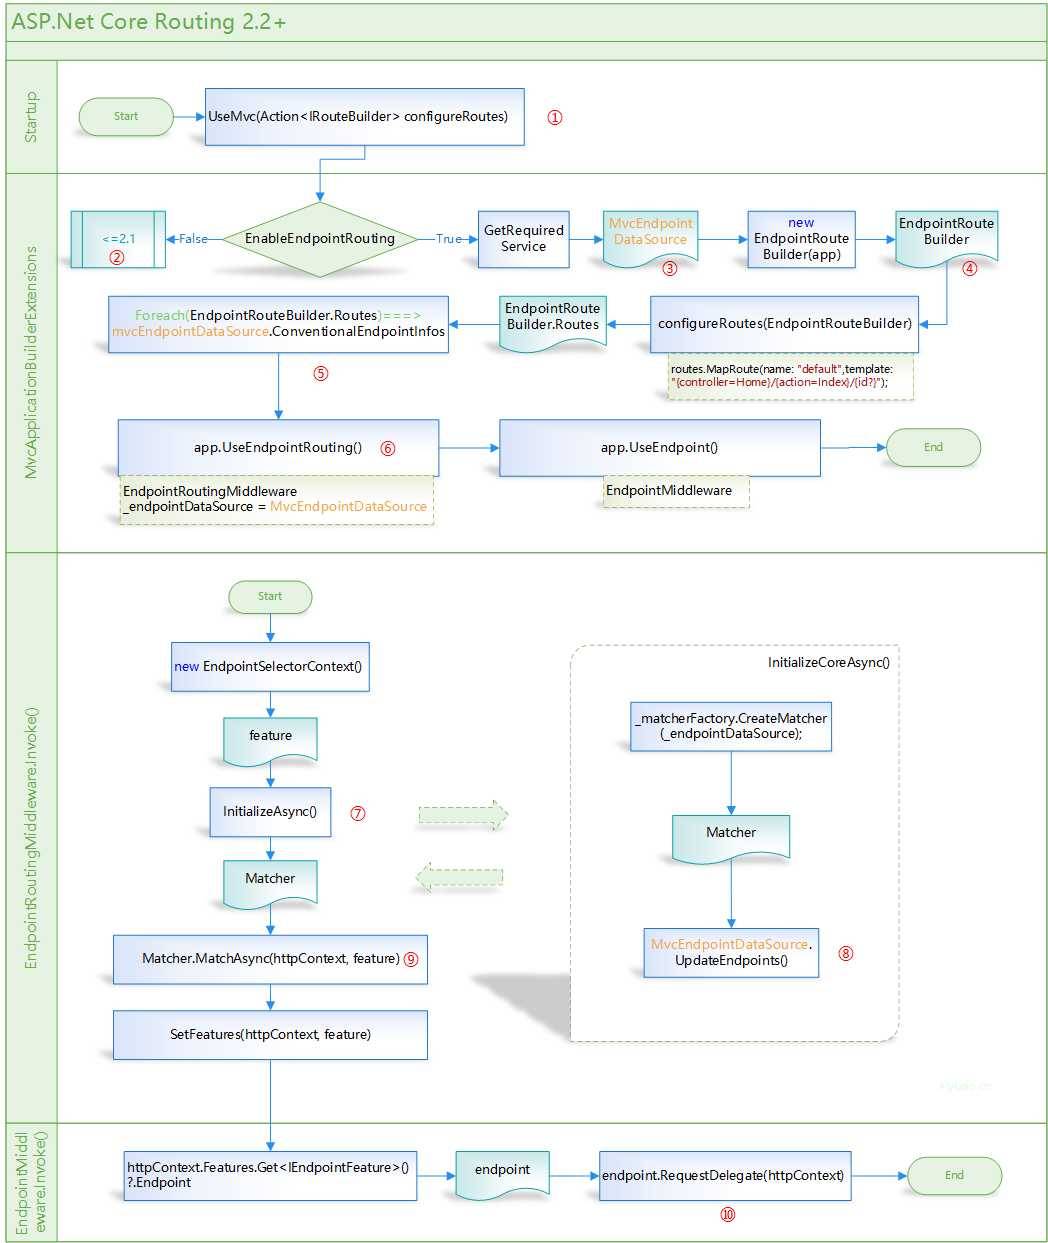
为了方便查看,依然对几个“重点对象”做了颜色标识(点击图片可以看大图):
1. 路由的初始化配置(图的前两个泳道)
-
① 一切依然是从Startup开始,而且和旧版一样,是通过UseMvc方法进行配置,传入routes.MapRoute(…)这样的一个或多个配置, 不做赘述。
-
下面着重说一下后面的流程,看一下MvcApplicationBuilderExtensions中的UseMvc方法:
 1 public static IApplicationBuilder UseMvc(
 2     this IApplicationBuilder app,
 3     Action<IRouteBuilder> configureRoutes)
 4 {
 5 //此处各种验证,略。。
 6     var options = app.ApplicationServices.GetRequiredService<IOptions<MvcOptions>>();
 7     if (options.Value.EnableEndpointRouting)
 8     {
 9         var mvcEndpointDataSource = app.ApplicationServices
10             .GetRequiredService<IEnumerable<EndpointDataSource>>()
11             .OfType<MvcEndpointDataSource>()
12             .First();
13         var parameterPolicyFactory = app.ApplicationServices
14             .GetRequiredService<ParameterPolicyFactory>();
15
16         var endpointRouteBuilder = new EndpointRouteBuilder(app);
17
18         configureRoutes(endpointRouteBuilder);
19
20         foreach (var router in endpointRouteBuilder.Routes)
21         {
22             // Only accept Microsoft.AspNetCore.Routing.Route when converting to endpoint
23             // Sub-types could have additional customization that we can‘t knowingly convert
24             if (router is Route route && router.GetType() == typeof(Route))
25             {
26                 var endpointInfo = new MvcEndpointInfo(
27                     route.Name,
28                     route.RouteTemplate,
29                     route.Defaults,
30                     route.Constraints.ToDictionary(kvp => kvp.Key, kvp => (object)kvp.Value),
31                     route.DataTokens,
32                     parameterPolicyFactory);
33              mvcEndpointDataSource.ConventionalEndpointInfos.Add(endpointInfo);
34             }
35             else
36             {
37                 throw new InvalidOperationException($"Cannot use ‘{router.GetType().FullName}‘ with Endpoint Routing.");
38             }
39         }
40         if (!app.Properties.TryGetValue(EndpointRoutingRegisteredKey, out _))
41         {
42             // Matching middleware has not been registered yet
43             // For back-compat register middleware so an endpoint is matched and then immediately used
44             app.UseEndpointRouting();
45         }
46         return app.UseEndpoint();
47     }
48     else
49     {
50        //旧版路由方案
51     }
52 }
② 第6行,这里会获取并判断设置的EnableEndpointRouting的值,若为false,则采用旧版路由,详见上一篇文章;该值默认为true,即采用新版路由。
③ 对应第9行,MvcEndpointDataSource在新版路由中是个非法非常重要的角色,在启动初始化阶段,它完成了路由表存储和转换,此处先用颜色重点标记一下,大家记住它,在后面的流程中详细介绍。
④ 对应第16行,同旧版的RouteBuilder一样,这里会new一个 endpointRouteBuilder,二者都是一个IRouteBuilder,所以也同样调用configureRoutes(endpointRouteBuilder)方法(也就是startup中的配置)获取了一个Route的集合(IList<IRouter>)赋值给endpointRouteBuilder.Routes,这里有个特别该注意的地方if (router is Route route && router.GetType() == typeof(Route)) ,也就是这里只接受route类型,终结点路由系统不支持基于 IRouter的可扩展性,包括从 Route继承。
⑤ 对应第20行,这里对刚获取到的endpointRouteBuilder.Routes进行遍历,转换成了一个MvcEndpointInfo的集和,赋值给mvcEndpointDataSource.ConventionalEndpointInfos。
⑥ 之后就是向管道塞中间件了,这里的处理中间件由原来的RouterMiddleware改为EndpointMiddleware和EndpointRoutingMiddleware。
2.请求的处理(图的后两个泳道)
请求的处理大部分功能在中间件EndpointRoutingMiddleware,他有个重要的属性_endpointDataSource保存了上文中初始化阶段生成的MvcEndpointDataSource,而中间件EndpointMiddleware的功能比较简单,主要是在EndpointRoutingMiddleware筛选出endpoint之后,调用该endpoint的endpoint.RequestDelegate(httpContext)进行请求处理。
⑦ InitializeAsync()方法主要是用于调用InitializeCoreAsync()创建一个matcher,而通过这个方法的代码可以看出它只是在第一次请求的时候执行一次。
private Task<Matcher> InitializeAsync()
{
var initializationTask = _initializationTask;
if (initializationTask != null)
{
return initializationTask;
}

return InitializeCoreAsync();
}
⑧ MvcEndpointDataSource一个重要的方法UpdateEndpoints(),作用是读取所有action,并将这个action列表与它的ConventionalEndpointInfos列表(见⑤)进行匹配,最终生成一个新的列表。如下图,我们默认情况下只配置了一个”{controller=Home}/{action=Index}/{id?}”这样的路由,默认的HomeController有三个action,添加了一个名为FlyLoloController的controller并添加了一个带属性路由的action,最终生成了7个Endpoint,这有点像路由与action的“乘积”。当然,这里只是用默认程序举了个简单的例子,实际项目中可能会有更多的路由模板注册、会有更多的Controller和Action以及属性路由等。

具体代码如下:


 1         private void UpdateEndpoints()
 2         {
 3             lock (_lock)
 4             {
 5                 var endpoints = new List<Endpoint>();
 6                 StringBuilder patternStringBuilder = null;
 7
 8                 foreach (var action in _actions.ActionDescriptors.Items)
 9                 {
10                     if (action.AttributeRouteInfo == null)
11                     {
12                         // In traditional conventional routing setup, the routes defined by a user have a static order
13                         // defined by how they are added into the list. We would like to maintain the same order when building
14                         // up the endpoints too.
15                         //
16                         // Start with an order of ‘1‘ for conventional routes as attribute routes have a default order of ‘0‘.
17                         // This is for scenarios dealing with migrating existing Router based code to Endpoint Routing world.
18                         var conventionalRouteOrder = 1;
19
20                         // Check each of the conventional patterns to see if the action would be reachable
21                         // If the action and pattern are compatible then create an endpoint with the
22                         // area/controller/action parameter parts replaced with literals
23                         //
24                         // e.g. {controller}/{action} with HomeController.Index and HomeController.Login
25                         // would result in endpoints:
26                         // - Home/Index
27                         // - Home/Login
28                         foreach (var endpointInfo in ConventionalEndpointInfos)
29                         {
30                             // An ‘endpointInfo‘ is applicable if:
31                             // 1. it has a parameter (or default value) for ‘required‘ non-null route value
32                             // 2. it does not have a parameter (or default value) for ‘required‘ null route value
33                             var isApplicable = true;
34                             foreach (var routeKey in action.RouteValues.Keys)
35                             {
36                                 if (!MatchRouteValue(action, endpointInfo, routeKey))
37                                 {
38                                     isApplicable = false;
39                                     break;
40                                 }
41                             }
42
43                             if (!isApplicable)
44                             {
45                                 continue;
46                             }
47
48                             conventionalRouteOrder = CreateEndpoints(
49                                 endpoints,
50                                 ref patternStringBuilder,
51                                 action,
52                                 conventionalRouteOrder,
53                                 endpointInfo.ParsedPattern,
54                                 endpointInfo.MergedDefaults,
55                                 endpointInfo.Defaults,
56                                 endpointInfo.Name,
57                                 endpointInfo.DataTokens,
58                                 endpointInfo.ParameterPolicies,
59                                 suppressLinkGeneration: false,
60                                 suppressPathMatching: false);
61                         }
62                     }
63                     else
64                     {
65                         var attributeRoutePattern = RoutePatternFactory.Parse(action.AttributeRouteInfo.Template);
66
67                         CreateEndpoints(
68                             endpoints,
69                             ref patternStringBuilder,
70                             action,
71                             action.AttributeRouteInfo.Order,
72                             attributeRoutePattern,
73                             attributeRoutePattern.Defaults,
74                             nonInlineDefaults: null,
75                             action.AttributeRouteInfo.Name,
76                             dataTokens: null,
77                             allParameterPolicies: null,
78                             action.AttributeRouteInfo.SuppressLinkGeneration,
79                             action.AttributeRouteInfo.SuppressPathMatching);
80                     }
81                 }
82
83                 // See comments in DefaultActionDescriptorCollectionProvider. These steps are done
84                 // in a specific order to ensure callers always see a consistent state.
85
86                 // Step 1 - capture old token
87                 var oldCancellationTokenSource = _cancellationTokenSource;
88
89                 // Step 2 - update endpoints
90                 _endpoints = endpoints;
91
92                 // Step 3 - create new change token
93                 _cancellationTokenSource = new CancellationTokenSource();
94                 _changeToken = new CancellationChangeToken(_cancellationTokenSource.Token);
95
96                 // Step 4 - trigger old token
97                 oldCancellationTokenSource?.Cancel();
98             }
99         }
View Code
本质就是计算出一个个可能被请求的请求终结点,也就是Endpoint。由此可见,如上一篇文章那样想自定义一个handler来处理特殊模板的方式(如 routes.MapRoute(“flylolo/{code}/{name}”, MyRouteHandler.Handler);)将被忽略掉,因其无法生成 Endpoint,且此种方式完全可以自定义一个中间件来实现,没必要混在路由中。
⑨ 就是用上面生成的Matcher,携带Endpoint列表与请求URL做匹配,并将匹配到的Endpoint赋值给feature.Endpoint。
⑩ 获取feature.Endpoint,若存在则调用其RequestDelegate处理请求httpContext。
三、新版与旧版的异同点总结
简要从应用系统启动和请求处理两个阶段对比说一下两个版本的区别:
1.启动阶段:
这个阶段大部分都差不多,都是通过Startup的app.UseMvc()方法配置一个路由表,一个Route的集合Routes(IList<IRouter>),然后将其简单转换一下
<=2.1: 将Routes转换为RouteCollection
2.2+ : 将Routes转换为List<MvcEndpointInfo>
二者区别不大,虽然名字不同,但本质上还是差不多,都仍可理解为Route的集合的包装。
2.请求处理阶段:
<=2.1: 1. 将请求的URL与RouteCollection中记录的路由模板进行匹配。
2. 找到匹配的Route之后,再根据这个请求的URL判断是否存在对应的Controlled和Action。
3. 若以上均通过,则调用Route的Handler对HttpContext进行处理。
2.2+ : 1. 第一次处理请求时,首先根据启动阶段所配置的路由集合List<MvcEndpointInfo>和_actions.ActionDescriptors.Items(所有的action的信息)做匹配,生成一个列表,这个列表存储了所有可能被匹配的URL模板,如下图,这个列表同样是List<MvcEndpointInfo>,记录了所有可能的URL模式,实际上是列出了一个个可以被访问的详细地址,已经算是最终地址了,即终结点,或许就是为什么叫Endpoint路由的原因。
2.请求的Url和这个生成的表做匹配,找到对应的MvcEndpointInfo。
3. 调用被匹配的MvcEndpointInfo的RequestDelegate方法对请求进行处理。
二者区别就是对于_actions.ActionDescriptors.Items(所有的action的信息)的匹配上,原版是先根据路由模板匹配后,再根据ActionDescriptors判断是否存在对应的Controller和action,而新版是先利用了action信息与路由模板匹配,然后再用请求的URL进行匹配,由于这样的工作只在第一次请求的时候执行,所以虽然没有做执行效率上的测试,但感觉应该是比之前快的。