
一、实验环境
两台同样配置的CentOS-7.5虚拟机;
两台虚机的防火墙+selinux均关闭;
两台虚机均可以上外网;
master:CentOS-1(192.168.218.128)
slave: CentOS-2 (192.168.218.136)
二、搭建主从复制
1)两台服务器同时安装MySQL服务
说明:因为本人之前已经写过“CentOS-7.5 安装 社区版 MySQL-5.7”这样的博文,所以在此就不在做重复性动作了;两台虚拟机安装MySQL服务的操作是一摸一样的,直接复制粘贴即可
博文链接为:https://blog.51cto.com/14783377/2485030
2)修改两台MySQL的配置文件
master端如下:
slave端如下: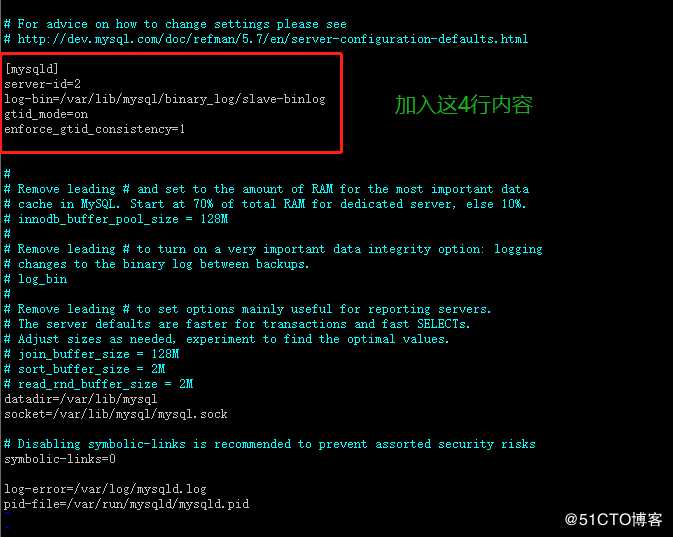
切记:修改完配置文件以后,都要重启MySQL服务使配置生效
3)mysql主服务器初始化以后的第一次全备
[root@CentOS-1 ~]#
[root@CentOS-1 ~]# mysqldump -uroot -p‘Mysql.2020‘ –all-databases –single-transaction > /tmp/mysql_all.sql #数据库第一次全量备份
mysqldump: [Warning] Using a password on the command line interface can be insecure.
Warning: A partial dump from a server that has GTIDs will by default include the GTIDs of all transactions, even those that changed suppressed parts of the database. If you don‘t want to restore GTIDs, pass –set-gtid-purged=OFF. To make a complete dump, pass –all-databases –triggers –routines –events.
[root@CentOS-1 ~]#
[root@CentOS-1 ~]#
[root@CentOS-1 ~]# ll /tmp | grep ‘mysql*‘
4)将mysql主服务器的第一次全备拷贝到从服务器
[root@CentOS-1 ~]#
[root@CentOS-1 ~]# scp /tmp/mysql_all.sql root@192.168.218.136:/tmp/ #将数据库的全备文件从主服务器拷贝到从服务器
在从服务器端进行查看:
[root@CentOS-2 ~]#
[root@CentOS-2 ~]# ll /tmp | grep ‘mysql*‘
5)在从服务器端进行全备恢复
[root@CentOS-2 ~]#
[root@CentOS-2 ~]# mysql -uroot -p‘Mysql.2020‘ < /tmp/mysql_all.sql
mysql: [Warning] Using a password on the command line interface can be insecure.
[root@CentOS-2 ~]#
此时,master端和slave端数据处于一致状态
6)主服务器对从服务器的授权
主服务器端执行:
[root@CentOS-1 ~]#
[root@CentOS-1 ~]# mysql -uroot -p‘Mysql.2020’
mysql>
mysql> grant replication slave on . to repluser@192.168.218.136 identified by ‘Mysql.2019‘; #授权repluser账户可以通过从服务器192.168.218.136来复制主服务器的所有库和所有表
Query OK, 0 rows affected, 1 warning (0.00 sec)
mysql>
mysql> flush privileges; #刷新权限
Query OK, 0 rows affected (0.00 sec)
mysql> 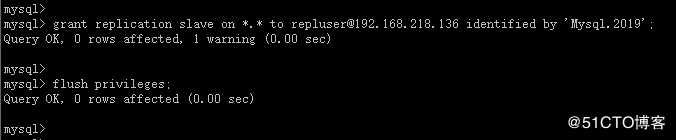
从服务器端执行:
[root@CentOS-2 ~]#
[root@CentOS-2 ~]# mysql -uroot -p‘Mysql.2020‘
mysql>
mysql> change master to master_host=‘192.168.218.128‘,master_user=‘repluser‘,master_password=‘Mysql.2019‘,master_auto_position=1;
Query OK, 0 rows affected, 2 warnings (0.11 sec)
mysql>
mysql> start slave;
Query OK, 0 rows affected (0.01 sec)
mysql>
mysql> show slave status\G #查看slave状态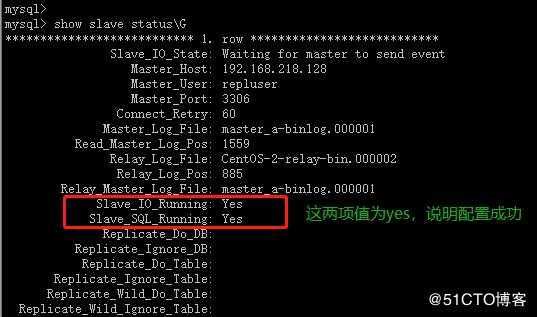
三、验证主从同步是否成功
思路:如果在master端插入或者删除SQL语句,在slave端能出现一样效果的话,就说嘛主从同步配置成功
1)在验证前,先对比master和slave数据是否一致
master服务器端执行:
[root@CentOS-1 ~]#
[root@CentOS-1 ~]# mysql -uroot -p‘Mysql.2020‘ #登录master
mysql>
mysql> show databases;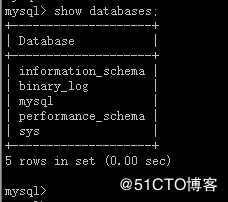
slave服务器端执行:
[root@CentOS-2 ~]#
[root@CentOS-2 ~]# mysql -uroot -p‘Mysql.2020‘ #登录slave
mysql>
mysql> show databases;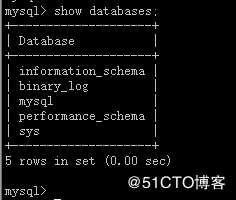
对比结果:验证前的master和slave两端数据一致
2)在master端创建数据库并插入数据
mysql>
mysql> create database db_1;
Query OK, 1 row affected (0.00 sec)
mysql>
mysql> use db_1;
Database changed
mysql>
mysql> create table Student(
-> Sid varchar(10),
-> Sname nvarchar(10),
-> Sage datetime,
-> Ssex nvarchar(10)
-> );
Query OK, 0 rows affected (0.13 sec)
mysql>
mysql> desc Student;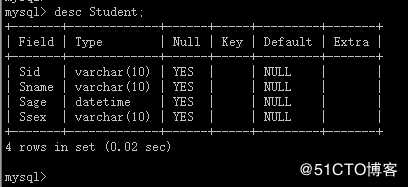
mysql>
mysql>
mysql> insert into Student values(‘01‘,‘张磊‘,‘1995-02-08‘,‘男‘);
Query OK, 1 row affected (0.01 sec)
mysql>
mysql> insert into Student values(‘02‘,‘李华‘,‘1995-06-11‘,‘男‘);
Query OK, 1 row affected (0.00 sec)
mysql>
mysql> insert into Student values(‘03‘,‘王青‘,‘1996-01-06‘,‘男‘);
Query OK, 1 row affected (0.01 sec)
mysql>
mysql> select * from Student;
3)去slave端查看是否存在master中插入的数据
[root@CentOS-2 ~]#
[root@CentOS-2 ~]# mysql -uroot -p‘Mysql.2020‘
mysql>
mysql> show databases;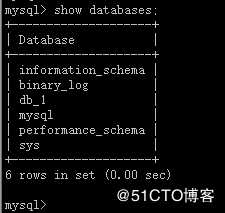
mysql> use db_1;
Reading table information for completion of table and column names
You can turn off this feature to get a quicker startup with -A
Database changed
mysql>
mysql> show tables;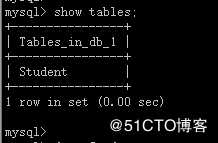
mysql>
mysql> desc Student;
mysql>
mysql> select * from Student;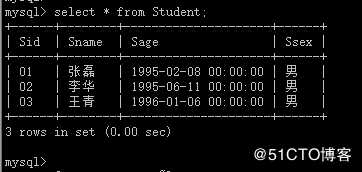
4)在master端删除数据
mysql>
mysql> drop database db_1;
Query OK, 1 row affected (0.01 sec)
mysql>
mysql> show databases;
5)去slave端查看db_1数据库是否还存在
mysql>
mysql> show databases;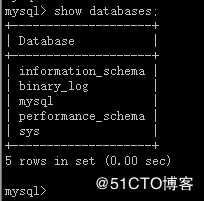
结论:经验证得出,MySQL-5.7主从同步搭建成功