什么是Urllib
Urllib是python内置的HTTP请求库
包括以下模块
urllib.request 请求模块 –>用来模拟发送请求 类似于输入网址敲击回车的过程
urllib.error 异常处理模块
urllib.parse url解析模块
urllib.robotparser robots.txt解析模块
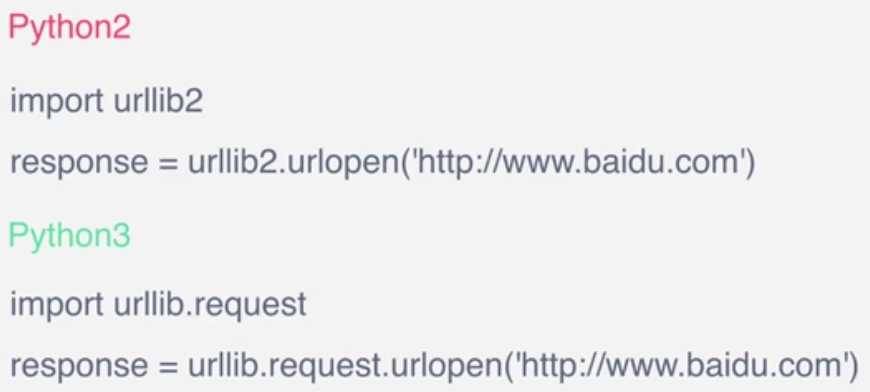
p2 p3的变化:
urlopen(get请求 post请求 超时时间)
关于urllib.request.urlopen参数的介绍:
urllib.request.urlopen(url, data=None, [timeout, ]*, cafile=None, capath=None, cadefault=False, context=None)
1.url参数的使用
先写一个简单的例子:
import urllib.request

response = urllib.request.urlopen(‘http://www.baidu.com‘)  #捕获源代码
print(response.read().decode(‘utf-8‘))
urlopen一般常用的有三个参数,它的参数如下:
urllib.requeset.urlopen(url,data,timeout)
response.read()可以获取到网页的内容,如果没有read(),将返回如下内容
data参数的使用
上述的例子是通过请求百度的get请求获得百度,下面使用urllib的post请求
这里通过http://httpbin.org/post网站演示(该网站可以作为练习使用urllib的一个站点使用,可以
模拟各种请求操作)。
import urllib.parse
import urllib.request

data = bytes(urllib.parse.urlencode({‘word‘: ‘hello‘}), encoding=‘utf8‘)
print(data)
response = urllib.request.urlopen(‘http://httpbin.org/post‘, data=data)
print(response.read())

这里就用到urllib.parse,通过bytes(urllib.parse.urlencode())可以将post数据进行转换放到urllib.request.urlopen的data参数中。这样就完成了一次post请求。
所以如果我们添加data参数的时候就是以post请求方式请求,如果没有data参数就是get请求方式
timeout参数的使用
在某些网络情况不好或者服务器端异常的情况会出现请求慢的情况,或者请求异常,所以这个时候我们需要给
请求设置一个超时时间,而不是让程序一直在等待结果。例子如下:
import urllib.request

response = urllib.request.urlopen(‘http://httpbin.org/get‘, timeout=1)
print(response.read())
运行之后我们看到可以正常的返回结果,接着我们将timeout时间设置为0.1(必须在0.1秒内得到相应 得不到就出错)
运行程序会提示如下错误
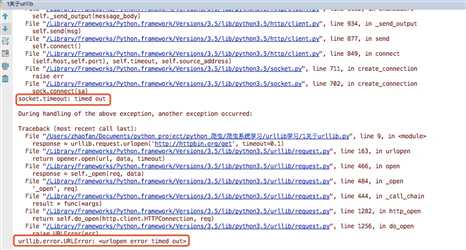
所以我们需要对异常进行抓取,代码更改为
import socket
import urllib.request
import urllib.error

try:
    response = urllib.request.urlopen(‘http://httpbin.org/get‘, timeout=0.1)
except urllib.error.URLError as e:
    if isinstance(e.reason, socket.timeout):
        print(‘TIME OUT‘)
=========================
响应 response
响应类型、状态码、响应头
import urllib.request

response = urllib.request.urlopen(‘https://www.python.org‘)
print(type(response))
可以看到结果为:<class ‘http.client.httpresponse‘=””>
我们可以通过 response.status获取状态码 –》用来判断响应是否成功 如果是200 响应成功
response.getheaders()、 response.getheader(“server”), 响应头 以及 特定头部信息
response.read() 获得的是响应体的内容
当然上述的urlopen只能用于一些简单的请求,因为它无法添加一些header信息,如果后面写爬虫我们可以知道,很多情况下我们是需要添加头部信息去访问目标站的,这个时候就用到了urllib.request
======================================
Request
设置Headers
有很多网站为了防止程序爬虫爬网站造成网站瘫痪,会需要携带一些headers头部信息才能访问,最长见的有user-agent参数
写一个简单的例子:
import urllib.request
#通过把url 直接构造成一个request   也能成功实现request 请求
request = urllib.request.Request(‘https://python.org‘)  #与上面直接urlopen结果相同
response = urllib.request.urlopen(request)
print(response.read().decode(‘utf-8‘))
给请求添加头部信息,从而定制自己请求网站是时的头部信息
from urllib import request, parse

url = ‘http://httpbin.org/post‘
headers = {
    ‘User-Agent‘: ‘Mozilla/4.0 (compatible; MSIE 5.5; Windows NT)‘,
    ‘Host‘: ‘httpbin.org‘
}
dict = {
    ‘name‘: ‘zhaofan‘
}
data = bytes(parse.urlencode(dict), encoding=‘utf8‘)

req = request.Request(url=url, data=data, headers=headers, method=‘POST‘)
response = request.urlopen(req)
print(response.read().decode(‘utf-8‘))
添加请求头的第二种方式
from urllib import request, parse

url = ‘http://httpbin.org/post‘
dict = {
    ‘name‘: ‘Germey‘
}
data = bytes(parse.urlencode(dict), encoding=‘utf8‘)
req = request.Request(url=url, data=data, method=‘POST‘)
req.add_header(‘User-Agent‘, ‘Mozilla/4.0 (compatible; MSIE 5.5; Windows NT)‘)
response = request.urlopen(req)
print(response.read().decode(‘utf-8‘))
这种添加方式有个好处是自己可以定义一个请求头字典,然后循环进行添加
==================================================
高级用法(欠)
高级用法各种handler
代理,ProxyHandler
通过rulllib.request.ProxyHandler()可以设置代理,网站它会检测某一段时间某个IP 的访问次数,如果访问次数过多,它会禁止你的访问,所以这个时候需要通过设置代理来爬取数据
import urllib.request

proxy_handler = urllib.request.ProxyHandler({
    ‘http‘: ‘http://127.0.0.1:9743‘,
    ‘https‘: ‘https://127.0.0.1:9743‘
})
opener = urllib.request.build_opener(proxy_handler)
response = opener.open(‘http://httpbin.org/get‘)
print(response.read())
cookie,HTTPCookiProcessor
cookie中保存中我们常见的登录信息,有时候爬取网站需要携带cookie信息访问,这里用到了http.cookijar,用于获取cookie以及存储cookie
import http.cookiejar, urllib.request
cookie = http.cookiejar.CookieJar()
handler = urllib.request.HTTPCookieProcessor(cookie)
opener = urllib.request.build_opener(handler)
response = opener.open(‘http://www.baidu.com‘)
for item in cookie:
    print(item.name+"="+item.value)
同时cookie可以写入到文件中保存,有两种方式http.cookiejar.MozillaCookieJar和http.cookiejar.LWPCookieJar(),当然你自己用哪种方式都可以
具体代码例子如下:
http.cookiejar.MozillaCookieJar()方式
import http.cookiejar, urllib.request
filename = "cookie.txt"
cookie = http.cookiejar.MozillaCookieJar(filename)
handler = urllib.request.HTTPCookieProcessor(cookie)
opener = urllib.request.build_opener(handler)
response = opener.open(‘http://www.baidu.com‘)
cookie.save(ignore_discard=True, ignore_expires=True)
http.cookiejar.LWPCookieJar()方式
import http.cookiejar, urllib.request
filename = ‘cookie.txt‘
cookie = http.cookiejar.LWPCookieJar(filename)
handler = urllib.request.HTTPCookieProcessor(cookie)
opener = urllib.request.build_opener(handler)
response = opener.open(‘http://www.baidu.com‘)
cookie.save(ignore_discard=True, ignore_expires=True)
同样的如果想要通过获取文件中的cookie获取的话可以通过load方式,当然用哪种方式写入的,就用哪种方式读取。
import http.cookiejar, urllib.request
cookie = http.cookiejar.LWPCookieJar()
cookie.load(‘cookie.txt‘, ignore_discard=True, ignore_expires=True)
handler = urllib.request.HTTPCookieProcessor(cookie)
opener = urllib.request.build_opener(handler)
response = opener.open(‘http://www.baidu.com‘)
print(response.read().decode(‘utf-8‘))
异常处理
在很多时候我们通过程序访问页面的时候,有的页面可能会出现错误,类似404,500等错误
这个时候就需要我们捕捉异常,下面先写一个简单的例子
from urllib import request,error

try:
    response = request.urlopen("http://pythonsite.com/1111.html")
except error.URLError as e:
    print(e.reason)
上述代码访问的是一个不存在的页面,通过捕捉异常,我们可以打印异常错误
这里我们需要知道的是在urllb异常这里有两个个异常错误:
URLError,HTTPError,HTTPError是URLError的子类
URLError里只有一个属性:reason,即抓异常的时候只能打印错误信息,类似上面的例子
HTTPError里有三个属性:code,reason,headers,即抓异常的时候可以获得code,reson,headers三个信息,例子如下:
from urllib import request,error
try:
    response = request.urlopen("http://pythonsite.com/1111.html")
except error.HTTPError as e:
    print(e.reason)
    print(e.code)
    print(e.headers)
except error.URLError as e:
    print(e.reason)

else:
    print("reqeust successfully")
同时,e.reason其实也可以在做深入的判断,例子如下:
import socket

from urllib import error,request

try:
    response = request.urlopen("http://www.pythonsite.com/",timeout=0.001)
except error.URLError as e:
    print(type(e.reason))
    if isinstance(e.reason,socket.timeout):
        print("time out")
URL解析
urlparse
The URL parsing functions focus on splitting a URL string into its components, or on combining URL components into a URL string.
urllib.parse.urlparse(urlstring, scheme=‘‘, allow_fragments=True)
功能一:
from urllib.parse import urlparse

result = urlparse("http://www.baidu.com/index.html;user?id=5#comment")
print(result)
结果为:

这里就是可以对你传入的url地址进行拆分
同时我们是可以指定协议类型:
result = urlparse(“www.baidu.com/index.html;user?id=5#comment”,scheme=”https”)
这样拆分的时候协议类型部分就会是你指定的部分,当然如果你的url里面已经带了协议,你再通过scheme指定的协议就不会生效
urlunpars
其实功能和urlparse的功能相反,它是用于拼接,例子如下:
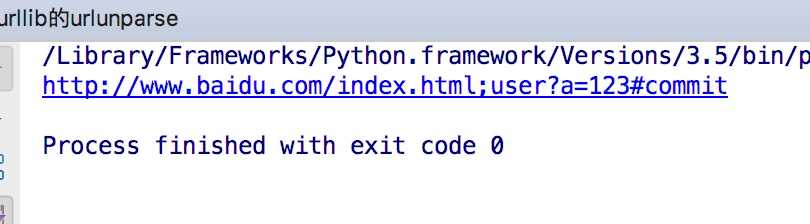
from urllib.parse import urlunparse

data = [‘http‘,‘www.baidu.com‘,‘index.html‘,‘user‘,‘a=123‘,‘commit‘]
print(urlunparse(data))
结果如下
urljoin
这个的功能其实是做拼接的,例子如下:
from urllib.parse import urljoin

print(urljoin(‘http://www.baidu.com‘, ‘FAQ.html‘))
print(urljoin(‘http://www.baidu.com‘, ‘https://pythonsite.com/FAQ.html‘))
print(urljoin(‘http://www.baidu.com/about.html‘, ‘https://pythonsite.com/FAQ.html‘))
print(urljoin(‘http://www.baidu.com/about.html‘, ‘https://pythonsite.com/FAQ.html?question=2‘))
print(urljoin(‘http://www.baidu.com?wd=abc‘, ‘https://pythonsite.com/index.php‘))
print(urljoin(‘http://www.baidu.com‘, ‘?category=2#comment‘))
print(urljoin(‘www.baidu.com‘, ‘?category=2#comment‘))
print(urljoin(‘www.baidu.com#comment‘, ‘?category=2‘))
结果为: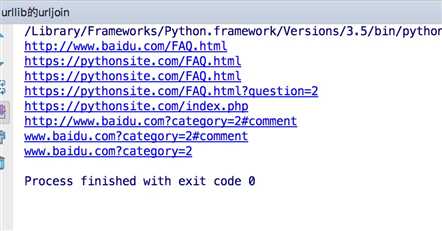
从拼接的结果我们可以看出,拼接的时候后面的优先级高于前面的url
urlencode
这个方法可以将字典转换为url参数,例子如下
from urllib.parse import urlencode

params = {
    "name":"zhaofan",
    "age":23,
}
base_url = "http://www.baidu.com?"

url = base_url+urlencode(params)
print(url)
结果为:
