
概述
在 Netty学习(3)中,我们已经学习了 Buffer 和 Channel 的概念, 接下来就让我们通过实现一个 NIO 的多人聊天服务器来深入理解 NIO 的第 3个组件:Selector。
目的
在本文中,我们将通过实现一个网络聊天室程序,来掌握 Selector 的概念以及如何使用 NIO 来完成网络编程。
需求
- 服务器端
- 可以检测用户上线、离线,并告知其他用户;
- 将一个客户端的消息转发给其他在线客户端。
- 客户端:
- 可以发送消息给其他所有在线用户;
- 通过转发,接受到其他用户的消息。
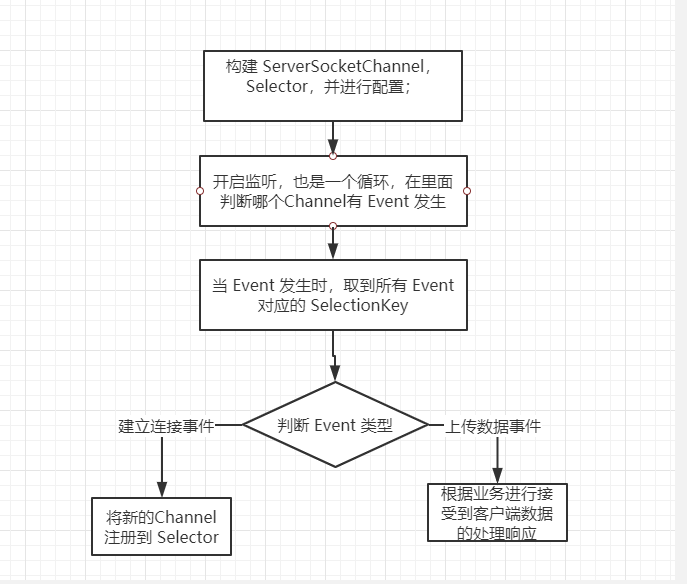
实现逻辑图
代码实现
Server
设置通用属性
public class NioNetworkServer {
    private Logger logger = LoggerFactory.getLogger(NioNetworkServer.class);

    ServerSocketChannel serverSocketChannel;
    Selector selector;
    InetSocketAddress inetSocketAddress;

    public NioNetworkServer() {
        try {
            // 生成一个 ServerSocketChannel 和 Selector,并将 ServerSocketChannel 绑定到指定端口
            serverSocketChannel = ServerSocketChannel.open();
            selector = Selector.open();
            inetSocketAddress = new InetSocketAddress(6666);
            serverSocketChannel.socket().bind(inetSocketAddress);

            serverSocketChannel.configureBlocking(false);

            // 将 serverSocketChannel(一开始的服务器Channel) 注册到指定selector上
            // 后面给每一个连接生成的 SocketChannel,就是通过 ServerSocketChannel 来生成的
            serverSocketChannel.register(selector, SelectionKey.OP_ACCEPT);

        } catch (IOException e) {
            logger.error("建立Server失败,失败原因:{0}", e);
        }
    }
}
?
设置一些属性,并在构造函数里设置这些属性的值
监听方法
    public void listen() {
        try {
            while (true) {
                // 没有事件发生,就干其他事
                if (selector.select(3000) == 0) {
                    continue;
                }

                // 得到有事件发生的事件集合,然后在后面可以通过其反向获取channel
                Set<SelectionKey> selectionKeys = selector.selectedKeys();
                Iterator<SelectionKey> iterator = selectionKeys.iterator();
                while (iterator.hasNext()) {
                    SelectionKey selectionKey = iterator.next();
                    // 事件:有新的连接
                    if (selectionKey.isAcceptable()) {
                        whenAccept();
                    }
                    // 事件:读从客户端获取的数据
                    if (selectionKey.isReadable()) {
                        readData(selectionKey);
                    }
                    iterator.remove();
                }
            }
        } catch (IOException e) {
            logger.error("读写错误:{0}", e);
        } finally {

        }
    }
连接请求
 private void whenAccept() throws IOException {
        // 因为此时已经有连接事件进入了,因此虽然 accept() 是阻塞的,但是在这里会直接返回
        SocketChannel socketChannel = serverSocketChannel.accept();
        logger.info("connect success,socketChannel : " + socketChannel.toString());
        socketChannel.configureBlocking(false);
        socketChannel.register(selector, SelectionKey.OP_READ, ByteBuffer.allocate(1024));

        //将某人上线的消息进行显示
        logger.info(socketChannel.getRemoteAddress() + "上线");
    }
读写数据
    private void readData(SelectionKey selectionKey) throws IOException {
        SocketChannel socketChannel = (SocketChannel) selectionKey.channel();
        ByteBuffer byteBuffer = ByteBuffer.allocate(1024);
        try {
            socketChannel.read(byteBuffer);
            String message = new String(byteBuffer.array());
            logger.info("{}{}{}", LocalDateTime.now().format(DateTimeFormatter.ofPattern("yyyy-MM-dd HH:mm:ss")), "\n\t\t", message);

            // 向其他的客户端转发消息
            sendInfoToOtherClients(socketChannel, message);
        } catch (Exception e) {
            // 在捕获到异常后,就是有客户端发送了断开连接的请求
            logger.info("{},离线了。。。", socketChannel.getRemoteAddress());
            sendInfoToOtherClients(socketChannel, socketChannel.getRemoteAddress() + " 离线了。。。");
            // 将关闭连接的 channel 关闭
            socketChannel.close();
            // 将该键移除出 set
            selectionKey.cancel();
        }
    }
在这里,我们根据 selectionKey 来反向获取到 channel,通过 channel 将数据读入到 buffer 中,从而读进内存。
接着,将该消息转发给其他客户端。
    private void sendInfoToOtherClients(SocketChannel socketChannel, String message) throws IOException {
        for (SelectionKey key : selector.keys()) {
            SelectableChannel sourceChannel = key.channel();
            if (sourceChannel instanceof SocketChannel && sourceChannel != socketChannel) {
                SocketChannel targetChannel = (SocketChannel) sourceChannel;
                // 根据转发过来的字节长度,直接生成目标大小的 Buffer,然后将数据写入到客户端的 channel 中
                ByteBuffer targetByteBuffer = ByteBuffer.wrap(message.getBytes());
                targetChannel.write(targetByteBuffer);
            }
        }
    }
最后,在 main 函数中启动即可。
    public static void main(String[] args) {
        NioNetworkServer nioNetworkServer = new NioNetworkServer();
        nioNetworkServer.listen();
    }
Client
设置通用属性
public class NioNetworkChatClient {
    private Logger logger = LoggerFactory.getLogger(NioNetworkChatClient.class);

    private Selector selector;
    private SocketChannel socketChannel;
    private String username;

    public NioNetworkChatClient() {
        try {
            selector = Selector.open();
            InetSocketAddress inetSocketAddress = new InetSocketAddress("localhost", 6666);
            socketChannel = SocketChannel.open(inetSocketAddress);
            socketChannel.configureBlocking(false);
            socketChannel.register(selector, SelectionKey.OP_READ);
            username = socketChannel.getLocalAddress().toString().substring(1);
        } catch (Exception e) {
            logger.error("构建客户端错误,错误原因:{0}", e);
        }
    }
}
客户端的构建方法和 Server 基本一致,不同的是,Server 构建的是 ServerSocketChannel,Client 构建的是 SocketChannel,此外 Client 一开始注册的是
SelectionKey.OP_READ事件。其他基本相似。
读取数据
    /**
     * 1. 获取selector上发生的事件
     * 2. 如果是读事件,则将数据通过 Channel 和 Buffer 进行操作
     * 3. 处理完成后,将该key从待处理keys中删除
     */
    public void readInfo() {
        try {
            int readChannel = selector.select();
            if (readChannel > 0) {
                Set<SelectionKey> selectionKeys = selector.selectedKeys();
                Iterator<SelectionKey> iterator = selectionKeys.iterator();
                while (iterator.hasNext()) {
                    SelectionKey selectionKey = iterator.next();
                    if (selectionKey.isReadable()) {
                        SocketChannel handingSocketChannel = (SocketChannel) selectionKey.channel();
                        ByteBuffer byteBuffer = ByteBuffer.allocate(1024);

                        int read = handingSocketChannel.read(byteBuffer);
                        if (read > 0) {
                            String message = new String(byteBuffer.array());
                            logger.info("{},{},{}", LocalDateTime.now().format(DateTimeFormatter.ofPattern("yyyy-MM-dd HH:mm:ss")), "\n\t\t", message);
                        } else {
                            logger.info("client closed");
                            // 将关闭连接的 channel 关闭
                            handingSocketChannel.close();
                            // 将该键移除出 set
                            selectionKey.cancel();
                        }
                    }
                }
                iterator.remove();
            } else {
                logger.info("当前没有 channel 可供使用!");
            }
        } catch (IOException e) {
            e.printStackTrace();
        }
    }
发送数据
    public void sendInfo(String info) {
        info = username + " : " + info;
        try {
            logger.info("{},{},{}", LocalDateTime.now().format(DateTimeFormatter.ofPattern("yyyy-MM-dd HH:mm:ss")), "\n\t\t", info);
            socketChannel.write(ByteBuffer.wrap(info.getBytes()));
        } catch (IOException e) {
            logger.error("发送数据错误,错误原因:{0}", e);
        }
    }
发送数据就很简单了,将数据简单封装一下,直接写入到 socketChannel 即可。
启动
    /**
     * 1. 启动一个线程来定时读取 Server 可能发送的数据,如果没有,就休眠,等待下次读取
     * 2. 启动一个获取控制台输出来进行数据的发送
     *
     * @param args
     */
    public static void main(String[] args) {
        NioNetworkChatClient nioNetworkChatClient = new NioNetworkChatClient();

        // 线程资源必须通过线程池提供,不允许在应用中自行显式创建线程,但跟前面一样,这里因为不是重点,就先这样用着
        new Thread() {
            @Override
            public void run() {
                while (true) {
                    nioNetworkChatClient.readInfo();
                    try {
                        sleep(3000);
                    } catch (Exception e) {
                        e.printStackTrace();
                    }

                }
            }
        }.start();

        Scanner scanner = new Scanner(System.in);
        while (scanner.hasNextLine()) {
            String message = scanner.nextLine();
            nioNetworkChatClient.sendInfo(message);
        }
    }
演示结果
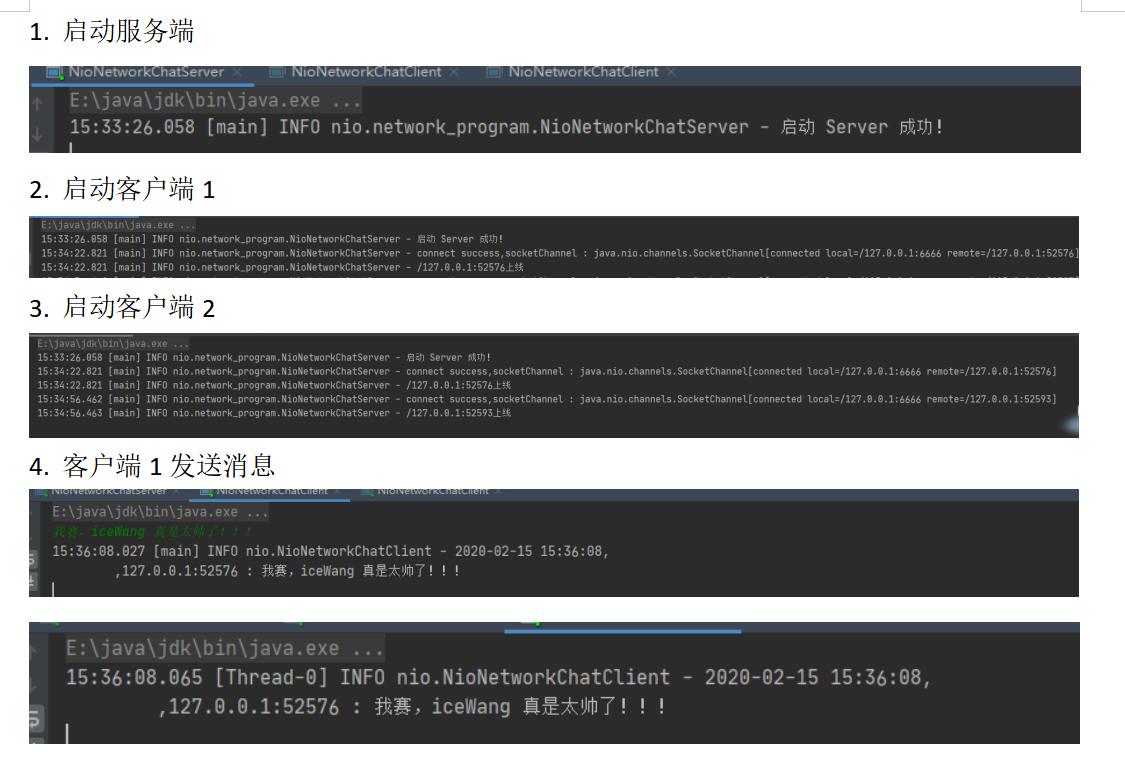
后面的结果就不在多演示了,跟这里的相似,这样,我们就完成了一个聊天室的程序,所有人可以在里面进行交流。
总结
本文我们通过一个聊天室的程序,来演示了 Selector,Channel,Buffer 结合使用的效果,通过这 3者,我们实现了一个 NIO 的网络编程程序。
但在编写这个程序的时候,相信朋友们也发现了,其异常的繁琐,中间涉及到 Buffer 的构建,Selector 的 API 使用等等。因此,在日后的使用过程中,我们就要用到 Netty 来实现现在的工作,从而减少开发的工作量了。
ps:讲了那么多,终于要到 Netty 了,不过良好的基础是学习的关键,如果不懂 Java 的 IO 模型以及 NIO 的实现方式和局限性,也不会很好的理解学习 Netty。
本文中代码已上传到 GitHub 上,地址为 https://github.com/wb1069003157/nettyPre-research ,欢迎大家来一起讨论,一起进步。

文章在公众号「iceWang」第一手更新,有兴趣的朋友可以关注公众号,第一时间看到笔者分享的各项知识点,谢谢!笔芯!