一、简介
LAMP:linux+apache+mysql(这里用mariadb)+php(perl,python)
LAMMP:memcached缓存的
CGI:Common Gateway Interface通用网关接口,说白了就是个简化的httpd协议
httpd+php有三种模式
modules 动态模块模式,最简单最容易配置的方式,httpd启动时会加载模块,加载时将对应的模块激活,php-cgi也就启动了,很多人认为动态编译模块时在需要的时候随时加载调用,不需要的时候就停止,其实动态编译的模块实际上和静态编译模块一样,动态加载的模块被加载时就被加入到激活链表中,无论使用不使用,它都已经运行在httpd的内部
cgi 模式, 很少使用这个模式,httpd接受到一个动态请求就fork一个cgi进程,cgi进程返回结果给httpd进程后自我销毁
fastcgi(fpm),php-fpm模式,使用php-fpm管理php-cgi,httpd不在控制php-cgi进程的启动,可以将php-fpm独立运行在非web服务器上,实现动静分离。
最简单就是模块的方式加入apache,fastcgi模式的php-cgi,是由php-fpm提供服务管理,它会根据配置文件启动一定数量的cgi进程,其默认监听端口为9000,该服务正常工作需要配置文件,所以fastcgi模式的php有两个配置文件,一个php的配置文件,一个是php-fpm的配置文件。
模块化安装php,不推荐在apache2.x中使用先出啊MPM(worker和event),而是使用prefork模式的mpm,因为linux系统线程设计并不是那么完美,所以,如果php和apache在同一个主机上(cgi或模块化方式安装php的时候),建议httpd使用prefork模型,而不同主机,建议php设计在fastcgi的工作模式,而windows平台无需考虑这个问题,因为windows系统是真正意义上的多线程系统。
本文yum安装LAMP得步骤,其中php使用得是frefork模型的,还有单独一台主机实现反代动态资源php-fpm管理方式。
1、官方资源下载地址:http://archive.apache.org/dist/
2、实验环境
| 主机 | IP地址 | 用途 | 备注 |
| web1 | 192.168.216.199 | web服务器 | 虚拟机 centos7 |
| web2 | 192.168.216.198 | Mysql服务器 | 虚拟机 centos7 |
| 客户端 | 物理机 win10 | ||
| web4 | 虚拟机 centos7,压测 | ||
| web3 | 192.168.216.232 | php-fpm | 虚拟机 centos7,实现反向动态代理 |
3、测试环境关闭selinux,firewall
关闭selinux
vim /etc/selinux/config
 1 # This file controls the state of SELinux on the system.
 2 # SELINUX= can take one of these three values:
 3 #     enforcing - SELinux security policy is enforced.
 4 #     permissive - SELinux prints warnings instead of enforcing.
 5 #     disabled - No SELinux policy is loaded.
 6 SELINUX=disabled  7 # SELINUXTYPE= can take one of three two values:
 8 #     targeted - Targeted processes are protected,
 9 #     minimum - Modification of targeted policy. Only selected processes are protected.
10 #     mls - Multi Level Security protection.
11 SELINUXTYPE=targeted
关闭防火墙
systemctl stop firewalld
systemctl disable firewalld
init 6
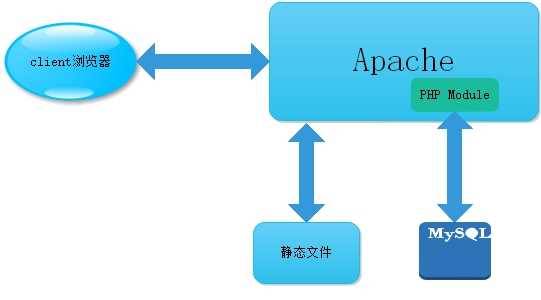
4、LAMP架构图

二、配置安装LAMP
1、解决依赖
yum -y install @”Development Tools” libxml2-devel mariadb-devel bzip2-devel
2、安装安装关键软件包,httpd与php
yum install httpd httpd-devel php php-mysql
启动服务
systemctl start httpd
检查监听端口
80端口监听
 1 [root@web1 ~]# systemctl start httpd
 2 [root@web1 ~]# ss -untlp
 3 Netid  State      Recv-Q Send-Q          Local Address:Port                         Peer Address:Port
 4 udp    UNCONN     0      0                           *:5353                                    *:*                   users:(("avahi-daemon",pid=624,fd=12))
 5 udp    UNCONN     0      0                           *:43495                                   *:*                   users:(("avahi-daemon",pid=624,fd=13))
 6 udp    UNCONN     0      0                           *:65037                                   *:*                   users:(("dhclient",pid=48791,fd=20))
 7 udp    UNCONN     0      0               192.168.122.1:53                                      *:*                   users:(("dnsmasq",pid=2120,fd=5))
 8 udp    UNCONN     0      0                    *%virbr0:67                                      *:*                   users:(("dnsmasq",pid=2120,fd=3))
 9 udp    UNCONN     0      0                           *:68                                      *:*                   users:(("dhclient",pid=48791,fd=6))
10 udp    UNCONN     0      0                           *:177                                     *:*                   users:(("lightdm",pid=860,fd=11))
11 udp    UNCONN     0      0                          :::34573                                  :::*                   users:(("dhclient",pid=48791,fd=21))
12 udp    UNCONN     0      0                          :::177                                    :::*                   users:(("lightdm",pid=860,fd=12))
13 tcp    LISTEN     0      128                         *:111                                     *:*                   users:(("systemd",pid=1,fd=31))
14 tcp    LISTEN     0      5               192.168.122.1:53                                      *:*                   users:(("dnsmasq",pid=2120,fd=6))
15 tcp    LISTEN     0      128                         *:22                                      *:*                   users:(("sshd",pid=847,fd=3))
16 tcp    LISTEN     0      128                 127.0.0.1:631                                     *:*                   users:(("cupsd",pid=842,fd=12))
17 tcp    LISTEN     0      100                 127.0.0.1:25                                      *:*                   users:(("master",pid=1984,fd=13))
18 tcp    LISTEN     0      128                        :::111                                    :::*                   users:(("systemd",pid=1,fd=30))
19 tcp LISTEN 0 128 :::80 :::* users:(("httpd",pid=51240,fd=4),("httpd",pid=51239,fd=4),("httpd",pid=51238,fd=4),("httpd",pid=51237,fd=4),("httpd",pid=51236,fd=4),("httpd",pid=51230,fd=4))
20 tcp    LISTEN     0      128                        :::22                                     :::*                   users:(("sshd",pid=847,fd=4))
21 tcp    LISTEN     0      128                       ::1:631                                    :::*                   users:(("cupsd",pid=842,fd=11))
22 tcp    LISTEN     0      100                       ::1:25                                     :::*                   users:(("master",pid=1984,fd=14))
23 [root@web1 ~]#
访问主页

测试php模块
1 [root@web1 ~]# cat /var/www/html/info.php
2 <?php
3         phpinfo();
4 ?>
5
6 [root@web1 ~]# systemctl restart httpd

安装常用php模块
yum install -y php-gd php-ldap php-odbc php-pear php-xml php-xmlrpc php-mbstring php-snmp php-soap curl curl-devel php-bcmath
3、web2主机,安装mysql服务,并设置mysql安全设置
1)、安装数据包,依赖
yum install mariadb mariadb-server mariadb-libs mariadb-devel
 1 Installed:
 2   mariadb.x86_64 1:5.5.60-1.el7_5   mariadb-devel.x86_64 1:5.5.60-1.el7_5   mariadb-server.x86_64 1:5.5.60-1.el7_5
 3
 4 Dependency Installed:
 5   keyutils-libs-devel.x86_64 0:1.5.8-3.el7                  krb5-devel.x86_64 0:1.15.1-34.el7
 6   libcom_err-devel.x86_64 0:1.42.9-13.el7                   libselinux-devel.x86_64 0:2.5-14.1.el7
 7   libsepol-devel.x86_64 0:2.5-10.el7                        libverto-devel.x86_64 0:0.2.5-4.el7
 8   openssl-devel.x86_64 1:1.0.2k-16.el7                      pcre-devel.x86_64 0:8.32-17.el7
 9   perl-Compress-Raw-Bzip2.x86_64 0:2.061-3.el7              perl-Compress-Raw-Zlib.x86_64 1:2.061-4.el7
10   perl-DBD-MySQL.x86_64 0:4.023-6.el7                       perl-DBI.x86_64 0:1.627-4.el7
11   perl-Data-Dumper.x86_64 0:2.145-3.el7                     perl-IO-Compress.noarch 0:2.061-2.el7
12   perl-Net-Daemon.noarch 0:0.48-5.el7                       perl-PlRPC.noarch 0:0.2020-14.el7
13   zlib-devel.x86_64 0:1.2.7-18.el7
14
15 Updated:
16   mariadb-libs.x86_64 1:5.5.60-1.el7_5
17
18 Dependency Updated:
19   e2fsprogs.x86_64 0:1.42.9-13.el7                         e2fsprogs-libs.x86_64 0:1.42.9-13.el7
20   krb5-libs.x86_64 0:1.15.1-34.el7                         krb5-workstation.x86_64 0:1.15.1-34.el7
21   libcom_err.x86_64 0:1.42.9-13.el7                        libkadm5.x86_64 0:1.15.1-34.el7
22   libselinux.x86_64 0:2.5-14.1.el7                         libselinux-python.x86_64 0:2.5-14.1.el7
23   libselinux-utils.x86_64 0:2.5-14.1.el7                   libsepol.x86_64 0:2.5-10.el7
24   libss.x86_64 0:1.42.9-13.el7                             openssl.x86_64 1:1.0.2k-16.el7
25   openssl-libs.x86_64 1:1.0.2k-16.el7                      pcre.x86_64 0:8.32-17.el7
26   zlib.x86_64 0:1.2.7-18.el7
27
28 Complete!
29 [root@web2 ~]#
2)、开启服务,并设置开机启动,检查状态
systemctl start mariadb
systemctl enable mariadb
systemctl status mariadb
netstat -tulp
3306端口是否监听
 1 [root@web2 ~]# netstat -tunlp
 2 Active Internet connections (only servers)
 3 Proto Recv-Q Send-Q Local Address           Foreign Address         State       PID/Program name
 4 tcp 0 0 0.0.0.0:3306 0.0.0.0:* LISTEN 92673/mysqld  5 tcp        0      0 0.0.0.0:111             0.0.0.0:*               LISTEN      1/systemd
 6 tcp        0      0 192.168.122.1:53        0.0.0.0:*               LISTEN      2308/dnsmasq
 7 tcp        0      0 0.0.0.0:22              0.0.0.0:*               LISTEN      1030/sshd
 8 tcp        0      0 127.0.0.1:631           0.0.0.0:*               LISTEN      959/cupsd
 9 tcp        0      0 127.0.0.1:25            0.0.0.0:*               LISTEN      1905/master
10 tcp6       0      0 :::111                  :::*                    LISTEN      1/systemd
11 tcp6       0      0 :::22                   :::*                    LISTEN      1030/sshd
12 tcp6       0      0 ::1:631                 :::*                    LISTEN      959/cupsd
13 tcp6       0      0 ::1:25                  :::*                    LISTEN      1905/master
14 udp        0      0 0.0.0.0:18649           0.0.0.0:*                           90339/dhclient
15 udp        0      0 0.0.0.0:5353            0.0.0.0:*                           568/avahi-daemon: r
16 udp        0      0 0.0.0.0:42481           0.0.0.0:*                           568/avahi-daemon: r
17 udp        0      0 192.168.122.1:53        0.0.0.0:*                           2308/dnsmasq
18 udp        0      0 0.0.0.0:67              0.0.0.0:*                           2308/dnsmasq
19 udp        0      0 0.0.0.0:68              0.0.0.0:*                           90339/dhclient
20 udp6       0      0 :::11173                :::*                                90339/dhclient
21 [root@web2 ~]#
3)、数据库安全设置
 1 [root@web2 ~]# mysql_secure_installation
 2
 3 NOTE: RUNNING ALL PARTS OF THIS SCRIPT IS RECOMMENDED FOR ALL MariaDB
 4       SERVERS IN PRODUCTION USE!  PLEASE READ EACH STEP CAREFULLY!
 5
 6 In order to log into MariaDB to secure it, we‘ll need the current
 7 password for the root user.  If you‘ve just installed MariaDB, and
 8 you haven‘t set the root password yet, the password will be blank,
 9 so you should just press enter here.
10
11 Enter current password for root (enter for none): <-初次使用直接回车即可 12 OK, successfully used password, moving on...
13
14 Setting the root password ensures that nobody can log into the MariaDB
15 root user without the proper authorisation.
16
17 Set root password? [Y/n] y   <-输入y,设置root密码 18 New password: <-设置root得密码 19 Re-enter new password: <-重复密码 20 Password updated successfully!
21 Reloading privilege tables..
22  ... Success!
23
24
25 By default, a MariaDB installation has an anonymous user, allowing anyone
26 to log into MariaDB without having to have a user account created for
27 them.  This is intended only for testing, and to make the installation
28 go a bit smoother.  You should remove them before moving into a
29 production environment.
30
31 Remove anonymous users? [Y/n] y <-是否删除匿名用户,建议删除 32  ... Success!
33
34 Normally, root should only be allowed to connect from ‘localhost‘.  This
35 ensures that someone cannot guess at the root password from the network.
36
37 Disallow root login remotely? [Y/n] y  <-是否禁止root远程登陆,建议禁止,我这里测试选择N不禁止 38  ... Success!
39
40 By default, MariaDB comes with a database named ‘test‘ that anyone can
41 access.  This is also intended only for testing, and should be removed
42 before moving into a production environment.
43
44 Remove test database and access to it? [Y/n] y  <-是否删除test数据库,建议删除 45  - Dropping test database...
46  ... Success!
47  - Removing privileges on test database...
48  ... Success!
49
50 Reloading the privilege tables will ensure that all changes made so far
51 will take effect immediately.
52
53 Reload privilege tables now? [Y/n] y  <-是否重新加载权限表,y 54  ... Success!
55
56 Cleaning up...
57
58 All done!  If you‘ve completed all of the above steps, your MariaDB
59 installation should now be secure.
60
61 Thanks for using MariaDB!
4)、php和数据库关联并测试
在web1上vim /var/www/html/index.php
 1 [root@web1 html]# cat index.php
 2 vim index.php
 3 <?php
 4 $conn=mysql_connect(‘192.168.216.202‘,‘root‘,‘你的root密码‘);
 5 if ($conn)
 6 echo "Success...";
 7 else
 8 echo "Failure!!!";
 9 ?>
10 [root@web1 html]#
我们来访问一下

php
检查一下php默认使用哪种模型模块
 1 [root@web1 conf.d]# pwd
 2 /etc/httpd/conf.d
 3 [root@web1 conf.d]# cat php.conf
 4 #
 5 # Cause the PHP interpreter to handle files with a .php extension.
 6 #
 7 <FilesMatch \.php$>
 8     SetHandler application/x-httpd-php
 9 </FilesMatch>
10
11 #
12 # Allow php to handle Multiviews
13 #
14 AddType text/html .php
15
16 #
17 # Add index.php to the list of files that will be served as directory
18 # indexes.
19 #
20 DirectoryIndex index.php
21
22 #
23 # Uncomment the following lines to allow PHP to pretty-print .phps
24 # files as PHP source code:
25 #
26 #<FilesMatch \.phps$>
27 #    SetHandler application/x-httpd-php-source
28 #</FilesMatch>
29
30 #
31 # Apache specific PHP configuration options
32 # those can be override in each configured vhost
33 #
34 php_value session.save_handler "files"
35 php_value session.save_path    "/var/lib/php/session"
36 [root@web1 conf.d]#
好像看不到,接下来,看到是用的prefork MPM
 1 [root@web1 conf.d]# cat /etc/httpd/conf.modules.d/00-mpm.conf
 2 # Select the MPM module which should be used by uncommenting exactly
 3 # one of the following LoadModule lines:
 4
 5 # prefork MPM: Implements a non-threaded, pre-forking web server
 6 # See: http://httpd.apache.org/docs/2.4/mod/prefork.html
 7 LoadModule mpm_prefork_module modules/mod_mpm_prefork.so  8
 9 # worker MPM: Multi-Processing Module implementing a hybrid
10 # multi-threaded multi-process web server
11 # See: http://httpd.apache.org/docs/2.4/mod/worker.html
12 #
13 #LoadModule mpm_worker_module modules/mod_mpm_worker.so 14
15 # event MPM: A variant of the worker MPM with the goal of consuming
16 # threads only for connections with active processing
17 # See: http://httpd.apache.org/docs/2.4/mod/event.html
18 #
19 #LoadModule mpm_event_module modules/mod_mpm_event.so
三、怎么使用fast-cgi那
现在利用web3做php-fpm,做反代
1、web3
yum install php-fpm php-mysql php-mbstring php-mcrypt php-zlib
php-mbstring:多字节字符支持;
php-mcrypt:整合libmcrpt至php加密传输
php-zlib:压缩传输
rpm -ql php-fpm
查看一下路径
 1 [root@web3 ~]# rpm -ql php-fpm
 2 /etc/logrotate.d/php-fpm
 3 /etc/php-fpm.conf
 4 /etc/php-fpm.d
 5 /etc/php-fpm.d/www.conf
 6 /etc/sysconfig/php-fpm
 7 /run/php-fpm
 8 /usr/lib/systemd/system/php-fpm.service
 9 /usr/lib/tmpfiles.d/php-fpm.conf
10 /usr/sbin/php-fpm
11 /usr/share/doc/php-fpm-5.4.16
12 /usr/share/doc/php-fpm-5.4.16/fpm_LICENSE
13 /usr/share/doc/php-fpm-5.4.16/php-fpm.conf.default
14 /usr/share/fpm
15 /usr/share/fpm/status.html
16 /usr/share/man/man8/php-fpm.8.gz
17 /var/log/php-fpm
18 [root@web3 ~]#
2、修改配置文件
vim /etc/php-fpm.d/www.conf
 1 [root@web3 ~]# vim /etc/php-fpm.d/www.conf
 2
 3 ; Start a new pool named ‘www‘.
 4 [www]
 5
 6 ; The address on which to accept FastCGI requests.
 7 ; Valid syntaxes are:
 8 ;   ‘ip.add.re.ss:port‘    - to listen on a TCP socket to a specific address on
 9 ;                            a specific port;
10 ;   ‘port‘                 - to listen on a TCP socket to all addresses on a
11 ;                            specific port;
12 ;   ‘/path/to/unix/socket‘ - to listen on a unix socket.
13 ; Note: This value is mandatory.
14 listen = 192.168.216.232:9000 #监听在哪台主机的9000端口,232即php-fpm服务器
15
16 ; Set listen(2) backlog. A value of ‘-1‘ means unlimited.
17 ; Default Value: -1
18 ;listen.backlog = -1
19
20 ; List of ipv4 addresses of FastCGI clients which are allowed to connect.
21 ; Equivalent to the FCGI_WEB_SERVER_ADDRS environment variable in the original
22 ; PHP FCGI (5.2.2+). Makes sense only with a tcp listening socket. Each address
23 ; must be separated by a comma. If this value is left blank, connections will be
24 ; accepted from any ip address.
25 ; Default Value: any
26 listen.allowed_clients = 192.168.216.199 #允许哪台主机,199为httpd,即web服务器
27
28 ; Set permissions for unix socket, if one is used. In Linux, read/write
29 ; permissions must be set in order to allow connections from a web server. Many
30 ; BSD-derived systems allow connections regardless of permissions.
31 ; Default Values: user and group are set as the running user
32 ;                 mode is set to 0666
33 ;listen.owner = nobody
34 ;listen.group = nobody
35 ;listen.mode = 0666
36
37 ; Unix user/group of processes
38 ; Note: The user is mandatory. If the group is not set, the default user‘s group
39 ;       will be used.
40 ; RPM: apache Choosed to be able to access some dir as httpd
41 user = apache
42 ; RPM: Keep a group allowed to write in log dir.
43 group = apache
44
45 ; Choose how the process manager will control the number of child processes.
46 ; Possible Values:
47 ;   static  - a fixed number (pm.max_children) of child processes;
48 ;   dynamic - the number of child processes are set dynamically based on the
49 ;             following directives:
50 ;             pm.max_children      - the maximum number of children that can
51 ;                                    be alive at the same time.
52 ;             pm.start_servers     - the number of children created on startup.
53 ;             pm.min_spare_servers - the minimum number of children in ‘idle‘
54 ;                                    state (waiting to process). If the number
55 ;                                    of ‘idle‘ processes is less than this
56 ;                                    number then some children will be created.
57 ;             pm.max_spare_servers - the maximum number of children in ‘idle‘
58 ;                                    state (waiting to process). If the number
59 ;                                    of ‘idle‘ processes is greater than this
60 ;                                    number then some children will be killed.
61 ; Note: This value is mandatory.
62 pm = dynamic        #动态请求是prefork模型
启动服务
systemctl start php-fpm.service
创建目录
mkdir -pv /data/web/
创建index.php,读取info就可以了
vim /data/web/index.php
1 [root@web3 ~]# cat /data/www/index.php
2 <?php
3 phpinfo();
4 ?>
5 [root@web3 ~]#
3、web1,web服务器上建个虚拟主机
 1 [root@web1 conf.d]# cat /etc/httpd/conf.d/fcgi.conf
 2 DirectoryIndex index.php
 3 <VirtualHost *:80>
 4 DocumentRoot "/data/web/fcgi"
 5 ProxyRequests off
 6 ProxyPassMatch ^/(.*\.php)$ fcgi://192.168.216.232:9000/data/www/fcgi/$1
 7 <Directory "data/web/fcgi">
 8 Options FollowSymlinks
 9 AllowOverride None
10 Require all granted
11 </Directory>
12 CustomLog logs/www_access_log combined
13 ErrorLog logs/www_error_log
14 </VirtualHost>
15 [root@web1 conf.d]#
测试语法
httpd -t
[root@web1 conf.modules.d]# httpd -t
AH00112: Warning: DocumentRoot [/data/web/fcgi] does not exist    #忽略这个错误
Syntax OK
[root@web1 conf.modules.d]# !sys
systemctl restart httpd
重启服务
systemctl restart httpd
测试网页

三、测试
1、压测
web4做压力测试
yum -y install httpd-tools
 1 [root@web4 ~]# yum install -y httpd-tools
 2 Loaded plugins: fastestmirror, langpacks
 3 base                                                       | 3.6 kB  00:00:00
 4 extras                                                     | 3.4 kB  00:00:00
 5 updates                                                    | 3.4 kB  00:00:00
 6 Loading mirror speeds from cached hostfile
 7  * base: mirrors.huaweicloud.com
 8  * extras: centos.ustc.edu.cn
 9  * updates: mirrors.huaweicloud.com
10 Resolving Dependencies
11 --> Running transaction check
12 ---> Package httpd-tools.x86_64 0:2.4.6-88.el7.centos will be installed
13 --> Processing Dependency: libaprutil-1.so.0()(64bit) for package: httpd-tools-2.4.6-88.el7.centos.x86_64
14 --> Processing Dependency: libapr-1.so.0()(64bit) for package: httpd-tools-2.4.6-88.el7.centos.x86_64
15 --> Running transaction check
16 ---> Package apr.x86_64 0:1.4.8-3.el7_4.1 will be installed
17 ---> Package apr-util.x86_64 0:1.5.2-6.el7 will be installed
18 --> Finished Dependency Resolution
19
20 Dependencies Resolved
21
22 ==================================================================================
23  Package            Arch          Version                       Repository   Size
24 ==================================================================================
25 Installing:
26  httpd-tools        x86_64        2.4.6-88.el7.centos           base         90 k
27 Installing for dependencies:
28  apr                x86_64        1.4.8-3.el7_4.1               base        103 k
29  apr-util           x86_64        1.5.2-6.el7                   base         92 k
 1 [root@web4 ~]# ab -c 200 -n 10000 http://192.168.216.199/index.php   #-c并发,-n请求次数
 2 This is ApacheBench, Version 2.3 <$Revision: 1430300 $>
 3 Copyright 1996 Adam Twiss, Zeus Technology Ltd, http://www.zeustech.net/
 4 Licensed to The Apache Software Foundation, http://www.apache.org/
 5
 6 Benchmarking 192.168.216.199 (be patient)
 7 Completed 1000 requests
 8 Completed 2000 requests
 9 Completed 3000 requests
10 Completed 4000 requests
11 Completed 5000 requests
12 Completed 6000 requests
13 Completed 7000 requests
14 Completed 8000 requests
15 Completed 9000 requests
16 Completed 10000 requests
17 Finished 10000 requests
18
19
20 Server Software:        Apache/2.4.6
21 Server Hostname:        192.168.216.199
22 Server Port:            80
23
24 Document Path:          /index.php
25 Document Length:        47524 bytes  #请求文件大小 26
27 Concurrency Level:      200        #并发级别
28 Time taken for tests:   30.998 seconds  #本次测试总共花费事件 29 Complete requests:      10000        #总共的请求数
30 Failed requests:        1037          ##失败了1037次
31    (Connect: 0, Receive: 0, Length: 1037, Exceptions: 0)
32 Write errors:           0
33 Total transferred:      477228842 bytes    #总传输量 34 HTML transferred:       475238842 bytes    #index.html总大小 35 Requests per second:    322.60 [#/sec] (mean) #每秒平均完成的请求数 36 Time per request:       619.965 [ms] (mean)  #从用户角度,完成一个请求所需要的时间 37 Time per request:       3.100 [ms] (mean, across all concurrent requests)#服务器完成一个请求的时间 38 Transfer rate:          15034.51 [Kbytes/sec] received #网络传输速度 39
40 Connection Times (ms)
41               min  mean[+/-sd] median   max
42 Connect:        1  103 218.3     86    7065
43 Processing:    37  514 345.7    473    7932
44 Waiting:        5  252 352.7    177    7729
45 Total:         41  617 411.6    566    8386
46
47 Percentage of the requests served within a certain time (ms)
48   50%    566
49   66%    625
50   75%    661
51   80%    691
52   90%    826   #百分之90的请求小于等于826ms
53   95%   1002
54   98%   1517
55   99%   1637
56  100%   8386 (longest request)
57 [root@web4 ~]#
四、压力测试
web3添加xcache模块
yum install php-xcache
systemctl restart php-fpm
web4再次测试
 1 [root@web4 ~]# ab -c 200 -n 10000 http://192.168.216.199/index.php
 2 This is ApacheBench, Version 2.3 <$Revision: 1430300 $>
 3 Copyright 1996 Adam Twiss, Zeus Technology Ltd, http://www.zeustech.net/
 4 Licensed to The Apache Software Foundation, http://www.apache.org/
 5
 6 Benchmarking 192.168.216.199 (be patient)
 7 Completed 1000 requests
 8 Completed 2000 requests
 9 Completed 3000 requests
10 Completed 4000 requests
11 Completed 5000 requests
12 Completed 6000 requests
13 Completed 7000 requests
14 Completed 8000 requests
15 Completed 9000 requests
16 Completed 10000 requests
17 Finished 10000 requests
18
19
20 Server Software:        Apache/2.4.6
21 Server Hostname:        192.168.216.199
22 Server Port:            80
23
24 Document Path:          /index.php
25 Document Length:        47524 bytes
26
27 Concurrency Level:      200
28 Time taken for tests:   31.298 seconds
29 Complete requests:      10000
30 Failed requests:        971
31    (Connect: 0, Receive: 0, Length: 971, Exceptions: 0)
32 Write errors:           0
33 Total transferred:      477228872 bytes
34 HTML transferred:       475238872 bytes
35 Requests per second: 319.51 [#/sec] (mean) 36 Time per request:       625.956 [ms] (mean)
37 Time per request:       3.130 [ms] (mean, across all concurrent requests)
38 Transfer rate:          14890.63 [Kbytes/sec] received
39
40 Connection Times (ms)
41               min  mean[+/-sd] median   max
42 Connect:        1  101 143.7     98    3073
43 Processing:    42  521 462.0    466   10429
44 Waiting:        7  228 455.0    147   10027
45 Total:         44  622 486.4    574   10452
46
47 Percentage of the requests served within a certain time (ms)
48   50%    574
49   66%    629
50   75%    670
51   80%    701
52 90% 801
53   95%    967
54   98%   1399
55   99%   1621
56  100%  10452 (longest request)
57 [root@web4 ~]#