
使用Sqlite数据库
创建项目
Asp.Net Core Web应用程序
Web应用程序 ASP.NET Core 2.2
NuGet管理,添加Sqlite数据库支持
Microsoft.EntityFrameworkCore.Sqlite
添加数据实体类
添加文件夹Models
在Models文件夹添加类 Test Context
using System.Collections.Generic;

using Microsoft.EntityFrameworkCore;

using System.ComponentModel.DataAnnotations;


namespace WebApplication1.Models

{

    public class TestContext:DbContext

    {

        public TestContext(DbContextOptions<TestContext> options)

            : base(options)

        {

        }

        public DbSet<Person> People { get; set; }

        public DbSet<Book> Books { get; set; }

    }

    public class Person

    {

        [Display( Name ="编号")]

        public int PersonID { get; set; }

        [Display(Name ="姓名")]

        public string PersonName { get; set; }

        [Display(Name ="书籍")]

        public List<Book> Books { get; set; }

    }

    public class Book

    {

        [Display(Name ="编号")]

        public int BookID { get; set; }

        [Display(Name ="书名")]

        public string BookName { get; set; }

        [Display(Name ="人员编号")]

        public int PersonID { get; set; }

        [Display(Name ="人员")]

        public Person Person { get; set; }

    }

}
更改Startup.cs文件
添加引用
using Microsoft.EntityFrameworkCore;

using Microsoft.EntityFrameworkCore.Sqlite;
更新以下过程
public void ConfigureServices(IServiceCollection services)

{

……

    //实现注入

    var dbpath = Path.Combine(AppDomain.CurrentDomain.BaseDirectory, "test.db");

    var connstr = $"Data Source={dbpath}";

    services.AddDbContext<TestContext>(options => options.UseSqlite(connstr));

    //自动创建数据库

    var builder = new DbContextOptionsBuilder<TestContext>();

    builder.UseSqlite(connstr);

    using (var db = new TestContext(builder.Options))

    {

        db.Database.EnsureCreated();

    }

……

}
添加Razor页面实现数据的增删改查
在Pages目录增加子目录 People和Books
在People目录右击鼠标,选择添加 新搭建基架的项目
选择使用实体框架生成Razor页面(CRUD)
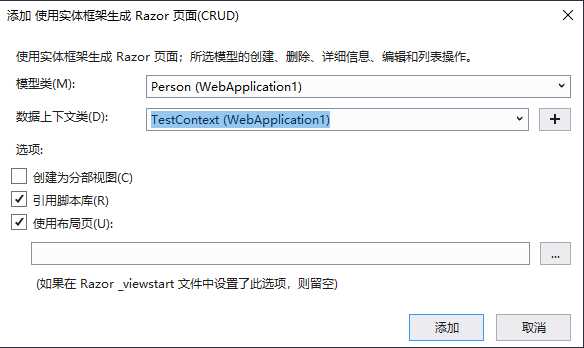
在Books目录右击鼠标,选择添加 新搭建基架的项目
选择使用实体框架生成Razor页面(CRUD)

安装配置 Session
NuGet 添加引用
Microsoft.AspNetCore.Session
Session 是基于 IDistributedCache 构建的,所以必须引用一种 IDistributedCache 的实现,ASP.NET Core 提供了多种 IDistributedCache 的实现 (Redis、SQL Server、In-memory)
修改Startup.cs文件
public void ConfigureServices(IServiceCollection services)

{

……

    services.AddDistributedMemoryCache();

    services.AddSession();

……

}

public void Configure(IApplicationBuilder app, IHostingEnvironment env)

{

……

    app.UseSession();

    ……

}
使用Session
设置Session变量
public async Task OnGetAsync()

{

    Book = await _context.Books

        .Include(b => b.Person).ToListAsync();


    var s = "hello world @ " + DateTime.Now.ToString();

    var b1 = System.Text.Encoding.UTF8.GetBytes(s);

    HttpContext.Session.Set("key1", b1);

}
读取Session变量
public async Task OnGetAsync()

{

    Person = await _context.People.ToListAsync();

    byte[] data;

    var b = HttpContext.Session.TryGetValue("key1", out data);

    var s = System.Text.Encoding.UTF8.GetString(data);

    ViewData["key1"] = s;

}
通过字段属性实现数据校验
字段属性使用范例
[Display(Name ="分组编号")]

public int GroupID { get; set; }

[Display(Name ="分组名称")]

[Required(ErrorMessage = "分组名称不能为空")]

[RegularExpression(@"^[a-zA-Z]+[0-9]*", ErrorMessage = "只能使用英文字母和数字,并且第一个符号必须为英文字母。")]

[StringLength(20,MinimumLength =3,ErrorMessage ="最短长度3,最大长度20")]

public string GroupName { get; set; }

[Display(Name ="学生列表")]
页面直接显示字段属性
列标题
@Html.DisplayNameFor(model => model.Administrator[0].UserName)
数据行
@Html.DisplayFor(modelItem => item.UserName)
使用正则表达式实现复杂校验
[RegularExpression(@"^[a-zA-Z]+[0-9]*", ErrorMessage = "只能使用英文字母和数字,并且第一个符号必须为英文字母。")]
自定义错误提示
ModelState的属性
这是一个类型为ModelStateDictionary的ModelState类型的字典集合。在进行数据验证的时候这个属性是比較实用的。在使用Html.ValidationMessage()的时候,就是从ViewData.ModelState中检測是否有指定的KEY。假设存在。就提示错误信息。
ModelState.AddModelError("LoginError", "登录失败");
页面上增加以下代码:
<span class="text-danger">@Html.ValidationMessage("LoginError")</span>
实现登录功能
添加Razor页面
页面代码如下:
@page

@model CourseAssistant.Pages.Login.IndexModel

@{

    ViewData["Title"] = "登录";

}

<h1>登录</h1>


<hr />

<div class="row">

    <div class="col-md-4">

        <form method="post">

            <div asp-validation-summary="ModelOnly" class="text-danger"></div>

            <div class="form-group">

                <label asp-for="LoginEntry.UserName" class="control-label"></label>

                <input asp-for="LoginEntry.UserName" class="form-control" />

                <span asp-validation-for="LoginEntry.UserName" class="text-danger"></span>

            </div>

            <div class="form-group">

                <label asp-for="LoginEntry.Password" class="control-label"></label>

                <input asp-for="LoginEntry.Password" class="form-control" />

                <span asp-validation-for="LoginEntry.Password" class="text-danger"></span>

            </div>

            <div class="form-group">

                <input type="submit" value="登录" class="btn btn-primary" />

                <span class="text-danger">@Html.ValidationMessage("LoginError")</span>

            </div>

        </form>

    </div>

</div>


@section Scripts {

    @{await Html.RenderPartialAsync("_ValidationScriptsPartial");}

}
更新IndexModel代码
public class IndexModel : PageModel

{

    private readonly CourseAssistant.Models.CourseAssistantContext _context;


    public IndexModel(CourseAssistant.Models.CourseAssistantContext context)

    {

        _context = context;

    }

    [BindProperty]

    public LoginEntry LoginEntry { get; set; }

    public void OnGet() { }

    public async Task<IActionResult> OnPostAsync()

    {

        if (!ModelState.IsValid)

        {

            return Page();

        }

        var admin = await _context.Administrators.FirstOrDefaultAsync(m => m.UserName == LoginEntry.UserName && m.Password == LoginEntry.Password);

        if (admin != null)

        {

            this.SetCurrentUser(new LoginUser() { UserTyep = UserType.Administrator, Administrator = admin, Student = null });

            return RedirectToPage("/Groups/Index");


        }

        else

        {

             ModelState.AddModelError("LoginError", "登录失败");

           return Page();

        }

    }

}


public class LoginEntry

{

    [Display(Name ="账号")]

    [Required(ErrorMessage = "用户名不能为空。")]

    [RegularExpression("^[a-zA-z]+[a-zA-z0-9]*",ErrorMessage ="只能使用英文和数字,并且第一个符号必须是英文")]

    [StringLength(20,MinimumLength =3,ErrorMessage="最大长度20,最小长度3")]

    public string UserName { get; set; }

    [Required(ErrorMessage = "密码不能为空。")]

    [DataType(DataType.Password)]

    [Display(Name = "密码")]

    [StringLength(20, MinimumLength = 3, ErrorMessage = "最大长度20,最小长度3")]

    public string Password { get; set; }

}
实现文件上传功能
添加Razor页面
页面代码如下:
@page

@model CourseAssistant.Pages.FileUploads.IndexModel

@{

    ViewData["Title"] = "文件上传";

}

<h2>文件上传</h2>

<hr />

<div class="row">

    <div class="col-md-4">

        <form method="post" enctype="multipart/form-data">

            <div class="form-group">

                <label asp-for="FileUpload.FileName" class="form-control"></label>

                <input asp-for="FileUpload.FileName" type="text" class="form-control" />

                <span asp-validation-for="FileUpload.FileName" class="text-danger"></span>

            </div>

            <div class="form-group">

                <label asp-for="FileUpload.FileData" class="form-control"></label>

                <input asp-for="FileUpload.FileData" type="file" class="form-control" style="height:auto;" />

                <span asp-validation-for="FileUpload.FileData" class="text-danger"></span>

            </div>

            <input type="submit" value="上传" class="btn btn-primary" />

        </form>

    </div>

</div>
更新IndexModel代码
public class IndexModel : PageModel

{

    public void OnGet()

    {

    }

    [BindProperty]

    public FileUpload FileUpload { get; set; }

    public async Task<IActionResult> OnPost()

    {

        var path = System.IO.Path.Combine(System.AppDomain.CurrentDomain.BaseDirectory, "Uploads");

        if (!System.IO.Directory.Exists(path))

        {

            System.IO.Directory.CreateDirectory(path);

        }

        path = System.IO.Path.Combine(path, $"{DateTime.Now.ToString("yyyyMMddHHmmssfff")}_{FileUpload.FileData.FileName}");

        var fs = System.IO.File.Open(path, System.IO.FileMode.Create, System.IO.FileAccess.Write);

        await FileUpload.FileData.CopyToAsync(fs);

        fs.Close();

        fs.Dispose();

        return Page();

    }

}

public class FileUpload

{

    [Required(ErrorMessage ="文件名不能为空")]

    [Display(Name ="文件名")]

    public string FileName { get; set; }

    [Required(ErrorMessage = "必须选择需要上传的文件")]

    [Display(Name ="选择文件")]

    public IFormFile FileData { get; set; }

}