一、简介
1、由于zabbix是php得,所有lnmp环境这里测试用的上一个实验环境,请查看https://www.cnblogs.com/zhangxingeng/p/10330735.html ;
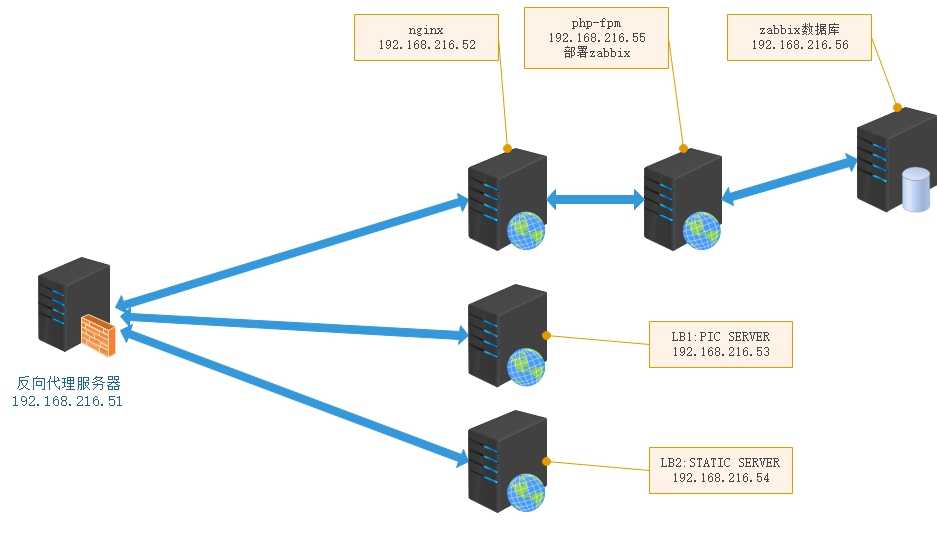
2、就是上一个例子得架构图加上zabbix,架构图如下;

3、系统环境CentOS Linux release 7.6.1810 (Core);
4、zabbix4,就zabbix3来说,安装起来还是很简单得,这次测试zabbix4.0+
5、添加zabbix源;
yum install http://repo.zabbix.com/zabbix/4.0/rhel/7/x86_64/zabbix-release-4.0-1.el7.noarch.rpm
注意:如果不是使用这个源,出现如下这个报错那么请更换正确得源就能解决
1 Error: Package: zabbix-server-mysql-4.0.4-1.el7.x86_64 (zabbix)
2            Requires: libiksemel.so.3()(64bit)
二、开始部署(由于动静分离架构,稍微麻烦些)
1、web5-55-php-fpm 部署zabbix动态内容
安装依赖,zabbix没有单独得包,安装zabbix-server-mysql即可
zabbix-server-mysql #主程序包及数据库文件
zabbix-web-mysql #
zabbix-get #为了便于agent端发起测试采集数据请求用得
iksemel
libiksemel Required for Jabber support.
fping Required for ICMP ping items.
yum install -y zabbix-server-mysql zabbix-web-mysql
yum install zabbix-get
1 Installed:
2   zabbix-server-mysql.x86_64 0:4.0.4-1.el7
3
4 Dependency Installed:
5   OpenIPMI-libs.x86_64 0:2.0.23-2.el7  OpenIPMI-modalias.x86_64 0:2.0.23-2.el7  iksemel.x86_64 0:1.4-2.el7.centos
6
7 Complete!
1 [root@web5 yum.repos.d]# rpm -qa |grep zabbix
2 zabbix-server-mysql-4.0.4-1.el7.x86_64
3 zabbix-get-4.0.4-1.el7.x86_64
4 zabbix-release-4.0-1.el7.noarch
5 zabbix-web-mysql-4.2.0-0.3alpha3.el7.noarch
6 zabbix-web-4.2.0-0.3alpha3.el7.noarch
7 [root@web5 yum.repos.d]#
然后看一下文档
 1 [root@web5 yum.repos.d]# rpm -ql zabbix-server-mysql
 2 /etc/logrotate.d/zabbix-server
 3 /etc/zabbix/zabbix_server.conf
 4 /usr/lib/systemd/system/zabbix-server.service
 5 /usr/lib/tmpfiles.d/zabbix-server.conf
 6 /usr/lib/zabbix/alertscripts
 7 /usr/lib/zabbix/externalscripts
 8 /usr/sbin/zabbix_server_mysql
 9 /usr/share/doc/zabbix-server-mysql-4.0.4
10 /usr/share/doc/zabbix-server-mysql-4.0.4/AUTHORS
11 /usr/share/doc/zabbix-server-mysql-4.0.4/COPYING
12 /usr/share/doc/zabbix-server-mysql-4.0.4/ChangeLog
13 /usr/share/doc/zabbix-server-mysql-4.0.4/NEWS
14 /usr/share/doc/zabbix-server-mysql-4.0.4/README
15 /usr/share/doc/zabbix-server-mysql-4.0.4/create.sql.gz #zabbix数据库sql脚本
16 /usr/share/man/man8/zabbix_server.8.gz
17 /var/log/zabbix
18 /var/run/zabbix
2、初始化数据库
2.1、准备好数据库机器mysql1,ip-56
关闭selinux,firewall,安装数据库
yum install mariadb-embedded mariadb-libs mariadb-bench mariadb mariadb-sever
systemctl start mariadb
systemctl enable mariadb
1 [root@mysql1 /]# netstat -untlp | grep 3306
2 tcp        0      0 0.0.0.0:3306            0.0.0.0:*               LISTEN      37059/mysqld
2.2、创建zabbix数据库及zabbix用户
1 CREATE DATABASE zabbix character set utf8 collate utf8_bin;
2
3 GRANT all privileges ON *.* TO ‘zabbix‘@‘%‘ IDENTIFIED BY ‘admin123‘;
4
5 MariaDB [mysql]> flush privileges;
2.3、修改数据库root密码
 1 [root@mysql1 /]# mysql
 2 Welcome to the MariaDB monitor.  Commands end with ; or \g.
 3 Your MariaDB connection id is 2
 4 Server version: 5.5.60-MariaDB MariaDB Server
 5
 6 Copyright (c) 2000, 2018, Oracle, MariaDB Corporation Ab and others.
 7
 8 Type ‘help;‘ or ‘\h‘ for help. Type ‘\c‘ to clear the current input statement.
 9
10 MariaDB [(none)]> use mysql;
11 Reading table information for completion of table and column names
12 You can turn off this feature to get a quicker startup with -A
13
14 Database changed
15 MariaDB [mysql]> update user set password=password(‘newpassword‘) where user=‘root‘;
16 Query OK, 4 rows affected (0.01 sec)
17 Rows matched: 4  Changed: 4  Warnings: 0
MariaDB [mysql]> flush privileges;
测试web5-55 测试连接数据库
 1 [root@web5 web]# vim index.php
 2
 3 <?php
 4 #echo ("55");
 5 $link=mysql_connect(‘192.168.216.56‘,‘zabbix‘,‘admin123‘);
 6 if($link) echo "<h1>The database connection was successful!</h1>";
 7 else echo "<h1>The database connection was Fail!!</h1>";
 8 mysql_close();
 9 #       phpinfo();
10 ?>

2.4、解压缩zabbix数据库脚本,并发送到数据库服务器
gunzip /usr/share/doc/zabbix-server-mysql-4.0.4/create.sql.gz
cd /usr/share/doc/zabbix-server-mysql-4.0.4/
scp create.sql root@192.168.216.56:/
2.5、导入数据库
mysql -uroot zabbix < /create.sql -p
3、配置nginx
web2-52 -nginx,配置文件
 1 [root@web2 zabbix]# cat /etc/nginx/conf.d/default.conf
 2 upstream php-cluster {
 3         #server 127.0.0.1:9000 max_fails=3 fail_timeout=10s;        #首先注释本地得php-fpm
 4         server 192.168.216.55:9000 max_fails=3 fail_timeout=10s;
 5         }
 6
 7 server {
 8         listen 80;
 9         server_name 192.168.216.52;
10         index index.html index.htm index.phpi;
11         root /usr/share/zabbix;                          #更换web目,zabbix默认目录,测试无所事先用默认得吧

12         location / {
13
14                 root  /usr/share/nginx/html;
15         }
16
17         location ~.*\.php$ {
18
19                 fastcgi_pass    php-cluster;
20                 fastcgi_index   index.php;
21                 fastcgi_param   SCRIPT_FILENAME $document_root$fastcgi_script_name;
22                 include         fastcgi_params;
23         }
24 }
4、配置zabbix
web5-55
4.1、修改zabbix配置
vim /etc/zabbix/zabbix_server.conf
修改下面几项即可
1 ### Option: DBHost
2 DBHost=192.168.216.56
3 ### Option: DBName
4 # DBName=
5 DBName=zabbix
6 # DBUser=
7 DBUser=zabbix
8 ### Option: DBPassword
9 DBPassword=admin123
systemctl start zabbix-server
4.2、解决error问题
测试访问www.web1.com/index.php,报错500,网上查询说display_errors没配置得原因,这里可以设置成on
问题1、网页返回500错误码,修改display_errors
web5-55
vim /etc/php.ini
display_errors = On
systemctl restart php-fpm
1 display_errors
2 错误回显,一般常用语开发模式,但是很多应用在正式环境中也忘记了关闭此选项。错误回显可以暴露出非常多的敏感信息,为攻击者下一步攻击提供便利。推荐关闭此选项。
3 display_errors = On
4 开启状态下,若出现错误,则报错,出现错误提示
5 dispaly_errors = Off
6 关闭状态下,若出现错误,则提示:服务器错误。但是不会出现错误提示
问题2、269的warning,给权限
再次访问www.web1.com/index.php,发现是269得warning,因为是nginx启动得php-fpm我们可以给一下权限
1 Warning: require_once(/etc/zabbix/web/maintenance.inc.php): failed to open stream: Permission denied in /usr/share/zabbix/include/classes/core/ZBase.php on line 269 Fatal error: require_once(): Failed opening required ‘/etc/zabbix/web/maintenance.inc.php‘ (include_path=‘.:‘) in /usr/share/zabbix/include/classes/core/ZBase.php on line 269
chown nginx:nginx -R /etc/zabbix
chown nginx:nginx -R /usr/share/zabbix
chmod 755 -R /etc/zabbix
chmod 755 -R /usr/share/zabbix
问题3、没有图片效果,因为架构是动静分离,所以静态内容需要放到静态服务器上
先访问一下,什么鬼,文字模式,没有图片效果

我们先用访问192.168.216.52/index.php,效果一样,也是文字模式,那我们看一下nginx的error.log
tail -5 /var/log/nginx/error.log
1 2019/02/20 18:37:45 [error] 3595#0: *8 open() "/usr/share/zabbix/styles/blue-theme.css" failed (2: No such file or directory), client: 192.168.216.1, server: 192.168.216.52, request: "GET /styles/blue-theme.css HTTP/1.1", host: "192.168.216.52", referrer: "http://192.168.216.52/setup.php"
2 2019/02/20 18:37:45 [error] 3595#0: *9 open() "/usr/share/zabbix/js/browsers.js" failed (2: No such file or directory), client: 192.168.216.1, server: 192.168.216.52, request: "GET /js/browsers.js HTTP/1.1", host: "192.168.216.52", referrer: "http://192.168.216.52/setup.php"
3 2019/02/20 18:37:47 [error] 3595#0: *9 open() "/usr/share/zabbix/js/browsers.js" failed (2: No such file or directory), client: 192.168.216.1, server: 192.168.216.52, request: "GET /js/browsers.js HTTP/1.1", host: "192.168.216.52", referrer: "http://192.168.216.52/setup.php"
4 2019/02/20 18:37:47 [error] 3594#0: *11 open() "/usr/share/zabbix/styles/blue-theme.css" failed (2: No such file or directory), client: 192.168.216.1, server: 192.168.216.52, request: "GET /styles/blue-theme.css HTTP/1.1", host: "192.168.216.52", referrer: "http://192.168.216.52/setup.php"
提示没有找到/usr/share/zabbix/styles,/usr/share/zabbix/js,提示找不到这两个目录,我们把目录复制过来,看看,为了方便可以先把所有目录一起复制过来
web5
cd /usr/share/
tar -jcvf zabbix.tar.bz2 zabbix
scp zabbix.tar.bz2 root@192.168.216.52:/
web2
cd /
tar -jxvf zabbix.tar.bz2
完成在访问一下,成功

那么放在 httpd服务器的效果那
web5-55
scp zabbix.tar.bz2 root@192.168.216.54:/
web4-54
cd /
tar -jxvf zabbix.tar.bz2
chown -R apache:apache zabbix
vim /etc/httpd/conf/httpd.conf
 1 DocumentRoot "/zabbix"
 2 <Directory "/zabbix">
 3 AllowOverride None
 4 # Allow open access:
 5 Require all granted
 6 </Directory>
 7 <Directory "/zabbix">
 8     #
 9     # Possible values for the Options directive are "None", "All",
10     # or any combination of:
11     #   Indexes Includes FollowSymLinks SymLinksifOwnerMatch ExecCGI MultiViews
12     #
13     # Note that "MultiViews" must be named *explicitly* --- "Options All"
14     # doesn‘t give it to you.
15     #
16     # The Options directive is both complicated and important.  Please see
17     # http://httpd.apache.org/docs/2.4/mod/core.html#options
18     # for more information.
19     #
20     Options Indexes FollowSymLinks
21
22     #
23     # AllowOverride controls what directives may be placed in .htaccess files.
24     # It can be "All", "None", or any combination of the keywords:
25     #   Options FileInfo AuthConfig Limit
26     #
27     AllowOverride None
28
29     #
30     # Controls who can get stuff from this server.
31     #
32     Require all granted
33 </Directory>
systemctl restart httpd
访问一下www.web1.com/index.php

三、开始配置zabbix
1、welcome,进入zabbix界面我们开始部署,点next
2、check of pre-requisites

编辑解决这三个问题
web5
vim /etc/php.ini
post_max_size = 16M # PHP将接受的POST数据的最大大小
max_execution_time = 300 #每个脚本最大执行时间
max_input_time = 300 #每个脚本可能花费在解析请求数据上的最大时间
systemctl restart php-fpm
刷新网页

3、configure DB connect
4、zabbix server details
5、pre-installation summary
6、insatll
总结,这个例子主要是试试看的心态,并没有向下做下去,因为还有很多问题,需要很多精力,下一篇只对zabbix—》mysql做分离实验。并介绍一些用法。谢谢
转载请注明出处:https://www.cnblogs.com/zhangxingeng/p/10402917.html