Autofac#
Autofac(https://autofac.org/)是一款.NET的IOC组件,它可以和Owin, Web Api, ASP.NET MVC, .NET Core完美结合,帮助开发人员轻松解决程序中的依赖注入问题。
动态注入启动Web Api#
所谓的动态注入启动Web Api需求, 就是在Web服务器启动时, 可以动态选择启动的Web Api 服务。
以前使用IIS + Web Api的时候,我们需要手动在IIS中部署所有的Web Api服务,并手动启动需要使用Web Api服务。
在微软推出Owin之后,Owin Self Host + Web Api使开发人员可以脱离IIS服务器,使用命令行的方式启动并寄宿一个Web服务。Web服务启动时,我们可以使用一些IOC容器,对Web Api进行动态注入启动。
具体案例#
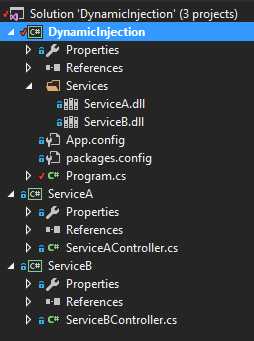
当前有一个项目(源码:https://github.com/lamondlu/DynamicInjection)中有2个Web Api服务ServiceA, ServiceB, 项目结构如下

- Service A和Service B的controller存放在不同的项目中。
- DynamicInjection是一个控制台项目,负责启动Web服务。
- 当Build Service A和Service B项目时,会自动将生成的dll复制到DynamicInjection项目中的Services目录中。
- 现在需要在DynamicInjection项目启动时,动态注入启动Services目录下的所有Web Api服务。
Service A
| 1 2 3 4 5 6 7 8 9 10 11 12 13 14 15 16 17 18 19 20 21 22 23 24 25 26 27 28 29 30 31 32 33 | [RoutePrefix( "api/ServiceA" )] public class ServiceAController : ApiController { [Route( "Values" )] [HttpGet] public List< string > Values() { return new List< string > { "value1" , "value2" }; } [Route( "Version" )] [HttpGet] public string Version() { return "Service A, version 1.0.0" ; } } |
Service B
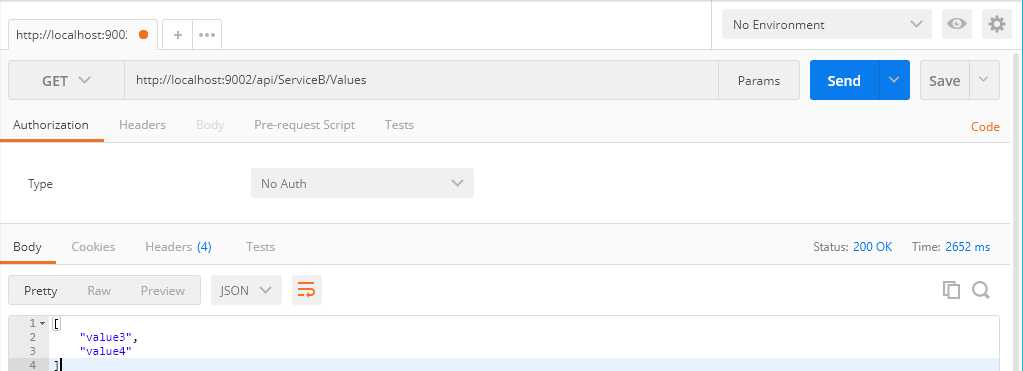
| 1 2 3 4 5 6 7 8 9 10 11 12 13 14 15 16 17 18 19 20 21 22 23 24 25 26 27 28 29 30 31 32 33 | [RoutePrefix( "api/ServiceB" )] public class ServiceBController : ApiController { [Route( "Values" )] [HttpGet] public List< string > Values() { return new List< string > { "value3" , "value4" }; } [Route( "Version" )] [HttpGet] public string Version() { return "Service B, version 1.0.0" ; } } |
功能实现#
添加Owin Self Host#
首先我们要在DynamicInjection项目添加Owin Self Host库。
在Package Manage Console中输入以下命令
Install-Package Microsoft.AspNet.WebApi.OwinSelfHost
然后修改Program.cs代码,创建一个Startup类,使用Owin Self Host启动一个Web服务
| 1 2 3 4 5 6 7 8 9 10 11 12 13 14 15 16 17 18 19 20 21 22 23 24 25 26 27 28 29 30 31 32 33 34 35 36 37 38 39 40 41 42 43 | class Program { static void Main( string [] args) { string baseAddress = "http://localhost:9002/" ; using (WebApp.Start<Startup>(url: baseAddress)) { Console.WriteLine( "App Server started." ); Console.ReadLine(); } } public class Startup { public void Configuration(IAppBuilder appBuilder) { } } } |
启动项目,如果出现以下界面,就表明Web服务启动成功了

添加Autofac#
程序启动成功之后,我们需要继续修改Program.cs。
首先,我们需要引入Autofac库
在Package Manage Console中输入以下命令
Install-Package Autofac.WebApi2.Owin
引入完成之后,我们需要在Programs.cs中添加代码,在启动服务之前,我们需要从Services目录中读取所有的dll, 使用反射将其加载在内存中,如果发现dll存在继承自ApiController类的子类时,就将其注册到当前Web服务中。
| 1 2 3 4 5 6 7 8 9 10 11 12 13 14 15 16 17 18 19 20 21 22 23 24 25 26 27 28 29 30 31 32 33 34 35 36 37 38 39 40 41 42 43 44 45 46 47 48 49 50 51 52 53 54 55 56 57 58 59 60 61 62 63 64 65 66 67 68 69 70 71 72 73 74 75 76 77 78 79 80 81 82 83 84 85 86 87 88 89 90 91 92 93 94 95 96 97 98 99 100 101 102 103 | public class Startup { public void Configuration(IAppBuilder appBuilder) { //定义Autofac容器创建器 var builder = new ContainerBuilder(); //注入Api服务 BuildControllers(builder); //生成Autofac容器 var container = builder.Build(); //在Owin管道中加入Autofac中间件 appBuilder.UseAutofacMiddleware(container); HttpConfiguration config = new HttpConfiguration(); config.DependencyResolver = new AutofacWebApiDependencyResolver(container); config.MapHttpAttributeRoutes(); config.Routes.MapHttpRoute( name: "DefaultApi" , routeTemplate: "api/{controller}/{id}" , defaults: new { id = RouteParameter.Optional } ); appBuilder.UseAutofacWebApi(config); appBuilder.UseWebApi(config); } private void BuildControllers(ContainerBuilder builder) { var searchFolder = Path.Combine(Path.GetDirectoryName(Assembly.GetEntryAssembly().Location), SearchPath); foreach ( var file in Directory.EnumerateFiles(searchFolder, "*.dll" , SearchOption.AllDirectories)) { try { var assembly = Assembly.LoadFrom(file); var exportedTypes = assembly.GetExportedTypes(); if (exportedTypes.Any(t => t.IsSubclassOf( typeof (ApiController)))) { Console.WriteLine( "Started service " + assembly.FullName); builder.RegisterApiControllers(assembly).InstancePerRequest(); } } catch { } } } } |
最终效果#
启动项目之后,控制台结果如下,2个Web Api服务被启动

然后我们在Postman中测试一下, Web Api是否能被正确调用